
 +1-877-790-2297
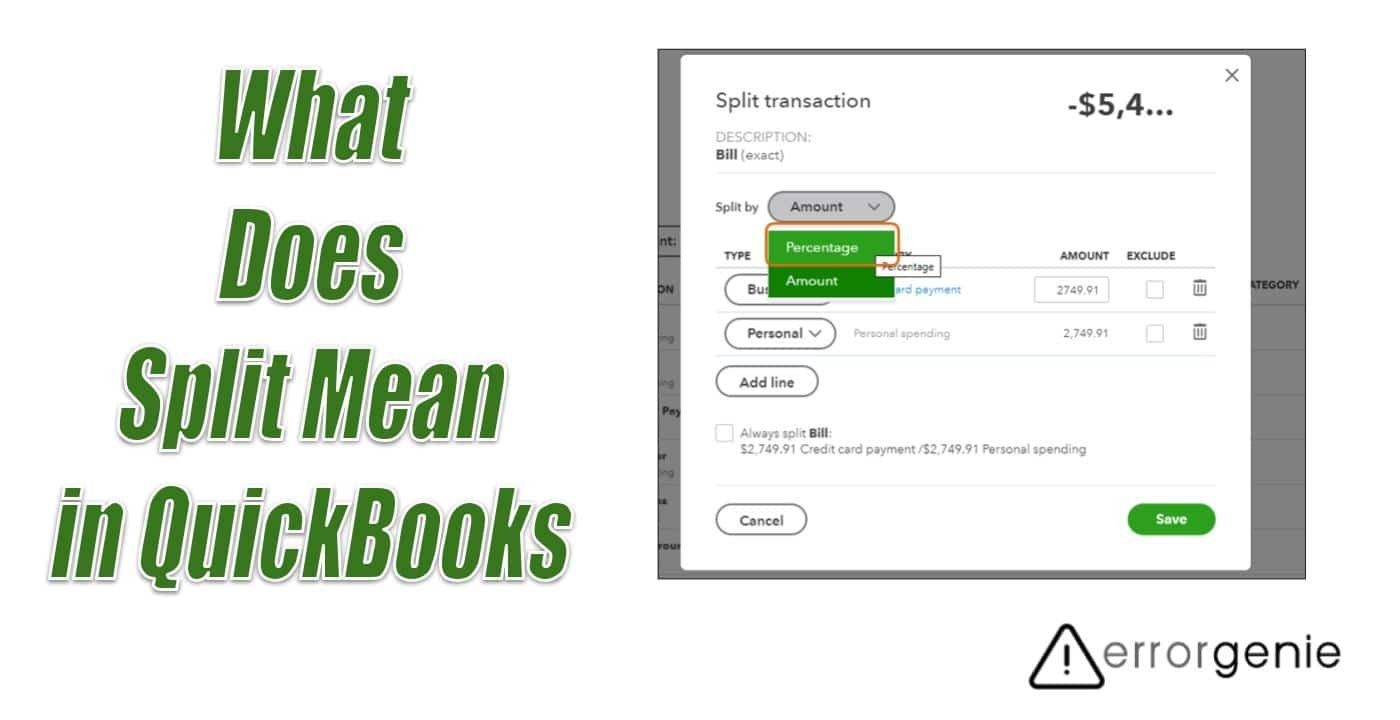
When there are multiple GL accounts connected to the transaction, we call it Split. QuickBooks allows you to enter, edit, and delete the split transactions as well. If you are wondering what does split mean in QuickBooks and how to split expenses in QuickBooks Online and Desktop, we will answer you. Besides that, we will guide how you can split lines to the accounts receivable and view the split details in QuickBooks.
What Does Split Mean in QuickBooks?
In QuickBooks, Split refers to several General Ledger accounts related to transactions. On the other hand, Split Transaction is the type of transaction that includes your single and current remote account. For instance, you use the Rent Expense account for the cheque transaction and if it is connected with the taxes then you will see it as Split in your bank account. Users can have split payments and split deposits as well. In addition, you can enter, edit, and delete the split transactions in QuickBooks.
How to Enter Split Transactions in QuickBooks Online?
As stated earlier, QuickBooks lets you enter the split transactions. Although the split is only for the customers, you can still split the payment to the contractor into different projects on which they are working. Here we will show you how to split expenses in QuickBooks Online into multiple projects and account for history.
Split Transaction in QuickBooks (To Multiple Projects)
With a dedicated option, you can split the payment or expense between multiple projects. Let us show you the procedure of entering QuickBooks Online split expense to multiple projects:
- Click on the “Banking” tab.
- Then, select the relevant bank account from here.
- Now, switch to the “For Review” menu.
- Here, you can find the transaction and click on it to expand its view.
- After this, hit the “Split” button located beside the “Add” option.
- Click on the “Payee” drop-down option to choose the relevant vendor.
- Add the required details.
- Then, choose the “Customer” drop-down to pick the projects into which you prefer to split your transactions.
- Now, select the “Billable” checkbox if applicable.
- Hit the “Save and Add” button.
By performing these steps, you can split the payment or expense into multiple projects in QuickBooks Online.
Split Transaction in QuickBooks (To the Account History)
You can only associate one account with the account history when entering the transaction into account history. However, if you want to list multiple accounts then you can do that. Here are the steps for recording the multiple accounts in one single transaction:
- Select the “Accounting” menu.
- Then, press the “Chart of Accounts” option.
- Here, you can locate the account for your transaction.
- Choose the “Account history” from the “Action” section.
- Now, you can choose the transaction and hit the “Edit” button. This will open the entry screen for a particular transaction.
- At this point, you can add other accounts with the amount. Make sure that the amounts for every account should add the total amount of your transactions.
- Once done, click the “Save” button.
As you follow these steps, your transaction will show as Split in the Account column. In case you did not add the transaction yet, it is better to open your Bill, Invoice, etc., in order to connect multiple accounts in QuickBooks.
How to Show Split Detail in QuickBooks Online?
To view the split detail in your QuickBooks account, you will have to run the report. Transaction List with Splits report will help you to display split transactions. Here, we will show how to run this report in QuickBooks Online:
- Select the “Reports” menu.
- Then, search the “Transaction List with Splits report” through the search bar.
- After this, you can modify the “Report Period”.
- Now, hit the “Run report” option.
With these steps, you can run the Transaction List with Splits report to view the split transactions in QuickBooks Online. Besides that, you can add the splits in the report named Transaction Detail by Account.
How to Split Transaction in QuickBooks Desktop?
When categorizing the transactions, you can split them beforehand in QuickBooks. If you are using QuickBooks Self-Employed, you can split the transaction as a percentage or amount between personal and business. In addition, you can split the business transactions between expense and Schedule C categories.
If you want to split the transaction by the percentage then you can do it by logging into your QuickBooks account through the internet browser. On the other hand, if you want to split the transactions by the amount then you can do it only through the QuickBooks phone app.
Split the Transactions via Internet Browser
- Click on the “Transactions” tab.
- Here, you can search for the transaction that you wish to split.
- Now, press the “Split” option using the “Type” column. This will open a “Split Transaction” screen.
- At this point, you can select the “Amount” or “Percentage” option using the “Split” drop-down.
- After that, click on the “Type” drop-down arrow to select the “Personal” or “Business” option for every split.
- In case you choose “Business” as your split type then click the link available in the “Category” section. After this, choose the category into which your split should go.
- Now, add the percentage or amount for every split.
- Once done, you can click on the “Add line” to enter the additional splits.
- In case you want to exclude any split, mark the “Exclude” checkbox.
- Then, click the “Save” button.
Tip: In case you wish to make a rule so you can split a particular type of transaction, in the same way, every time then don’t forget to place a checkmark for Always Split.
Split the Transactions via Android or iOS Device
- Select the “Transactions” tab. On Android, click on the “Menu” icon and then select the “Transactions” option.
- Then, search for the transaction you wish to split.
- Hit the “Edit” menu.
- Click on the “Split” button.
- From the “Category” section, choose the “Business” or “Personal” category for every split.
- Switch to the “Amount” section, type the amount for every split.
- Click on the “Add line” to enter the additional splits.
- Press the “Save” button.
This is how you can split the transaction as a percentage or amount between personal and business. Remember that you can split the transaction by the percentage through the internet browser and to split the transactions by the amount, you have to use the mobile app.
How to Show Split Detail in QuickBooks Desktop?
The Transaction List with Splits report can only be used in QuickBooks Online to see the split details. If you want to view the split detail in QuickBooks Desktop, the Transaction List by Customer report would help you. All you have to do is to personalize the report and then add the Split column. Let us show you how to pull up the split transactions in QuickBooks Desktop:
- Select the “Reports” menu.
- Then, select the “Customers & Receivables” drop-down option.
- Choose the “Transaction List by Customer” option.
- Here, you can hit the “Customize Report” option on the top left.
- Switch to the “Display” tab.
- Add “Split” in the “Columns” and place the checkmark next to the result.
- Click the “OK” button.
With these instructions, you can easily run the Transaction List by Customer report to view the split details in QuickBooks Desktop.
How to Split Lines to Accounts Receivable in QuickBooks?
When you enter the transactions into a QuickBooks account, you can split your expenses among several accounts. This helps in maintaining the organization in the accounting records. If you have to pass the vendor expense to the customer then you can split your expenses to the customer by using the Accounts Receivable account.
Split transactions are usually created in the register of your expense account. Here are the steps on how to split lines to accounts receivable in QuickBooks:
- Go to the “Lists” menu.
- Then, select the “Chart of Accounts” option.
- Click twice on the account register name that you wish to view.
- Switch to the “Date” column. It should be available at the end of your register. Here, you can add the transaction date. In case the transaction already took place on a current date then you don’t need to add a new date.
- Moving on to the “Number” section. Here, you can check the number.
- Add the vendor or payee name in the “Payee” section.
- Once done, go to the “Payment” section and add the total amount of your transaction.
- Hit the “Splits” option. The screen will now change to the additional columns. You can use them to add the account details.
- Press the “Accounts” section drop-down arrow in the 1st blank line.
- Click the “Accounts Receivable” option.
- In the “Amount” section, you can add the transaction amount that comes from your “accounts Receivable” account. Make sure you add the only number which is lesser than the total transaction amount.
- Press the “Customer: Job” drop-down option.
- Choose the customer name to which you are applying the split. Also, you have to add the customer when you use “Accounts Receivable” as a split.
- Now, click on the “Billable” section. This will help you to pass on the expense to your selected customer.
- Here, you can add the account details for your remaining account that split this expense.
- Once done, hit the “Record” button.
By performing these steps, you can easily split lines to the account receivable in QuickBooks. If required, you can spread your expenses between multiple QuickBooks accounts.
To Sum Up!
Split transactions are quite complex as it is not easy to edit or delete them. To make certain changes in split transactions, one has to run the transaction report. Through this guide, we have shown you the procedure of QuickBooks split transaction to multiple projects and account history in QuickBooks Online, QuickBooks Desktop, and mobile apps (iPhone, iPad, and Android). If you want to view the split detail and split lines to accounts receivable, you can do that too.
To know about restricted funds and the 1099 form filling procedure, you can jump to the following guides:
- QuickBooks Restricted Funds
- QuickBooks Online 1099 Wizard