
 +1-877-790-2297
QuickBooks Desktop is prone to technical glitches. QuickBooks error code 193 is one of the most common errors that crops up while using QuickBooks software in multi-user mode. As a result, users fail to access the QuickBooksDBXX service automatically or manually. Moreover, you can confront QuickBooks error 193 while using QuickBooks Database Server Manager.
Some users who are not tech-savvy can find it difficult to resolve the error. Thus, we bring you this guide where we will be explaining the best and easy ways to fix QuickBooks error code 193 when Windows could not start the QuickBooksDBXX service.
- What Causes QuickBooks Error 193?
- Best Way to Fix QuickBooks Error Code 193
- Fix 1: Use QuickBooks Clean Install Tool
- Create a Backup of Your Company Files to Avoid Losing Data
- Gather License Number and Product Details
- 1: Uninstall QuickBooks Software Using Control Panel
- 2: Perform QuickBooks Clean Install Tool from QuickBooks Tool Hub
- 3: Reinstall QuickBooks Desktop
- Fix 2: Remove QBT Files from Remote Store and Headquarters
- Fix 3: Update Windows Operating System
- Fix 4: Restart Database Server Manager Service
- Fix 5: Scan Windows Computer
What Causes QuickBooks Error 193?
While seeing QuickBooks error 193:0xcl on your screen, you must be wondering what caused this error. There can be numerous reasons behind the QuickBooks error 193 listed below:
- Your QuickBooks software may have the same names or department codes.
- QBT files in the database must be damaged or corrupted.
- You are probably trying to access the removed or merged names of customers.
- QuickBooks has a corrupt list of customers at the remote store.
- Outdated version of Windows operating system.
- QuickBooks company files have been damaged.
Other factors such as outdated QuickBooks version, antivirus software programs, or an old version of the Windows operating system can also lead to QuickBooks error code 193.
Best Way to Fix QuickBooks Error Code 193
QuickBooks Desktop or QB Point of Sale can be a victim of error code 193. To fix this error, you can perform a clean install of QuickBooks Desktop, delete the QBT files remote store and headquarters, upgrade the Windows system, scan your PC, or restart the QuickBooks Database Manager Service.
To get the detailed procedure, you can go through the following methods:
Fix 1: Use QuickBooks Clean Install Tool
QuickBooks Clean Install Tool helps you to reinstall the QuickBooks Desktop. By doing so, you can repair the error restricting your software to work properly.
Before proceeding further, it is important to back up your company files and keep the essential details such as product and license number.
If you have no earthly clue how to create a backup of QuickBooks company data and find the product information, we will help you with the details.
Create a Backup of Your Company Files to Avoid Losing Data
- Insert the “Flash Drive” on your computer.
- Open “QuickBooks Desktop”.
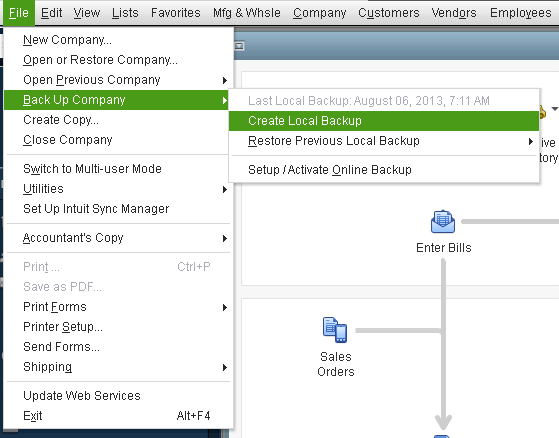
- Click on the “File” menu located on the top left.
- Select the “Back Up Company” option.
- Now, choose the “Create Local Backup” option.
Note: You can also select between Online Backup or Local Backup depending on your choice. However, it is safe to keep files on your Flash Drive. Also, it is quick to move the company back to the place.
- Click the “Next” button.
- Follow the prompts given on your screen to complete the backup process.
Gather License Number and Product Details
- Press the “F2” key or “Ctrl + 1” together.
- This will show you the “Product Information”. From here, you can note down the “License number” and “Product number” of your QuickBooks Software.
Once you are done creating a backup and noting down the product details, you can continue following the process of QuickBooks clean installation.
The entire process requires you to perform 3 simple steps; uninstall, perform QB Clean Install Tool, and reinstall the QuickBooks Desktop on your Windows computer.
1: Uninstall QuickBooks Software Using Control Panel
- Use the “Windows” + “R” keys together. This will open the “Run” dialog box.
- Type in “Control Panel”.
- Click the “Ok” button or press the “Enter” key.
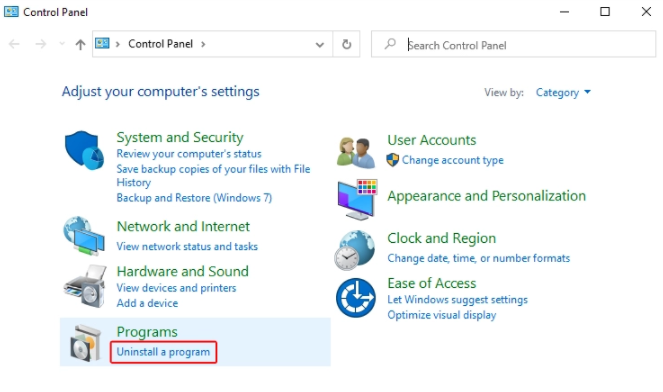
- Now, go to the “Programs and Features” section.
- After this, click on the “Uninstall a Program” option.
- From the installed programs list, select your “QuickBooks Desktop”.
- Click on the “Uninstall” button.
- To complete the uninstallation process, follow the instructions shown on your screen.
2: Perform QuickBooks Clean Install Tool from QuickBooks Tool Hub
- Visit the “Intuit” website and download the “QuickBooks Tool Hub” on your Windows computer.
- Once the download file is saved on the “Downloads” folder, double click on the file to proceed with the installation.
- Click on the “I Accept” button to finish the installation process.
- From your “Desktop” screen, open the “QuickBooks Tools Hub” program.
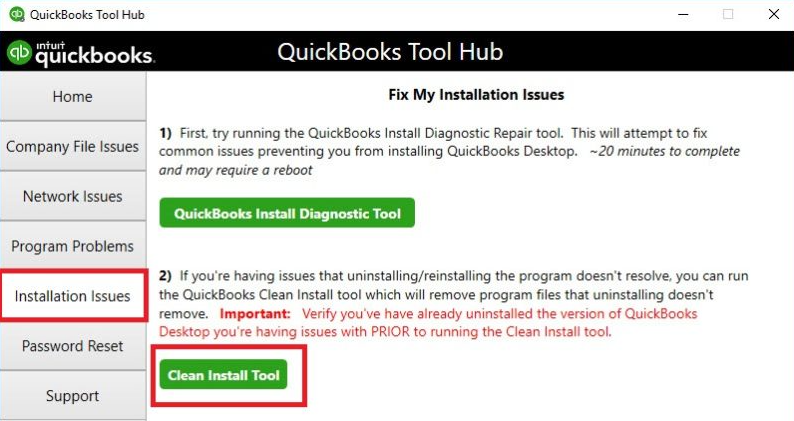
- Navigate to the “Installation Issues” tab located on the left menu.
- Press the “Clean Install Tool” button.
- Make sure you select the correct version of your QuickBooks program.
- Select the “Continue” button.
- Here, press the “Please Install Your Copy of QuickBooks to the Default Location” option.
- Select the “OK” button.
If you fail to access QuickBooks Desktop while renaming the folder then you should end processes in Windows Task Manager.
- Open “Windows Task Bar”.
- Go to the “Task Manager”.
- Click on the “Processes” tab.
- Select the “Image Name” column.
- Now, choose “QBDBMgern.exe, exe, QBCFmonitorservice.exe, qbw32.exe files.
- Then, click on the “END” button.
- Select the “Yes” button if it shows any pop-up.
3: Reinstall QuickBooks Desktop
- Insert a QuickBooks Desktop CD on your computer.
- Follow the instructions shown on the screen.
- When the software is installed, it will ask you for the “Product Number” and “License Number”. You can enter the details correctly that you saved earlier.
- After following the on-screen instructions, click the “Next” button.
- Choose the “Installation Type” and hit the “Next” option.
- Press the “Install” option.
When done following these steps, you can launch QuickBooks Desktop to access your company files. This way you can get rid of QuickBooks error code 193 on a Windows computer.
Fix 2: Remove QBT Files from Remote Store and Headquarters
Due to damaged QBT files, you may confront unexpected errors in QuickBooks. By removing QBT files from both remote stores and headquarters, you can reduce the risk of errors.
All you are required to do is delete the QBT files at the headquarters then remove them from the remote store. Thereafter, you can create the new remote file.
1: Delete QBT Files at Headquarters
- Reach the following path on your Windows computer:
- OS: C:\Program Data\ Intuit\QuickBooks Point of sale x.x/STex
- Here, mark all the folders.
- In case you locate any other “.qbt” files, delete them too.
2: Delete QBT Files at Remote Store
- In your Windows search bar, type “.QBT”.
- When you find the “.QBT” file in the result, delete that.
- Then, go to the “Recycle Bin” folder and remove the deleted file from that too.
3: Create a New Remote File
- Choose the “Files” along with your “Company Operations”.
- Select the “Create New Company” option.
- Now, type the name of your company.
- Choose the “Remote Store”.
- Enter the “Store Number”.
- Thereafter, users have to resend the mailbag from “Remote Store” and “Headquarters”.
This is how you can delete QBT files from both remote stores and headquarters. As you follow these steps, the error will be resolved by then.
Fix 3: Update Windows Operating System
Running a Windows computer in an old version may not support all the programs to work efficiently. Moreover, it may welcome unwanted errors in your system or cause issues with QuickBooks Desktop.
If you are viewing the QuickBooks error 193 on your Windows then you are required to check for the new updates for Windows PC and install them if available.
To upgrade the Windows system to the latest build (based on different versions), pursue the following steps:
Update Windows 10
- Use the “Windows” key on your keyboard.
- Search for the Windows “Settings” directly from the Windows search bar.
- Then, select the “Settings” option once you see it in the result.
- The “Update and Security” option has to be selected.
- Now, click on the “Windows Update” button.
- Select the “Check for Updates” option.
- Choose the “Restart Now” option.
- When your Windows computer restarts, it starts with the update installation.
Update Windows 8
- Move your mouse cursor right on Windows 8 desktop screen.
- Navigate to the “Change PC settings” button.
- Go to the “Update and Recovery” option.
- Click on the “Windows Update” option.
- Here, “Check Now” has to be chosen.
- Hit the “View Details” option if you find any Windows updates.
- Press the “Install” button.
- Add your system administrator password if prompted.
- When the procedure of Windows update is finished, restart your device.
Update Windows 7
- Click on the Windows “Start” button.
- From the list of apps, choose the “Control Panel.
- Now, switch to the “System and Security”.
- Press the “Windows Update” option.
- Select the “Check for Updates” button.
- Press the “Update Now” option when you see any updates.
Depending on your Windows version, you can upgrade your operating system to the latest build. This way you can keep your system in an updated state. Also, it helps you to avoid errors such as QuickBooks error 193.
Fix 4: Restart Database Server Manager Service
QuickBooks Database Server Manager may also bring QuickBooks error code 193 on your computer. If you restart Database Server Manager Service, you can reduce the risk of error.
To do so, you can open the Run dialog box and search for the service to restart it. You can follow the steps for the same:
- Use the “Windows” + “R” keys together. This will open the “Run” dialog box.
- Type in “services.msc”.
- Click the “Ok” button or press the “Enter” key.
- Scroll down and find the “QuickBooksDBXX” from the list.
- Once found, click right on it and choose the “Restart” button
Note: These services may display as QuickBooksDB27, QuickBooksDB26, or QuickBooksDB28. Here, 27 stands for QuickBooks version 2017, 26 stands for QuickBooks version 2016, or 28 stands for QuickBooks version 2018.
As you restart the QuickBooksDBXX service, you will not find any errors. To verify this, you can open your QuickBooks Desktop and access the company files.
Fix 5: Scan Windows Computer
Malicious activities can create conflicts while using QuickBooks Desktop. If you think your system is infected with the virus then you should add QuickBooks to the Windows Firewall or run an antivirus program on your computer.
All you are required to download and install is the trusted antivirus program. Thereafter, you can run it to perform. Such tools will scan your computer system and detect errors to resolve them automatically. After scanning the system, make sure you restart your Windows computer.
Final Note
QuickBooks error 193 can occur due to several reasons. By implementing the right step, you can fix the error in no time. Here, in this guide, you have got a number of repairing methods along with the leading causes of the error code 193. Hope you find this guide helpful.
To recover QuickBooks error 6189 and 816, read this guide to find the best and effective troubleshooting methods.