
 +1-877-790-2297
QuickBooks accounting software lets you store all the business information in one place. Important reports and documents are also stored in QuickBooks. If required, you can print any document or transaction in QuickBooks. For that, you need to add a printer and other devices. All you are required to do is install a new printer and integrate it with your operating system and QuickBooks program. Once you connect the printer, you can easily get prints of your reports and documents. If you have no idea how to add printer to QuickBooks Desktop, we are here to enlighten you.
In this simple guide, we will teach you how to add a printer in QuickBooks Desktop in an easy way. You will also learn to set up the default printer in QuickBooks to avoid errors.
How Do I Add a Printer to QuickBooks Desktop?
To add a new printer to QuickBooks Desktop, first of all, you will have to connect the printer with your computer. Make sure you connect both of them using a USB wire in the port. Thereafter, you can go through the Windows Start menu, go to the Devices and Printer, and click on the “Add a New Printer. Here, you can add a local printer while selecting the existing port. Once done, you can install the necessary drivers for printing on Windows. After that, you can try printing the reports and documents through the printer.
For a step-by-step guide, you can carry out the following steps to know how to add a printer to QuickBooks Desktop.
Install the Print Drivers
- Click on the Windows “Start” menu.
- Search for “Devices and Printer”.
- Once the window opens, click on the “Add a New Printer”.
- Now, you can select the “Add a Local Printer” option from the list.
- After that, select the “Use an Existing Port” button.
- Press the “Next” button.
- Once you see the “Driver” window, you will have to choose the options linked with the model of your printer.
- Then, choose the “Next” button. This will start downloading and installing the drivers that are required for QuickBooks so that it can function properly.
Start the Printer
- Now, you can set the accounting software with your new printer. To do so, you need to launch the QuickBooks software and open the report that you want to print.
- Once done, click on the “File” menu.
- Select the “Print” option.
- Now, select the “Printer” option using the drop-down menu.
- Here, you need to choose the name of the printer that you want to use for printing the report of documents.
- In the end, hit the “Print” button.
As you pursue these steps, your printer will give you the expected result. If required, you can take prints of important transactions as well. We hope you have understood how to add printer to QuickBooks Desktop.
How to Set Up a Default Printer in QuickBooks?
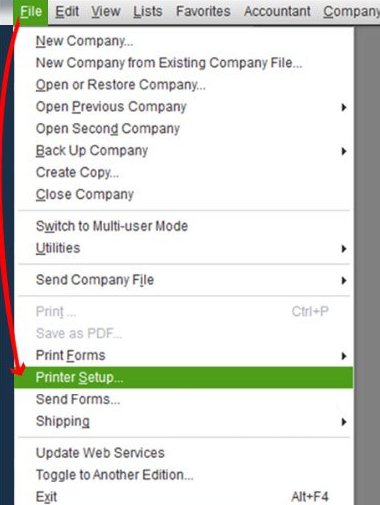
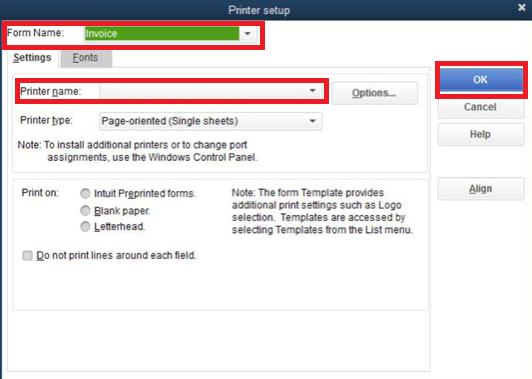
In some instances, the QuickBooks printer setup window does not open. This happens when the QBprint.qbp file is damaged. If that is the case, you need to set up the printer as the default in QuickBooks. To do so, you should go through the File menu and select the Printer Setup. Here, you can select the Form Name, pick the transaction, select the Printer Name, and choose your printer.
- In QuickBooks Desktop, click on the “File” menu.
- Then, select the “Printer Setup”.
- Now, you can click the transaction by using the “Form Name” drop-down menu.
- Select the printer by clicking on the “Printer Name” drop-down menu.
- Press the “OK” button.
Once you set the printer as the default in QuickBooks, you can resolve a number of errors related to printing. If you are finding difficulty opening the QuickBooks Desktop printer setup window then you can do the following:
- Open the “Control Panel” on a Windows computer.
- Go to the “Printer and Faxes”.
- Then, select the dialog window and click right on the working printer.
- After that, click on the “Set as Default Printer” option.
Now, you can close the Printer and Faxes window and launch QuickBooks Desktop. After that, open your Printer Setup screen to verify changes.
To Sum Up
Adding or setting up the printer in QuickBooks Desktop is not difficult at all. All you have to do is install the print drivers and set up the printer using the USB wire. If you are facing any kind of issue related to the printer then you can add the printer as the default in QuickBooks Desktop. In this guide, we have shown you how to add printer to QuickBooks Desktop.
If you want to know how to migrate QuickBooks to a new server, we have prepared this detailed guide.