
 +1-877-790-2297
If you are planning to replace the existing server then you may require to move your QuickBooks data. Generally, users migrate QuickBooks to new server when they want to access the QuickBooks company files and accounting data from a different server. However, to perform this procedure, you will have to install QuickBooks on another server and then enable the multi-user network so that other members of your team can access the necessary company files in QuickBooks. To learn how to migrate QuickBooks to a new server, read this guide carefully.
In our guide, we will enlighten you with the different ways of moving QuickBooks and its data to another server safely.
- What is a Server Computer and Why Do You Need to Move QuickBooks to a New Server?
- How to Migrate QuickBooks to a New Server Computer?
- Step 1: Take a Backup of QuickBooks Company Files
- Step 2: Install QuickBooks on a New Server Computer
- Step 3: Set Up the Folder Permission
- Step 4: Install QuickBooks Database Server Manager
- Step 5: Set Up the Admin Rights
- Step 6: Scan the Folders using QuickBooks Database Server Manager
- Step 7: Enable the Host Multi-User Access
What is a Server Computer and Why Do You Need to Move QuickBooks to a New Server?
A computer system that hosts all your QuickBooks company files is called a Server Computer. Other computers that are connected with the server computer are known as Workstations.
In some instances, you replace the old server (Server Computer) with a new one. Due to this, you are required to migrate QuickBooks to new server so that all your company data can be accessed on the new server. Those who have no clue how to migrate QuickBooks to a new server can go through our following guide.
How to Migrate QuickBooks to a New Server Computer?
Moving the QuickBooks data to another server requires you to perform a number of ways. First of all, you will have to create a backup of your company files. Once the backup is taken, you can download the QuickBooks software on a new server computer and set the folder permission. Thereafter, it is required to install the QuickBooks Data Server Manager. On the new server computer, you will have to set up the admin rights as well. Once done, scan the folder containing QuickBooks files and then you can enable multi-user access.
To know the entire procedure of migrating the QuickBooks data to another server, you can continue following the steps:
Step 1: Take a Backup of QuickBooks Company Files
While taking a backup, you need to make sure that the backup files are stored on the local drive of your computer. It should not be on the network.
- Now, put the “Flash Drive” on your PC.
- Launch “QuickBooks Desktop”.
- Go to the “File” menu available on the top left.
- Click on the “Back Up Company” option.
- Now, select the “Create Local Backup” option.
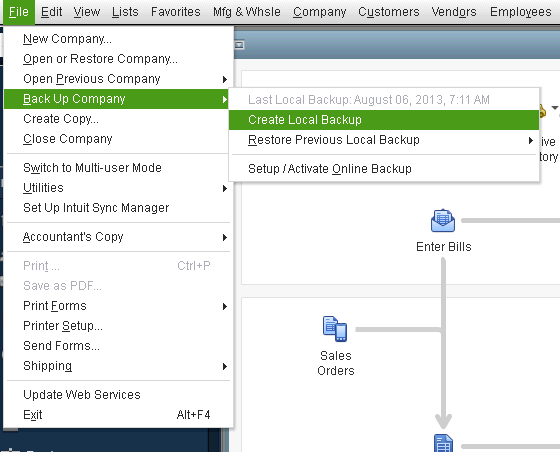
- Press the “Next” button.
- Follow the on-screen prompts to complete the backup process.
Step 2: Install QuickBooks on a New Server Computer
Once done with the backup, you can install the accounting software program on the new server computer.
- If you want to access the complete version of QuickBooks software on the new server computer then choose the “custom and network install” and select the “I’ll be using QuickBooks Desktop on this computer”.
- But, if you only want to use the server computer for hosting the files then click on the “I will NOT be using QuickBooks Desktop on this computer” option.
- Thereafter, you can complete the QuickBooks installation on the new server.
Step 3: Set Up the Folder Permission
It is important to make sure you grant permission to the folders. By doing so, you can access the company files on the new server computer once you migrate QuickBooks Desktop.
- Click on the “Start” button on Windows PC.
- Open the “File Explorer”.
- Now, click right on the folder containing your company files.
- After that, click on the “Properties” option.
- When you switch to the “Security” tab, click on the “Advanced” option.
- Here, choose the “QBDataServiceUserXX” folder.
- Then, go to the “Edit” button.
- Here, you need to check the preference is set to “Allowed”. If it is not then click the “Full Control” option and set it to “Allow”.
- Press the “Apply” and “OK” buttons.
Step 4: Install QuickBooks Database Server Manager
You need to install the QuickBooks Database Server Manager on the server computer that will host the company files. Before doing so, make sure that all the programs including QuickBooks are closed on the server computer.
- Now, locate the downloaded “Setup_QuickBooks.exe” file you downloaded.
- Install this file and follow the instructions given on your screen.
- If QuickBooks prompts you to select the install type then choose the “Custom or Network Options”.
- Press the “Next” button. Make sure you don’t choose “Express”.
- Now, you can select the best option for the network setup.
- Then, press the “Next” button.
- Both the options will install the “QuickBooks Database Server Manager”. If QuickBooks software is installed on the server computer, it will not overwrite the existing company file.
- If you want both QuickBooks Database Server Manager and QuickBooks Desktop then select “I’ll be using QuickBooks Desktop on this computer” (Recommended).
- But, if you only want to use the QuickBooks Database Server Manager on the server computer then click on the “I will NOT be using QuickBooks Desktop..” option.
- After pursuing the on-screen instructions, click on the “Install” button. Windows computers may ask for permission. You can grant permission to complete the installation process.
Step 5: Set Up the Admin Rights
- When you log in to the new server computer, you should have proper administrator privileges.
- Also, your Windows computer should have complete rights for using the Database Server Manager.
Step 6: Scan the Folders using QuickBooks Database Server Manager
To scan the folder, you can either use QuickBooks Database Server Manager on your Windows computer or run the QuickBooks Tool Hub if installed already. Here, we will show you how to run QuickBooks Database Server Manager from both Windows computer and QuickBooks Tool Hub.
Run Database Server Manager from Windows
- Click the Windows “Start” menu on the server computer.
- Search for “QuickBooks Database Server Manager” through the Windows search bar.
- Switch to the “Scan Folders” tab.
- Press the “Browser” button and open the folder containing your QuickBooks company file.
- Now, click the “OK” button.
Run Database Server Manager from QuickBooks Tool Hub
- Double click the “QuickBooks Tool Hub” icon.
- Then, switch to the “Network Issues” tab from the left.
- Now, hit the “QuickBooks Database Server Manager” button.
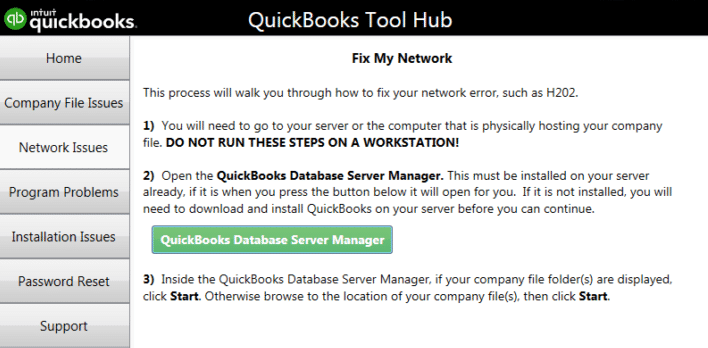
- Press the “Start scan” option.
- If you can find the file then press the “Browse” option and open the file from its location.
- Then, click the “Start scan” option. After that, “QuickBooks Database Server Manager” starts repairing the files.
Step 7: Enable the Host Multi-User Access
Once the QuickBooks is installed on the new server successfully, you can enable the multi-user access mode. This will allow your team member to access the company data on the new server.
- Launch “QuickBooks Desktop”.
- Click on the “File” menu available on the top left.
- Press the “Utilities” option.
- At this stage, you have to select the “Host Multi-User Access” option using the list of options.

In case you see the Stop Hosting Multi-User option then you can click again on this option to host the multi-user mode in QuickBooks.
Final Words
Moving the QuickBooks data to another computer is easy. All you have to do is make sure that you create a backup to avoid any kind of file loss. Thereafter, you can continue with the QuickBooks installation on a new server computer. Through this guide, we have shown how to migrate QuickBooks to a new server. As an alternate option, you can take a backup from the old server computer and restore the backup file on the new computer.