
 +1-877-790-2297
QuickBooks for Shopify allows you to export all the Shopify sales to your QuickBooks account automatically. If you proceed with Shopify and QuickBooks integration, your taxes and line items can be sent to QuickBooks Online directly from the admin.
There are other benefits of integrating QuickBooks with Shopify one may take advantage of. If you want to know how to integrate QuickBooks with Shopify, this guide will help you to understand the procedure.
Content Summary
Learn About Shopify and QuickBooks Enterprise Integration
Shopify is a commerce platform where you can start, manage, and grow the business. With the help of this platform, you can create and personalize the online store, sell in several places like the internet, by phone, through social media, pop-up shops, and brick and mortar locations. By using this system, you can easily manage your inventory, products, shipping, and payments.
Advantages of QuickBooks Online Integration with Shopify
By adding Shopify with QuickBooks, you can automate your business in a smart way.
- It ensures consistency and accuracy in repetitive tasks.
- Also, it saves time and energy that you may spend elsewhere.
Other Business That You Can Automate with Shopify and QuickBooks integration
- Processing orders
- Data and email capture
- Tracking orders
- Marketing
- Inventory counting and management
- Printing labels
- SEO
- Social proofs
After you integrate Shopify with QuickBooks, the transactions get automatically uploaded and stored. There are numerous third-party apps that you can use to seamlessly proceed with the Shopify and QuickBooks online integration.
Must Read: HubSpot QuickBooks Integration
Why Do You Need to Use QuickBooks Enterprise and Shopify Integration?
By integrating Shopify with QuickBooks, you can perform a number of tasks easier than ever. Some of the duties are mentioned below:
- Export the Shopify Orders as Sales Receipts into Your QuickBooks Online
With the Shopify and QuickBooks integration, you can easily and quickly import all the refunds and orders from Shopify to your QuickBooks account. This also includes products and customers linked with the orders. Click to Learn how to delete a customer in QuickBooks?
In addition, you can export the old data from the preferred time from Shopify into QuickBooks. With just one click, you can easily enable the orders so that they can be exported automatically.
- Export Fees and Pay outs Automatically for the Shopify Payments
After downloading the app, you can simply enable the settings so that it can export your payouts and Shopify Payments automatically to your QuickBooks Online.
- View the Account Balances and Export Summary
When you export the Shopify Orders to your QuickBooks Online, you will be provided a full summary of all the Shopify orders along with the total value. You can see the breakdown of the products and how much you have made on them.
- Export Taxes and Line Items Automatically
The orders you export from your Shopify into your QuickBooks will include all the taxes including shipping and line items. This way you do not need to worry about adding the details again.
- Import Tax Rates Automatically for Several Tax Agencies
This will set up tax agencies and the tax rates automatically. However, it depends on the imported orders. You can set the primary tax agency where you do your business regularly. Besides that, you can run the report in order to check how much money you owe in the taxes.
- Choose Which Account You Want Your Gifts Cards and Product Sales Income to Go Into
QuickBooks for Shopify allows you to select an account or create the new one so that you can import the order information in that account. This will help you to classify the gift card sales in your liability account. In addition, put all the Shopify sales into one account if you select.
How to Integrate Shopify and QuickBooks?
To proceed with QuickBooks Online integration with Shopify, one has to download the QuickBooks app in their Shopify software.
- Download and install a QuickBooks app in Shopify.
- Now, click on the “Add App” button.
- Hit the “Install app” option.
- Then, you can select the payment plan based on your choice.
- Now, read the terms and conditions and accept them.
- Click on the “Connect with QuickBooks” button.
- When you see a new pop-up window, it prompts you to authorize Intuit to share the data securely with QuickBooks Online and Shopify. Here, you can hit the “Connect” button. Doing so, you will be taken to Shopify where you need to choose your QuickBooks accounts that you wish to connect with Shopify.
- After this, go to the “Payment fees settings”.
- Then, go to the “Tax settings”, “Customer export settings”, and Customer export settings”.
Note: In case you did not set up the taxes in your QuickBooks Online then you don’t need to link anything in the Tax settings. But, you will have to set up the VAT in QuickBooks before selecting the HM Revenue & Customs (VAT) option.
- Once done, go to the “Export settings” and the price plan.
- Then, hit the “Complete Setup” button.
When you are done following these steps, launch your QuickBooks software and verify if Shopify has successfully integrated with QuickBooks. To confirm this, you can go to the Overview tab located under the company setup section. Here, you will see the message that you have integrated Shopify with QuickBooks.
Must Read: How to Integrate Square with QuickBooks Online?
How Does QuickBooks Get Affected By the Integration and Double Entries?
After you integrate Shopify with QuickBooks, the integration must be affecting QuickBooks and the double entries that are involved. Here, we will show you what changes Shopify will make.
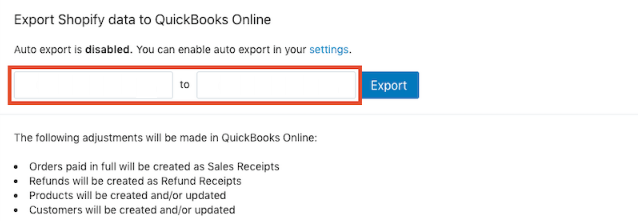
- The order that is paid in full will be made as a Sales Receipts
- DR – Bank
- CR – VAT Control – HMRC
- CR – Product/Service Account
- It creates refunds as Refunds Receipts
- DR – Product/Service Account
- CR – Bank
- DR – Vat Control – HMRC
- Products will be updated and created
- In the “Products and Services” section, a new service code will be prepared when your sales receipt is made.
- Customers will be updated and created
- This is exactly the same as the product is being created. The customer section gets updated with new customer details when you create the sales receipt.
- Shopify Payment fees will be exported
- DR – Bank
- CR – Sales
- DR – Uncategorised/Sundry Account
How to Reconcile Shopify in Your QuickBooks Account?
By reconciling your accounts, you can have a look at the balance and transactions of your business so that you can match them with your credit card or bank statements. If you do not find any difference between the transactions, it indicates that your bank and books are in the agreement.
If you ever need to reconcile Shopify in the QuickBooks account then there are a few ways you can follow.
Two of the ways are quite common among online sellers which are QuickBooks reconciliation and manual reconciliation. Both digital and manual reconciliation rely on the data from the three main financial documents. These are as follows:
- Balance Sheet: This is the record of your assets, owner equity, and liabilities. One column consists of your inventory and cash whereas the other columns comprise debts related to business.
- Income Statement: This shows your money over a period of time. It also records both non-operating income and direct sales.
- Cash Flow Statement: This is the important document that has records of all expenses, sales, and other business transactions.
Note: If you have never reconciled the Shopify sales then you should start with the oldest bank statement or the first bank statement since the time you reconciled last. Then, you can work through it in months. However, chances are high for discrepancies and finding errors if starting from the older statements.
How to Setup Automatic Reconciliation?
When you use cloud-based Shopify software such as QuickBooks then it becomes easy to reconcile quickly. This becomes possible if you download information for your sales and present it so that you can compare it against your credit card and bank statements.
To set up an automatic reconciliation, you can follow these steps:
- Go to the “Settings” menu.
- Click on the “Tools” option.
- Choose the “Reconcile” and start reconciling.
- Then, pick your bank account. This will display the information depending on your account type.
- Now, add the “Ending date”. You can enter the date of the last time you reconciled.
- Follow the on-screen instructions.
- Lastly, compare the transactions to the credit cards or bank statements.
When you reconcile, you can set your QuickBooks to display Deposits or Payments only which collects the data in a simple view. This becomes easy for you to compare against the statements. Also, you can edit the transactions manually if they are not correct.
After reviewing the statements and transactions, you can hit Finish Now and follow the on-screen instructions to save and view the reconciliation report.
QuickBooks Business for the Shopify Seller
The biggest advantage of using QuickBooks for the eCommerce store is that you can have access to the bundle price for your QuickBooks commerce add-on. QuickBooks Commerce provides a great service for eCommerce to QuickBooks Online users.
These features include the following:
- Order management to track and fulfill orders.
- Shipping workflows and automated orders.
- Inventory control over multiple channels.
- Automatic products listing over channels.
- Wholesale options with customizable B2B stores.
- Support for two sales channels.
- Personalized reporting and insights.
- 1000 sales orders that process per month.
- Custom shipping rates over carriers.
QuickBooks Commerce lets you automate other aspects of the Shopify store. This can be processed under the same account. It gives you visibility over the larger area of business in one place. This will help you to operate your business smoothly.
As a QBO user, it does not require adding QuickBooks Commerce to your plan. Rather, you can simply use a combination of different apps in order to get the same functionality. However, you may require to get connected to QuickBooks externally.
To Wind Up
In this guide, we have shown the complete procedure of Shopify integration with QuickBooks Desktop and Online. If required, you can reconcile Shopify to your QuickBooks account as well.
Frequently Asked Questions (FAQs)
Ans. Yes, you can smoothly integrate Shopify with QuickBooks to grow your business. All you need to install QuickBooks to your Shopify software and connect the app by configuring all the settings.
Ans. Yes, you can easily proceed with QuickBooks Desktop with Shopify integration. If required, you can connect QuickBooks Online and Enterprise versions to integrate Shopify.
Ans. As you integrate Shopify with QuickBooks, the sales data starts importing automatically. If you are using third-party apps for the integration then you may also get additional features that will take your business to the next level.