
 +1-877-790-2297
Intuit has now released HubSpot for QuickBooks which is an integrated CRM. This financial management solution helps growing businesses speed up sales cycles. Furthermore, it allows finance and sales teams to work together efficiently. With HubSpot QuickBooks integration, the businesses get a clear vision for financial health and eliminate blind spots.
In addition, HubSpot and QuickBooks integration propels businesses through the digital transformation journey because they move to the cloud. If you are curious to know how to connect both the apps then we are here to enlighten you.
- Introduction to HubSpot and QuickBooks
- How to Use HubSpot and QuickBooks Integration?
- Part 1: Set up the Integration
- Part 2: Use HubSpot QuickBooks integration
- Generate the Invoices
- Add the Existing Invoices
- Create Custom Workflows
- Enable Contact Sync
- Enable the Product Sync
- Part 3: Use Advance Features of QuickBooks
- Perform HubSpot integration with QuickBooks Online Advanced
- Advantages of HubSpot Integration with QuickBooks
Introduction to HubSpot and QuickBooks
About HubSpot: The services of HubSpot are focused on marketing and sales tools. It helps your company to reorient the marketing efforts into inbound marketing. By using HubSpot, your company can effortlessly create content in a way that can attract the leads who were already taking interest in your products and services. Users can collect the customized visitors’ experiences and contact details by using HubSpot’s marketing tools.
About QuickBooks: QuickBooks is a software solution that is designed to handle your payroll, sales, inventory, and other requirements of small businesses. The software serves merchant services, marketing tools, training solutions, and products and supplies.
How to Use HubSpot and QuickBooks Integration?
By using HubSpot and QuickBooks Online integration, you can directly generate invoices from the deal record, see payment events on the timeline, and view invoice details in HubSpot. This makes your process convenient and time-saving.
To start with integration, you need to perform a number of steps. First of all, set up the integration in the HubSpot account, use the HubSpot QuickBooks integration, generate invoices or add the existing invoices.
If needed, you can perform other tasks such as create custom workflows, enable contact sync, product sync, use QuickBooks smart features, send invoices to the QB task manager, and set up a workflow to automate tasks in QuickBooks.
Part 1: Set up the Integration
To set up the HubSpot and QuickBooks integration, you need to search for QuickBooks within HubSpot and then connect it to your Connected Apps list.
- Open your “HubSpot” account.
- Click on the “Marketplace icon” located in the navigation bar.
- Choose the “App Marketplace” option.
- Now, look for the QuickBooks integration using the search bar. All you have to hover over the search bar and click on the “View integration” option.
- Hit the “Connect App” button.
- As you connect the QuickBooks app with your HubSpot account, you may need to enter the QuickBooks login credentials for security purposes.
Note: Adding QuickBooks account credentials is a must in order to install the integration. In case you are unsure about the login details, connect with the QuickBooks admin.
Connect Multiple Account
HubSpot also allows you to add numerous accounts. However, you can disconnect them if required in the future. If you want to connect more than one account then you can do it following these steps:
- Navigate through the “Marketplace icon” located in the menu bar.
- Click on the “Connected apps” from the “Manage” section.
- Click on the “QuickBooks Online” option.
- Select the “Connect QuickBooks account” located on the top.
If you ever need to remove the integration from your HubSpot account then you just need to hit the Disconnect button from the menu.
Important Note: Only the invoices you create in HubSpot will display in your HubSpot account automatically. If you want to view the invoices created in QuickBooks Online then you need to add them to your HubSpot account.
Part 2: Use HubSpot QuickBooks integration
After you set up the integration, you can use HubSpot integration with QuickBooks to generate invoices from the deal record, see payment events on the timeline, and view invoice details in HubSpot.
This should be noted if any invoice in QuickBooks is available in a different currency, the company currency of HubSpot’s account, HubSpot does not sync the invoices from QuickBooks to deal properties.
Generate the Invoices
- Open your “HubSpot” account and navigate through the “Sales” option.
- Click on the “Deals”.
- Add a “Name” for a deal record.
- From the “Invoices” section, click on the “Create Invoice” option located on the right.

- If having multiple accounts then click on the “QuickBooks account” using the drop-down menu.
- Hit the “Next” button.
- Now, choose the option if you prefer to generate invoices from the “Existing quote” or “Create from Scratch”.
- Create from quote: If you choose this option then HubSpot will match the quote details in the QuickBooks records. If it does not match the result then you can choose the customer using the drop-down menu or click on the “create a new QuickBooks customer” option.
- Create from Scratch: If you select this option then HubSpot will match the details in your QuickBooks records. If no customer is found then you can choose the customer using the drop-down menu or click on the “create a new QuickBooks customer” option.
- Click the “Next” button.

Note: Quotes that are already published and have not expired yet can be used to generate invoices.
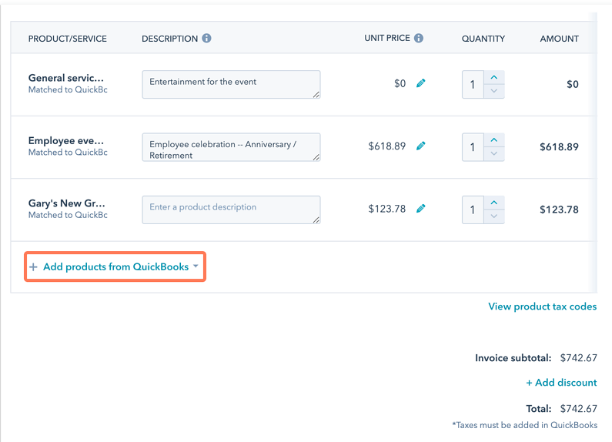
Now, click on the “Add products from QuickBooks” in order to choose the existing products from your QuickBooks account. This will add the products to the invoice.
Once added, click the “Next” button.
Remember: If the account is international then you can enable multiple currency sync and add the tax codes to the invoices.
- Select the “Invoice create date”, “Payments Terms”, and “Invoice due date” for the invoice.
- Now, write the text for the customer’s invoice in the “Write a message to your customer” section.
- Click the “Next” button.
- Review the details in the invoice.
- Click on the “Previous” button to return and edit the invoice details if required.
- Select the “Create draft invoice” in order to generate the invoice in QuickBooks.
- From the “Invoices” section, click on the invoice name so that you can preview the invoice. Now, the invoice is ready to send from the QuickBooks account
When the invoice is created successfully, it will be labeled with one of the following stages:
- Waiting to be sent: When the invoices have not been sent to the customers.
- Partial payment: When the invoices are paid partially.
- Sent to customer: Invoices have been sent to your customer.
- Overdue: When the invoice is past the payments data and now it is overdue.
- Paid in full: If your invoices are paid in full, it will show this tag.
Note: Make sure you disable this option for HubSpot so that it can generate invoices in your QuickBooks account.
Add the Existing Invoices
- Open your “HubSpot” account.
- Navigate through “Contacts, Deals, and Companies”.
- Click on the name of the record.
- From the right panel, click on the “Add existing invoice” in the “Invoices” section.

- In case you have various accounts then click on the “QuickBooks account” using the drop-down menu.
- Hit the “Next” button.
- Now, look for the checkbox on the left of your invoice and click the “Add” button.
- You will see the invoices linked with the record in the “Invoices section on the record”.
Create Custom Workflows
When you successfully perform HubSpot and QuickBooks Desktop integration, you can create custom workflows. For this, you can use the new invoice deal properties mentioned below:
- amount billed
- Invoice number
- recipient
- due date
- status
By using these new invoice deal properties, you can create reports to see the full record of the income that your team is preparing for your business.
Remember: When you sync multiple invoices to your HubSpot account to the same deal record then the properties get updated by the recently updated QuickBooks invoices.
Enable Contact Sync
- In the “HubSpot” account, you can go to the “Settings” icon through the navigation bar.
- Now, click on the “Integrations” option from the left panel.
- Select the “Connected apps” option.
- Then, click on the “QuickBooks Online”.
- Hit the “Contacts” option.
- In order to sync customers of QuickBooks with the contacts in HubSpot, click on the toggle to enable the “Contact Sync” service.
- From the “Creating and updating contacts” section, click on the drop-down menu to determine what happens when your contacts are updated or created in QuickBooks.
- From the “Deleting contacts” section, click on the drop-down menu to choose what happens when your contacts are removed in QuickBooks.
Remember: Only the contacts you create will be synced to HubSpot.
Enable the Product Sync
- In the “HubSpot” account, you can go to the “Settings” icon through the navigation bar.
- Now, click on the “Integrations” option from the left panel.
- Select the “Connected apps” option.
- Then, click on the “QuickBooks Online”.
- Hit the “Products” option.
- In order to sync products of QuickBooks with the products in HubSpot, click on the toggle to enable the “Product Sync” service.
- From the “Creating and updating products” section, click on the drop-down menu to determine what happens when your records are updated or created in QuickBooks.
- From the “Deleting products” section, click on the drop-down menu to choose what happens when your records are removed in QuickBooks.
Remember: Only the products you create will be synced to HubSpot.
No, go to the “Product property mappings” tab so that you can see the status of the properties that sync between HubSpot and QuickBooks.
Part 3: Use Advance Features of QuickBooks
If you have connected the QuickBooks Advance account to the HubSpot then you can share the invoices with your QuickBooks task manager directly. Besides that, you can generate workflows and access additional reporting.
Send Invoices to Your QuickBooks Task Manager
When you generate the invoice and share it with QuickBooks Advance, the entire data from the deal or quote will be shared with the QuickBooks task manager.
If you want to access the task manager in the QuickBooks account then do the following:
- Sign in to the “QuickBooks Online” account.
- Click on the “HubSpot” located on the left panel.
- Go to the “To Do” section and select the “View tasks” option.
- At this point, you can create new tasks or approve the draft invoices.
Automate Tasks by Setting Up Workflows in QuickBooks
To set up the workflows, you can go to the Task Manager section and create a task automatically when the actions have to be finished.
Here, you can select from the following standard workflows:
- Pay vendor reminder
- Payment due reminder
- Unsent invoices reminder
- Bank deposits reminder
Before you turn these on, you customize the workflows in the QuickBooks Online account.
Perform HubSpot integration with QuickBooks Online Advanced
If you are using QuickBooks Online Advanced then you can import deals from your HubSpot account as invoices. All you have to do is connect HubSpot to your QuickBooks Online Advanced account.
Thereafter, you can share deals from HubSpot accounts to QuickBooks as draft invoices. For this process, you need to approve the draft in order to add them to your QuickBooks account. This will help you to speed up the sales cycle and keep your information organized.
To set up the HubSpot QuickBooks integration in order to get deals, you can perform the following steps:
Part 1: Connect the HubSpot to QuickBooks Account
Before proceeding further, make sure that you are the admin user of QuickBooks and HubSpot. Otherwise, you may find trouble connecting both the apps.
- Log in to the “QuickBooks Online Advanced” with admin rights.
- Click on the “Apps”.
- Now, look for the “Hub Spot for QuickBooks” app.
- Click on the “Learn More”.
- Now, click on the “Connect App” from the “HubSpot” page.
- Follow the prompts to complete the setup.
- When you see the “HubSpot login page”, enter your login credentials as an admin.
- Click on the ”Allow” button to connect the accounts.
Note: If you find the HubSpot apps disconnected from your QuickBooks account then you don’t need to worry. You can follow the same steps in order to reconnect your account.
Part 2: Import Deals into QuickBooks
After connecting both the apps, you can bring the deals into your QuickBooks account. Every time you click on the Create new button and QuickBooks Invoice in HubSpot, it shares the deal over to your QuickBooks account. Thereafter, QuickBooks generates a draft invoice from the deal.
To review a draft invoice, you can follow these steps:
- Click on the “Tasks” menu. Alternatively, you can click on the “HubSpot” menu.
- Choose the “View Tasks” option.
- On the “Outstanding list”, review your opportunities.
- Choose the dropdown menu and click on the “Edit details” to view more details.
Note: If you find any deal with an exclamation mark, it indicates you need to review these deals.
- Edit the details as required. To review your original deal, you can choose the “HubSpot deal” link.
- Click the “Save” button.
Once you save the drafts, QuickBooks starts converting the drafts into regular invoices. Thereafter, you can handle these invoices like the sales forms in your QuickBooks account.
If required then you can stop downloading the deals from your HubSpot account. All you have to do is click on the HubSpot menu bar, choose the Disconnect option, and follow the on-screen instructions.
Note: If you do not save or review any drafts, QuickBooks removes them automatically.
Advantages of HubSpot Integration with QuickBooks
There are several advantages of connecting both platforms. For instance, you do not need to transfer details manually from the CRM into the financial management system, when the sales are closed. This process typically requires coordination between the finance and sales teams. Also, invoices manual input into a spreadsheet, email, or any online documentation program.
Doing so, the details are connected and this automatically captures the customer’s intent to purchase. When the purchase is finished in the ERP or back-end financial system, it integrates with the company’s recognition of revenue.
Add and Send QuickBooks Online Invoices within HubSpot Account
With HubSpot QuickBooks integration, you can link the already existing QuickBooks invoices to the HubSpot account. You can also generate the QuickBooks invoice directly within the HubSpot deal record and send the new invoice using the provided URL. In addition, link the tax codes with invoice items. When you create the invoices for customers, you can use the multiple currency syncing feature. Above all, you can sync contacts from your QuickBooks Online into HubSpot.
- Trigger WorkFlows with Invoice Data: Users can automate the outreach and use invoice deal properties in order to trigger HubSpot workflows depending on the invoices of QuickBooks Online. New invoice deal properties consist of invoice recipient, invoice amount billed, invoice status, invoice number, and invoice due date.
- Prepare Custom HubSpot Reports on QuickBooks Online Invoices: You can also use the new invoice deal properties in order to generate the customer reports for the sales dashboard. This way you can have a clear vision of the bottom line.
- Custom Financial Workflows: Users are allowed to set up the automated flow so that you can move the invoices from draft to the review and approval between both QuickBooks and HubSpot. But remember that your Enterprise and Sales Hub Professional HubSpot account for reporting and workflows
- Improves Cash Flow: HubSpot and QuickBooks Desktop integration reduce the time from customer proposal/quote to when the amount is received and allocated.
- Ensure Accuracy: You can send sales entries from your HubSpot account to the books reliably. Centralized details offer the single source of truth.
- Saves Your Time: You do not need to spend time on dual data entry and correcting errors.
- Serve Confidence: It gives you peace of mind that you can process invoices accurately and timely.
To Sum Up
Connecting QuickBooks and HubSpot is quite easy. All you will have to set up the accounts, connect multiple accounts, use the integration and its advanced features. With HubSpot and QuickBooks integration, you can create invoices, custom workflows, enable product and product sync. If required then you can connect HubSpot to your QuickBooks Online Advanced account.
If you want to learn how to perform Square QuickBooks integration, read this guide and know the benefits of app integration.