
 +1-877-790-2297
Square QuickBooks integration helps you easily manage finances associated with inventory and sales. As you integrate Square with QuickBooks, it syncs all the sales data and then you can view it in one place. This also helps you to avoid manual entry for a large amount of the sales data.
Here, in this detailed guide, we will show you the whole procedure of integrating Square with QuickBooks Online. Let’s dig in.
- Square QuickBooks Integration
- What Are the Limitations for Integrating Square with QuickBooks Online?
- How to Integrate Square with QuickBooks Online?
- How to Sync Square with QuickBooks?
- Part 1: Set up QuickBooks
- Part 2: Get the App
- Part 3: Get Transactions
- Part 4: Manage the Settings After Connecting the App
- Methods to Install Commerce Sync
- Compatible Devices with the Square Mag-Stripe and Chip Card Readers
- How to Disconnect the Sync with Square App?
- What If You Cannot Connect the App?
- How to Add Switch Admin?
Square QuickBooks Integration
Square is a well-known point of sale app. Using this app, you can accept payments easily. The payments can be received via credit or debit cards. Furthermore, Square is affordable and can also be used with different devices including iPad and iPhone.
In addition, you can get many features with Square QuickBooks Desktop integration such as creating the invoices for each sale, avoiding the manual entry of payment data and sales, sync data with QuickBooks, see and create reports from the Sales date and send invoices to clients and customers.
Advantages of Square Integration with QuickBooks Desktop
- You can track your projects till the end.
- Using Square QuickBooks integration, you can manage the clients by adding the notes, details, and information to a list.
- It also helps you to securely share the documents by communicating and meeting the deadlines through QuickBooks.
- Besides that, you can track the inventory every day through QuickBooks.
Features of Square QuickBooks Integration
- You can import paid invoices from your Square account. It includes payments, deposits, and invoices into your QuickBooks account.
- Using this Square and QuickBooks integration, you can enter the data in a way that your credit card payments can get batched together as a deposit. This becomes easy to reconcile as well.
- The details of items are preserved that provide the item names, sales data include taxes, discounts, and tips.
- You can import refunds.
- With Square QuickBooks integration, you can import the data of more than 18 months of all transactions.
What Are the Limitations for Integrating Square with QuickBooks Online?
Square and QuickBooks are powerful if integrated with each other. However, there are some limitations every user should be aware of. Have a look.
- Users cannot import buyer details such as the name and email address. When you view the data, you will see them as “Square Customer”.
- The summary of daily transactions will not be available. Currently, you will see the daily transactions one by one after the settlement. It means that if there is a large volume it may be difficult to see.
- You need to review the transactions before importing them.
- You cannot pay a QuickBooks invoice using the Square service.
- If your business belongs to several locations then there can be finite functionality depending on how it is set up. In case your position operates all under the one QuickBooks account then Sync with Square is the best app for integrating Square with QuickBooks Online.
- You can generate the deposit by fees that are accounted for when the Square pays to your bank account.
- Square for QuickBooks Desktop is being invented but not available yet.
- Square sales can be imported as payments and invoices in your QuickBooks account.
Considerate Necessary Items Before Installing the App
Before you proceed with Square QuickBooks integration, you need to check a number of items which are as follows:
- Make sure you log in to the computer on which QuickBooks is installed already.
- If you are going to install Commerce Sync then your QuickBooks Desktop should run Windows 7, 8, or 10. Remember that you cannot install Commerce Sync on a Mac PC.
- Chrome and Firefox are the best internet browsers that we suggest you use.
- The QuickBooks company files that you want to sync should be opened when you install the app.
- It also requires you to sign in with Admin rights and use single-user mode in QuickBooks Online. This will help you with the installation to work properly.
- We also suggest you reboot your computer (on which you are installing the app) before the installation.
How to Integrate Square with QuickBooks Online?
By connecting the Square merchant account with QuickBooks Online, you can easily download sales transactions that can be prepared through the Square account.
Here are the steps for integrating Square with QuickBooks Online.
- Go to the “Left” menu bar.
- Click on the “Apps”.
- Now, search for the “Square” using the “Search apps” fields.
- Choose the “Sync with Square” app from the result.
- Hit the “Get App Now” button.
- Follow the on-screen instructions to finish the process.
Make sure that you allow Intuit to enter the Square account. When you connect the account for the very first time, your QuickBooks Online shows the transactions on the last day. This will provide the day’s worth of transactions to drive the import.
In case you don’t proceed with anything for 15 days then you will not see any transaction until you process it using the Square account. As an example, if you had processed a transaction yesterday and one day in the previous weeks then you will not be able to view the daily batches from yesterday. After that, you can view the everyday batch for import.
How to Sync Square with QuickBooks?
If you use Square service to process the payments then you can simply sync with the Square app in order to insert data to your QuickBooks Online. This way you don’t need to make a separate transaction in your QuickBooks account for Square sale because they will be downloaded automatically.
If you want to sync Square with QuickBooks, you can follow these steps:
Part 1: Set up QuickBooks
The first step you will have to follow is to set up your QuickBooks account. Before you connect the Sync with the Square app, you need to connect your bank account, turn on Sales Tax Center, create a new account in QuickBooks, and import Square products and services.
Connect the Bank Account: If you have not connected your bank account then you should. The bank account is necessary to connect as your Square account will use it to deposit the money for the sales.
- Launch “QuickBooks Online”.
- Go to the “Banking” menu.
- Select the “Add Account” option.
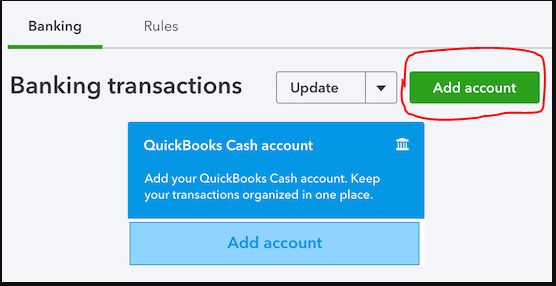
- Now, follow the prompts given on your screen to add the account to process sales payments.
Turn On Sales Tax Center: Even if you don’t collect sales tax, it is still important to enable Sales Tax Center service. However, it is not required to set up a sales tax rate as QuickBooks manages to do it when it downloads a new transaction.
- Go to the “Taxes” menu.
- Click on the “Sales Tax” tab.
- Select the “Set up Sales Tax” option.
- Now, follow the instructions given on your screen.
While setting up the sales tax, make sure that you add the same sales tax agency that you were previously using for your Square transactions.
Set Up New Accounts in QuickBooks: In case you are not having an account in your QuickBooks account then you should add some. These accounts can be used to track your expenses, class sales, and fees.
Import the Square Products and Services: This is optional to import the Square products and services, however, if you want to so then you can import them.
If you are willing to import Square products and services then you can do the following:
- Open your “Square” account and export the products and services in the CSV file format.
- Now, return to the “QuickBooks account”.
- Click on the “Products and Services” menu.
- Then, import the list.
Note: In case you don’t import the current items of Square products and services then you will see them as the default name, i.e., Square Item. You need to manually change them.
Part 2: Get the App
- Sign in to your QuickBooks Online account.
- Now, click on the “Sync with Square” page in “QuickBooks Online App Store”.
- Hit the “Get App Now”. This will start your connection.
- Then, select the company (that you wish to connect) using the drop-down menu.
- After this, sign in to the “Square” account with the correct login details. Make sure you use the same credential that you use while visiting www.squareup.com.
- Switch to the “Primary Settings” window and select the “Bank and Expense” accounts for fees and charges. It should be the same as you use for processing payments in your Square account.
- After this, select the default payment method.
- Once done, click the “Save Changes” button.
- Follow the on-screen prompts and edit the settings if required.
- When done, click the “Connect” button.
While settings up the account, you can decide if you wish to receive the daily emails for summarizing the imported Square transactions.
Part 3: Get Transactions
As stated earlier, QuickBooks downloads the Square transactions once you connect the app. QuickBooks downloads the new transactions automatically at the end of the day (once a day).
Also, you don’t have to create the new Square transactions manually in your QuickBooks account. When you successfully integrate Square with QuickBooks, you will see everything in your Square downloaded for the users.
Yet you wish to check the duplicate the transactions in your QuickBooks account then go through the following information:
- Make sure you don’t use too many tools and apps in order to download the transactions from your Square account. You can use Syncing only with your Square app.
- Don’t import the transactions with different tools for the date that you have imported previously.
- Also, don’t download the transactions for the overlapping dates.
Part 4: Manage the Settings After Connecting the App
- Sign in to the “QuickBooks Online company”.
- Then, click on “My Apps”.
- Click the “Settings” under “Sync with Square”.
- Click the “Edit” menu located near the “Basic Settings” so that you can change the payment method or the default expense and bank account.
- Now, go to the “Edit” button near Default for Unmatched Items”. Then, update the sales tax code and income account.
- Hit the “Save changes” button.
Once you save the changes, all the future transactions will follow the new settings you have made. Remember that the older transactions will not be using these new settings.
Methods to Install Commerce Sync
In case you prefer to use Commerce Sync with QuickBooks Online then you can run this service from the Settings:
Here are the steps for that:
- Log in to the “QuickBooks Online”.
- Then, click “My Apps”.
- Click on the “Settings” located under Sync with Square.
- Hit the “Run” button located next to the manual report.
- Now, choose the date range for the transactions that you wish to import manually.
- Then, click the “Run” button.
To install the Commerce Sync, you can follow these steps:
- Login to your “Square” account.
- Go to the “Apps” option.
- Now, locate the “Commerce Sync” app and select to get started or start the app.
- Hit the “Allow” button to permit the app.
- Now, connect the Commerce Sync to each location.
- Then, download and install the Commerce Sync installer.
- When done, open the app and click the “Run” button.
- Now, sign in to your Square account.
- Also, ensure that QuickBooks is open with your correct company file.
- Click the “Yes” button to continue.
- Select the “Done” button.
After this, you can enter your billing information and start with the service to process payments with Square and QuickBooks integration.
Compatible Devices with the Square Mag-Stripe and Chip Card Readers
As mentioned earlier, Square can be run on Android and iPhone devices. So, we want to list a few requirements for these two:
iOS Devices
- Apple devices can also be used to run Square. But you have to make sure that the iPhone runs the latest iOS version. Currently, it supports iPhone 4S, 5, 5S, 6, 6 Plus, 6S, 6S Plus, 7, 7 Plus, 8, 8 Plus, SE, and X.
- The devices after 6S and 6S Plus require Lightning to 3.5 mm Headphone Jack Adaptors which should be compatible.
Android Devices
- Your Android device version should be Google Android 5.0 or higher.
- It requires a 3.5 mm headset jack with microphones. Remember audio jack adaptors are not supported.
- Enable the location services.
- It should have access to Google Play Store.
- Your Android device should support the USB OTG cable.
How to Disconnect the Sync with Square App?
There can be instances when you want to remove the Sync app from the Square app. Sync app can be removed from the QuickBooks Online and QuickBooks Online Accountant. Here is how to do that.
Remove Sync from QuickBooks Online
- Click on the “Apps”.
- Then, select “My Apps” located on the left.
- Now, click the “Actions” drop-down menu.
- Select the “Disconnect” button.
Remove Sync from QuickBooks Online Accountant
- Click on the “Apps”.
- Then, select “Firm Apps” located on the left.
- Now, click the “Actions” drop-down menu.
- Select the “Disconnect” button.
Note: In case you cannot find the Disconnect option in the menu options then go to Settings, and find the Disconnect option.
When you are done, click the Confirm Disconnect button. This will remove the app from the company file.
What If You Cannot Connect the App?
If you are not an admin, you probably won’t be able to connect and maintain the app. Only Admin users of QBO can connect the app for their firm. However, for the Quickbooks Online Accountants firms, only the owners or firm owners can connect and manage the app for the customers.
How to Add Switch Admin?
- Click on the “Apps” located on the left.
- Now, search for the app you may be interested in.
- Select the app and then click on the “Get the app now” button located next to the desired app.
- Now, check the Authorizations page and hit the “Connect” button.
- Check the message details.
- Click the “Switch Admin” button.
- Now, change the settings if required.
- Make sure that your app is connected with the User ID.
In a Nutshell
With Square and QuickBooks integrations, you can generate invoices easily and process the payments automatically in Square. This will make your task easier than ever with transactions.
We hope you find this guide informative. Integrate Square now with QuickBooks Online and make your payments automatically.
You can now easily create invoices and process payments automatically in QuickBooks Online with Salesforce QuickBooks integration. Try it now!
Frequently Asked Questions (FAQs)
Ans. The current integration of QuickBooks Desktop does not support the Split Tender payments. However, you can use Commerce Sync. This will help you to connect QuickBooks Desktop with Square services.
Ans. Square can be integrated with QuickBooks Online Simple Start, Plus, and Essentials. For the Desktop version, you can use QuickBooks Pro, Enterprise, and Premier.
Ans. Open QuickBooks -> Click on File -> Choose Import -> Click Transactions -> Select the Sales Receipts -> Click Import button -> Browse the file that you exported from your Square account.
Ans. Yes, it supports Square Point of Sales, Square for Retail, Square for Restaurants, and Square Appointments.