
 +1-877-790-2297
When updating the QuickBooks program, users often confront QuickBooks error 1328. Such errors may hop up on your screen when you install, repair, or reinstall your QuickBooks Desktop on Windows PC. The error message can also display in different ways; it may refer to c:\config.msi\PT**.TMP.
Receiving error 1328 when repairing QuickBooks can be very frustrating. To get rid of such an error, you are required to implement effective troubleshooting methods which we will discuss in further discussion.
- Major Causes of QuickBooks Error 1328
- How to Fix QuickBooks Update Error 1328?
- Fix 1: Reinstall QuickBooks with Clean Installation Process
- Uninstall QuickBooks Desktop from Control Panel
- Rename the Installation Folders
- Reinstall QuickBooks Desktop
- Fix 2: Use QuickBooks Install Diagnostic Tool
- Fix 3: Upgrade Windows Operating System
- Fix 4: Fix Microsoft .NET Framework
- Fix 5: Repair Microsoft MSXML Manually or Config MSI QuickBooks
- Fix 6: Install QuickBooks in Selective Startup Mode to Repairing 1328
Major Causes of QuickBooks Error 1328
Using the different license number while installing a different version of QuickBooks could be one of the most common reasons for error 1328 in QuickBooks 2016 or other versions. However, there can be other reasons that may lead to an unexpected error which are as follows:
- Invalid entry in Windows Registry.
- Malware attack on your system.
- Your QuickBooks Desktop has been corrupted.
- QuickBooks is not installed properly.
- The Windows system was not shut down properly.
- There is a network error while installing QuickBooks Desktop.
Now that you know the key reasons for the update error, one can perform a valid or relevant solution to repair the error.
How to Fix QuickBooks Update Error 1328?
To avoid error 1328 in QuickBooks 2016 or other versions, you should configure your Windows operating system and QuickBooks program. For instance, you can try reinstalling QuickBooks using a clean install method, run the Install Diagnostic tool, or update Windows operating system to the latest build.
In case these methods don’t work effectively then repair the Windows components manually. By repairing .Net Framework and MSXML on a Windows computer, you can solve the error instantly. Besides that, you can try installing QuickBooks in Selective Startup mode. But make sure that you switch back to the normal configuration later.
For your better understanding, we are explaining each method with a manual procedure.
Fix 1: Reinstall QuickBooks with Clean Installation Process
To perform this clean installation process, you are required to uninstall the QuickBooks software. After that, you need to change the name of the installation folders and then install QuickBooks again or to update QuickBooks follow the guide. This will help you to repair error 1328 in QuickBooks 2016 or other versions.
To proceed with the QuickBooks clean installation procedure, you can go through the following instructions:
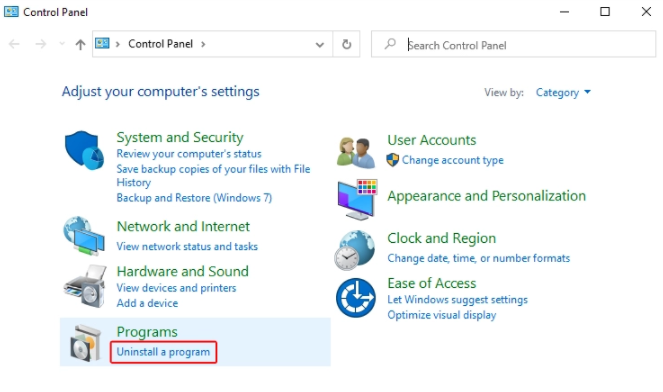
Uninstall QuickBooks Desktop from Control Panel
- Press the “Windows” + “R” keys together to open the “Run” dialog box.
- Type “Control Panel” in the text field of the “Run” box.
- Press the “Enter” key or click the “Ok” button.
- When you see the “Control Panel” window, click on the “Programs and Features” option.
- After this, select the “Uninstall a Program” button. Here, you will see the list of the installed programs.
- Locate “QuickBooks” from the list and double click on it.
- Go to the “Change” button or select the “Uninstall” button.
- Then, click on the “Uninstall” button again.
- Now, follow the instructions given on your screen to complete uninstalling the program.
- Also, ensure the hidden files and folders are visible.
Rename the Installation Folders
- Open the “Windows File Manager” by using “Windows” + “E” keys together.
- To locate the “QuickBooks Installation Folder”, you can navigate through the following locations:
- C:\Users(current user)\AppData\Local\Intuit\QuickBooks
- C:\ProgramData\Intuit\QuickBooks
- 64-bit version C:\Program Files (x86)\Intuit\QuickBooks
- C:\Program Files\Intuit\QuickBooks
- When you find the folder, click right on it.
- Select the “Rename” option from the right-click context menu.
- Add “OLD” after the name of the file name.
Reinstall QuickBooks Desktop
- To install the “QuickBooks Desktop”, you are required to download the “QuickBooks Tool Hub” on your computer.
- Save the download file to the specific location where you can find it later.
- Now, go to the “Downloads” folder.
- Click twice on the “QuickBooks Tools Hub”.
- Keep following the on-screen instructions.
- When you see the pop-up of the license agreement, make sure you click on “I Accept”.
- Now, Go to your “Desktop” screen.
- Double click on the “QuickBooks Tools Hub” icon.
- Click on the “Installation Issues” tab from the left menu.
- Now, hit the “Clean Install Tool” button.
- Make sure you choose the correct version of QuickBooks.
- Hit the “Continue” button.
- Here, click on the “Please Install Your Copy of QuickBooks to the Default Location” option.
- Click on the “OK” button.
Once you follow these steps, the “Clean Install Tool” will automatically reinstall the QuickBooks program. After the QuickBooks reinstallation is done, you can restart your system and check if you find QuickBooks error 1328.
Fix 2: Use QuickBooks Install Diagnostic Tool
QuickBooks Install Diagnostic Tool scans your QuickBooks program and its company files. By scanning the program, it can detect and repair the error automatically.
Note: QuickBooks Install Diagnostic Tool can be used from QuickBooks Tool Hub. So, if you have QuickBooks Tool Hub, you do not need to install the QuickBooks Install Diagnostic Tool separately.
Pursue the following steps to repair the error using the tool:
- First of all, end all the running programs in the background.
- Open “QuickBooks Tool Hub” on your device.
- Now, select the “Installation Issues” tab. This should be located on the left.
- Then, select the “QuickBooks Install Diagnostic Tool” button.

After performing these steps, the tool will start scanning the program. If it finds any errors, the tool will resolve them. The entire process can take a few minutes. Once the process is finished, you can reboot your computer and access QuickBooks to verify if QuickBooks error 1328 has been resolved.
Fix 3: Upgrade Windows Operating System
If you are using the outdated version of your Windows system, the errors are likely to appear on the screen. It may also create unwanted problems between the programs. If you see QuickBooks update error 1328 on your computer screen then make sure your Windows operating system is up to date.
To update the Windows system based on different versions, you can go through the following steps:
Windows 10
- Press the “Windows” key.
- Type “Settings” in the Windows search bar.
- Now, click on the “Settings” when it appears in the result.
- Go to the “Update and Security” option.

- Select the “Windows Update” option.
- Click on the “Check for Updates” option.

- Press the “Restart Now” button.
- As your system restarts, it will start installing the new update.
Windows 8
- On your desktop screen, move the mouse cursor to the right and then go to the “Settings”.
- Then, select the “Change PC settings” option.
- Click on the “Update and Recovery” option.
- Select the “Windows Update” button.
- Hit the “Check Now” button.
- Click the “View Details” option in case you see any updates.
- Click on the “Install” button.
- Enter the password of the system administrator if prompted.
- Once the update is successfully installed, you can restart your device.
Windows 7
- Go to the “Start” button.
- Select the “Control Panel from the apps.
- Then, choose the “System and Security”.
- Hit the “Windows Update”.
- Click on the “Check for Updates” option.
- If you see any updates, press the “Update Now” button.
This way you can install the new update for Windows 7, 8, or 10. Once the process is finished, restart your device and check if you can update QuickBooks Desktop.
Fix 4: Fix Microsoft .NET Framework
Microsoft .NET Framework is a component of a Windows computer. If you find any kind of issue with your .NET Framework, it may restrict QuickBooks Desktop to work properly.
In this method, we will show you the procedure of reviewing the settings for .NET Framework 4.5 and .NET Framework 3.5 SPI. Before getting started, you need to find the .NET Framework. This can be done through the Control Panel.
- Go to the “Start” button.
- Search for the “Control Panel” using the search bar.
- Click on “Control Panel” when you find it in the results.
- Select the “Program and Features” tab.
- Hit the “Uninstall a Program”.
- Select the “Turn Windows features on or off”.
- Now, find the “.NET Framework” in the list.
After you locate the Microsoft .NET Framework, the next step is to correct the settings for .NET Framework 4.5 and .NET Framework 3.5 SPI.
Check Settings for .NET Framework 3.5 SP1
Follow these steps if you don’t see the checkbox selected:
- Select the checkbox to turn on “.NET Framework 3.5 SP1”.
- Click the “OK” button to save your changes.
- Then, you can restart your device.
Follow these steps if you see the checkbox selected:
- Select the checkbox to turn off the “.NET Framework 3.5 SP1”. Also, ensure that you do not turn it on again.
- Click the “OK” button to save your changes.
- Then, you can restart your computer.
- When you log in again to your computer, follow the on-screen prompts to turn on the “.NET Framework 3.5 SP1” again.
Check Settings for .NET Framework 4.5 (or later)
Follow these steps if you don’t see the checkbox selected:
- Select the checkbox to turn on “.NET Framework 4.5 (or later)”.
- Click the “OK” button to save your changes.
- Then, you can restart your device.
Follow these steps if you see the checkbox selected:
- Select the checkbox to turn off the “.NET Framework 4.5 (or later)”. Also, ensure that you do not turn it on again.
- Click the “OK” button to save your changes.
- Then, you can restart your computer.
- When you log in again to your computer, follow the on-screen prompts to turn on the “.NET Framework 4.5 (or later)” again.
This is how you can repair the .NET Framework on your Windows computer. Then, you can try updating your QuickBooks program.
Fix 5: Repair Microsoft MSXML Manually or Config MSI QuickBooks
To fix QuickBooks error code 1328, you should repair the MSXML 4.0 manually. If you installed your QuickBooks program with the help of a CD then you should also choose the installation type.
- Insert the CD into your Windows computer.
- As you insert the If it opens “QuickBooks” software, you can close the window.
- Now, follow the instructions given on your screen. This will start installing the MSXML.
You can follow this procedure to repair Microsoft MSXML manually on Windows 7, Windows 8, or Windows 10.
Windows 10
- Open the “Windows Taskbar”.
- Search for the “msiexec.exe /forum “d:\QBOOKS\msxml.msi” by using the search bar.
- Select the “Enter” key.
- If you did not save the file in Local Disk D then replace it with a different drive name.
Windows 7 or Vista
- Go to the “Start” button.
- Type in “msiexec.exe /forum “d:\QBOOKS\msxml.msi”.
- Select the “Enter” key.
- In case you find a different CD drive then replace it with other drives (eg. drive D).
Windows XP
- Press the “Windows + R” key combination on your keyboard to open the “Run” dialog box.
- Then, write down the following path in the “Run” box:
- msiexec.exe /forum “d:\QBOOKS\msxml.msi
- Click the “OK” button.
- In case you find a different CD drive then replace it with other drives (eg. drive D).
These are the steps for repairing the MSXML 4.0 manually on your Windows computer. Once you are done following these steps, try updating QuickBooks Desktop and verify if you encounter the error 1328 config MSI QuickBooks.
Fix 6: Install QuickBooks in Selective Startup Mode to Repairing 1328
Antivirus or antispyware programs installed on your computer can create problems between other applications. Such programs may lead to error 1328 when repairing QuickBooks. To prevent your system from such errors, you can install your QuickBooks software in Selective Startup Mode.
Here, we will teach you how you can start your device in Selective Startup mode and restore your device to the normal configuration. Before proceeding further, you should ensure that you have a local user account on your Windows 10 computer.
Start Your Device in Selective Startup Mode
- To get started, open the “Run” box. For this, you can press the “Windows” + “R” keys together.
- Then, start typing “MSConfig” in the “Run” box.
- Press the “Enter” button.
- Now, switch to the “General” tab and select the “Selective startup and Load System Services”.
- When you see the “System Configuration” window, click on the “Services” tab.
- Here, you need to select the “Hide all Microsoft Services” option.
- Now, press the “Disable all” option.
- Here, deselect the “Hide all Microsoft Services” option.
- Now, open the list of services and make sure that the “Windows Installer” box is chosen. In case it is not then select the “OK” button.
- Switch back to the “System Configuration” screen and choose the “Restart” button. As your computer restarts, you can install or uninstall QuickBooks using the clean install method.
Restore Your Device to the Normal Configuration
- Open the “Run” box. For this, you can press the “Windows” + “R” keys together.
- Then, start typing “MSConfig” in the “Run” box.
- Press the “Enter” button.
- Now, switch to the “General” tab and select the “Normal startup” option.
- Press the “OK” button.
- Switch back to the “System Configuration” screen and choose the “Restart” button.
By restarting your QuickBooks program in Selective Startup mode, you can easily get rid of stubborn errors such as error 1328 QuickBooks update.
Summing Up
Facing technical glitches while updating QuickBooks Desktop is pretty common. By implementing the right solution, you can fix the QuickBooks error instantly. But before that, one has to figure out what could be the major cause of update error in QuickBooks. After you diagnose the cause, perform the methods we have given above.