
 +1-877-790-2297
After the year-end, users tend to start a new company file in QuickBooks. A lot of users find it a hectic task to start the company file from scratch. To make this task easier for you it is suggested to use the old company data for setting up a new file. This also helps you to avoid mistakes while entering the details. In addition, it saves a lot of hours as you don’t need to add details manually. To know more let’s read how to start a new company file in QuickBooks.
- Why Do You Need to Start a New Company File in QuickBooks Desktop?
- How to Create a Company File in QuickBooks Desktop?
- Step 1: Prepare a Copy of the Account Balances
- Step 2: Export the Lists from Your Old Company File
- Step 3: Make a New QuickBooks Company File
- Step 4: Import the Lists
- Step 5: Enter the Opening Balances
- How to Start a New Company File in QuickBooks Premier and Pro?
Why Do You Need to Start a New Company File in QuickBooks Desktop?
Before creating a new company file in QuickBooks, you should know if this change is appropriate for you. Check out the following steps when you require to create a new company file in QuickBooks.
- If the company changed from one to another business (for example; partnership to corporation or proprietorship to partnership, etc.), you will need to create a new company in QuickBooks.
- When you wish to combine numerous company files in one company file.
- Or, you may need to start a new company file when you wish to change the way you track inventory.
When you are not sure about why and when you should start a new company file then you can connect with the accountant. But, if you are sure about the idea of creating a new company, you can continue to follow this guide.
How to Create a Company File in QuickBooks Desktop?
To create the new company file from the existing data in QuickBooks Desktop, you need to perform a number of steps. Check out the guide if QuickBooks Already Has a Company File open and not opening. First of all, you will have to save a copy of the account balances. Thereafter, you are required to export the lists. To do so, the old company data can be used. Once you are done, start with the procedure of creating a new company file. In the new company file, you can import the list and the opening balances.
To understand the whole procedure in steps, you can learn here how to start a new QuickBooks company file from the existing company data.
Step 1: Prepare a Copy of the Account Balances
If you have not saved it yet, we will help you with the instructions to keep a copy of the account balances. All you have to do is choose the type of report, customize the report, and take prints to get a physical copy. You can even save the copy as a PDF to keep a digital copy.
- Before proceeding further, make sure the books are updated.
- Then, click on the “Reports” menu.
- Now, you are required to choose the report for which you want to keep a copy. Here, you will find the following balances report:
- Account balances: For this option, you can click on the “Company & Financial” option. Then, choose the “Balance Sheet Detail” option.
- Supplier balances: Click on the “Suppliers & Payables” option. Then, select the “Supplier Balance Detail” option.
- Customer balances: For this option, choose the “Customers & Receivables”. And then select the “Customer Balance Detail” option.
- If you prefer to personalize the report to meet your requirements then you can do that effortlessly. You can pursue these steps to do so:
- Run a report.
- Go to the “Report” menu.
- Choose the “Customize Report” option.
- When the “Modify Report” window opens, navigate through the tabs you wish to edit (for example:- Display tab, Filters tab, Fonts & Numbers tab, and Header/Footer tab).
- Press the “OK” button after making the necessary changes.
- When you return to the “Report” window, click on the “Print: drop-down. Thereafter, you can decide in what form you want to keep the copy:
- If you want to save the copy of the report as a digital copy then you should click on the “Save as PDF” button.
- But, if you wish to save a physical copy then click the “Print” button.
Step 2: Export the Lists from Your Old Company File
It is not required to specify the details manually in order to enter the lists in your file. To get this job done, you can simply export the lists and accounts from your old company file. This way you can carry the information to the new one.
Before proceeding further, you can read the following:
- When you export the lists from your QuickBooks account, it will generate the IIF file. You can open this on excel or notepad.
- Major lists such as Customers, Items, and Suppliers can be exported only one at a time. This will prevent problems while exporting the long lists.
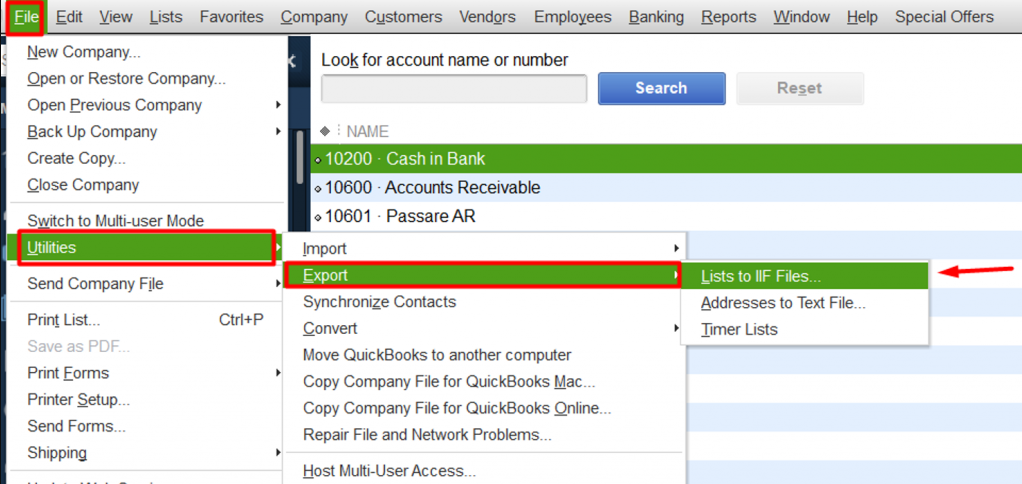
Now, you can follow these steps to export the lists from QuickBooks old file:
- Open the “QuickBooks” program.
- Click on the “File” menu.
- Then, choose the “Utilities” option.
- Here, you can select the “Export” button.
- Hit the “Lists to IIF Files” option.
- At this point, you can pick the list that you wish to export.
- Press the “OK” button.
- Now, you can browse that location where you wish to keep the file.
- Once decided, click the “Save” button.
Step 3: Make a New QuickBooks Company File
Once you are done saving a copy of the account balance and exporting the data from an old file, the next step is to create a new file so that you can import the lists into the new account.
To create a new file in QuickBooks, you can follow these instructions:
- Launch “QuickBooks Desktop”.
- From the “No Company Open” screen, you can click on the “Create a new company” option.
- Here, you will find two types of setups:
- Express Start: You can choose this setup to simply get started. Here, you just need to add the business name, business type, and industry. Then, you can select the “Create Company File” where you can mention the details later.
- Advanced Setup: This setup option can be selected when you are planning for a complete setup along with all the details.
- Now, you can follow the instructions displayed on your screen to complete the setup.
Note: In case you already have the company file in QuickBooks, make sure you give your file a unique name. This will prevent your account from overwriting the data accidentally.
Once done, click on the “Start Working” option.
Step 4: Import the Lists
Now that you have created a new company file in QuickBooks, you can proceed with list import. The IIF file you just created in the previous steps should now be imported to the new company file. This way you can bring all your data from old to new files effortlessly.
Before going ahead, keep the following points into consideration:
- It is suggested to create a backup of your QuickBooks company files before you import any list. You can also take a backup after importing any major lists
- To run the procedure of import smoothly, make sure you import the lists in an order that we will discuss below.
To import the major lists in a new company file, you can pursue the following steps:
- First of all, make sure you are using QuickBooks as an administrator. Also, your account should run in a single-user mode.
- Then, open your new company file.
- Go to the “File” option.
- Choose the “Utilities” option.
- Here, the “Import” option should be selected.
- Then, click on the “IIF Files” option.
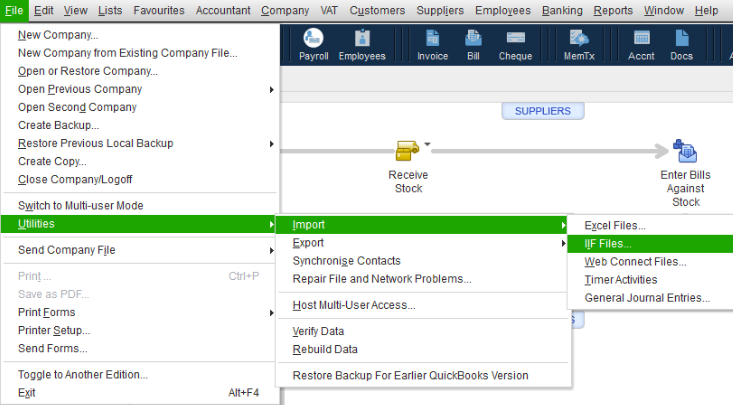
- Now, start importing the “Chart of Accounts”.
- Once done, you need to import other lists in the same order listed below:
- Import the following lists that don’t have details from other lists:
- Customer Type List
- Supplier Type List
- Class List
- Job Type List
- Payment Terms List
- Payment Methods List
- Shipping Methods List
- Customer Message List
- To-Do Notes
- Import the following lists in the same order as shown below:
- Supplier
- Employee
- Other Names
- Sales Rep
- Item
- Price Level
- Customer
- Budgets
- Import the following lists that don’t have details from other lists:
Step 5: Enter the Opening Balances
When you are done importing the lists to your new company file, you can start entering the opening balance. To proceed with this, first, you will have to add the opening balance. Later you review the opening balance entry in your QuickBooks Desktop.
Create a Bank Account
To add your opening balance or record opening balance in QuickBooks, you will have to create a new bank account so that you can add your beginning balance. After that, you can review the opening balance entry to ensure that entry is accurate.
Note: Before you create a new bank account it should be decided what you need to record for the opening balance. For instance, you can add the opening balance for the actual bank account that you just created or add a balance for the existing account that has been there for a while.
- To enter the opening balance, you are required to get your bank statements. Alternatively, you can sign to your bank’s website.
- Now, launch your “QuickBooks Desktop”.
- After that, click on the “Company” menu.
- Here, select the “Chart of Accounts” option.
- On the “Chart of Accounts” area, click right anywhere.
- Then, choose the “New” button.
- Here, you are required to choose the account type. You can either select the“Credit Card” or “Bank” as your account type.
- Press the “Continue” button.
- Give the name of the account. If you have several accounts for the same type or the same bank then make sure you mention unique names. This way you can recognize your accounts easily.
- Enter the details in the remaining fields.
- After that, select the “Enter Opening Balance”. If needed, you can update your opening balance. All you have to do is go to the “Change Opening Balance” button and then apply the required changes.
Enter the Opening Balance
Once done setting up a new bank account, you can continue adding the opening balance. But, you should note that adding the information as an opening balance totally depends on how you manage the old transactions.
For instance, if you have no plans to specify the old transaction that is displayed before the opening balance date in QuickBooks Desktop then you should do the following:
- Mention the ending balance as well as the ending date using the recent bank statement.
- Now, press the “OK” button.
As you do so, it will start summarizing all your past transactions. In addition, this becomes easy for you to track your new transactions.
However, if you plan to specify your past transactions in QuickBooks Desktop then you should be aware of the following steps:
- Before getting started, you should decide how far you prefer to go back.
- Once decided, you are required to select the date. The date should be older than the oldest transaction you prefer to track. The opening balance will help you with the summarization only before the date you choose.
- Whichever date you pick, specify it in the “Ending date” field.
- Now, go to the “Ending Balance” field then mention the actual balance for the particular date.
- Here, the “OK” button has to be chosen. By doing so you can prevent counting the old transactions repeatedly.
- Select the “Save & Close” button to record your beginning balance.
Note: Opening balance can also be recorded for the liability, asset, and other types of accounts.
Review the Entry of Your Opening Balance
Now that you have entered the opening balance, you should review it so that you can be sure of the accuracy of the account register. In addition, you should make sure that the Opening Balance Equity account has no remaining balance.
To check the opening balance equity, you can do the following:
- Go to the “Lists” menu.
- Now, select the “Chart of Accounts” option.
- Here, you can search for your “Opening Balance Equity” account. Once found, you can open it.
If you see the balance as 0.00 then you are required to write down the remaining balance. As you do so, run the report of the Balance Sheet for the last year. To do this, do the following:
- Select the “Reports” option.
- Then, hover your mouse over the “Company & Financial” option.
- Click on the “Balance Sheet Standard” option.
- Now, click on the “Last Fiscal Year” by clicking on the “Dates” dropdown option.
- Go to the “Equity” section and select the “Retained Earnings” balance.
Once done with the procedure, you can compare your Retained Earnings balance (of the last year) with the remaining balance which should be in the Opening Balance Equity account. If your balance is matched, it indicates that your data is balanced. However, if the data is not matched then you should get connected with your accountant.
Note: To manage your QuickBooks, you can use other services offered by the accounting software. For instance:
- You can create a bank account for the bank feeds.
- Use the Class Tracking feature to track your account balances.
- Enable the Inventory Inventory for your QuickBooks Desktop Enterprise.
- Set up the QuickBooks Desktop Payroll Subscription.
- Connect the existing payment account.
- Use Intuit Data Protect in order to back up the file.
Now, you have learned how to start a new company file in QuickBooks Desktop. Make sure you follow these steps carefully and enter the valid details.
How to Start a New Company File in QuickBooks Premier and Pro?
The procedure of creating a new company file in QuickBooks Pro and Premier is quite different from the QuickBooks Desktop. In case you are running QuickBooks Premier and Pro, we will enlighten you on how to start a new company file in QuickBooks.
- Open your accounting software and navigate to the “File” menu. This should be located on the top left.
- Go to the “Utilities” option.
- Then, switch to the “Condense data” option.
- Now, you are required to rebuild all your outstanding balances in your accounts receivable. This can be done by regenerating individual invoices or you can create an invoice of balance forward for a round sum customer balance either.
- After that, go to the “Vendors” menu.
- Here, you can click on the “Enter Bill” option and create your vendor balances. Now, your bills will be charged directly to the un-categorized expense account.
- To create a new company file, click the “File” menu from the top left.
- Then, click on the “New Company” option.
- When you see the “EasyStep Interview”, select the “Start Interview” option.
- Follow the on-screen prompts and enter relevant details to finish setting up the new file.
Note: You should remember that payroll users will not be able to use this feature because the payroll files have critical payroll information. Similarly, you cannot use this feature for online banking due to time-related data and security from financial institutions.
To Sum Up
Starting a new company file in QuickBooks is pretty easy. Even if you don’t want to enter the company file details manually, you can use the old company file data. All you are required to save is a copy of the account balances. Thereafter, you can export the lists using the old company data. Once you are done, start creating a new company file and import the list along with the opening balances. Hopefully, you have understood how to create a new company file in QuickBooks Desktop.