
 +1-877-790-2297
In QuickBooks, it is important to keep a record of credit card payments to track your business expenses. By recording the credit card payments, you can prepare the financial report at the end of the financial year. If you have no earthly clue how to receive credit card payments in QuickBooks Desktop and QuickBooks Online, this guide is all you need.
- How to Receive Credit Card payments in QuickBooks Online?
- Method 1: Use Pay Down Credit Card Menu
- Method 2: Create Payment After Reconciling the Credit Card
- Method 3: Transfer the Fund
- Method 4: Use Bank Download
- Method 5: Receive Payment to the Invoice
- Method 6: Make Sales Receipt
- How to Receive a Credit Card Payment in QuickBooks Desktop?
- Method 1: Use Enter Credit Card Charges Menu
- Method 2: Reconcile Your Credit Card Account
- Method 3: Proceed with Payments for Open Invoices
- Method 4: Process Payments in Person
- How to Write the Check?
How to Receive Credit Card payments in QuickBooks Online?
In the latest update, Intuit released a dedicated feature named Pay down credit card. This feature makes your task easy to record credit card payments as it eliminates confusion between selecting which credit card account you need to pay and an account that funds the credit card to create payments.
However, there are other methods you may try. Let’s have a look at different methods of receiving credit card payments in QuickBooks Online.
Method 1: Use Pay Down Credit Card Menu
By clicking on the +New menu, you can find that newly released feature Pay down credit card. Then, you can enter a few details to record the credit card payment.
Here are the steps for that:
- Click on the “+New” button located on the top left.
- From the “Others” section, select the “Pay down credit card” option.
- In the new window, you can enter details such as the type of credit card, the amount that you paid, and the date of payment.
- Also, select the type of account that you used to create payments.
- Other fields such as attachment, memo, etc., can also be filled in.
- Once done, review the details you entered and hit the “Save and close” button.
In case you want to see the credits and debits in your transactions then go to the More button located at the bottom and choose the Transaction Journal option.
Method 2: Create Payment After Reconciling the Credit Card
Another method to receive the credit card payment is to reconcile the credit card. Thereafter, you can pay for the credit card transactions.
Reconcile the Credit Card Transactions
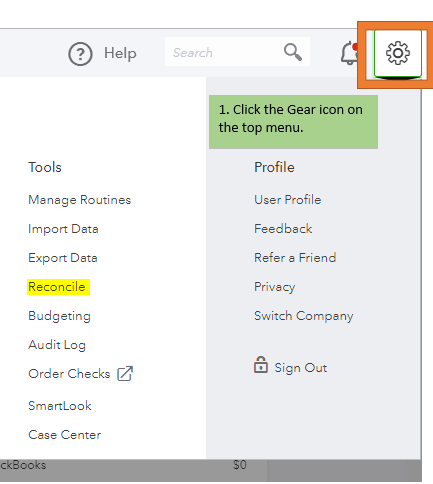
- Navigate through the “Gear” icon.
- Then, click on the “Reconcile” option.
- In case you are reconciling the transaction for the first time then click on “Get Started” and go with “Let’s do it”.
- Choose the credit card account.
- Now, enter the missing transactions and adjust the incorrect transactions if required.
- Then, you can reconcile once you see Zero.
- When you see the reconcile window, place a checkmark for those transactions that are available in the statement.
- Hit the “Finish Now”.
- Click the “Done” button.
Pay Credit Card Transactions
- Pay all or a Portion of Bill Now: Whether you want to pay the whole bill or a portion of it, this option can be selected to proceed.
- Enter a Bill to Pay Later: Select the option only when you wish to pay the bill later, move the amount in your credit card account to the “Account Payable”.
- Done: Select this option when you reconcile. But remember this option should be selected when you do not prefer to record credit card payments.
Note: If your business is based on the bill, cash, bill payments for the credit cards then it may show up as unapplied cash on your profit and loss statement.
Method 3: Transfer the Fund
- Click on the “+New” button located on the top left.
- From the “Others” section, select the “Transfer” option.
- When you see the “Transfer Funds From” window, choose the bank account that paid the credit card bill.
- Now, choose the relevant credit card in the “Transfer Funds To”.
- Add the amount that has been paid.
- If required then you can edit the date.
- Once done, click the “Save and Close” button.
Method 4: Use Bank Download
By transferring the record, you can easily record the payments. For receiving credit card payments in QuickBooks Online, you need to make sure that the bank account and credit card that you use to pay expenses is connected. Thereafter, you can continue to follow these steps:
Transfer the Amount
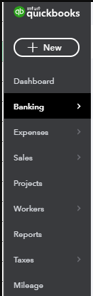
- Click on the “Banking” tab.
- Choose the “Banking” option.
- Then, choose the account from where you wish to send the payment.
- Choose the transactions.
- Then, hit the “Pay Down Credit Card” radio button.
- Select the “Transfer Account” drop-down menu. Here you need to choose the account to which you are sending the transactions.
- Hit the “Confirm” button.
Alternatively, you can follow this easy process to transfer the amount to the selected account.
- Click on the “Banking” tab.
- Choose the “Banking” option.
- Then, choose the account from where you wish to send the payment.
- Choose the transactions.
- Click the “Record as Transfer” radio button.
- Click the “Confirm” button.
Match the Transactions
- Click on the “Recognized” tab.
- Find your transactions.
- Click the “Match” button located under the “Action” column.
Method 5: Receive Payment to the Invoice
- Click the “+New” button.
- Click on the “Receive Invoice Payment” or “Receive Payment” option.
- Add the customer details and date of payment.
- Go to the “Outstanding Transaction” section, click on the “Open invoice” in order to apply the payment. If you want to make a partial payment then change the “Amount Received” field.
- Click on the “Credit Card” option using the “Payment method” drop-down option.
- Click on the “Enter credit card details” and add the credit card information.
- In case you want to save this credit card detail for future reference, click the “Use this credit card in the future” option.
- Click the “Process credit card” option.
- Hit the “Save” button.
- Then, press the “Save and New” or “Save and Close” buttons.
Method 6: Make Sales Receipt
- In case you don’t use the invoice, proceed with the sales receipt by pressing the “+New” button.
- Click the “Make a sale” or “Sales receipt” option.
- Then, fill in the customer information.
- Also, add the service and product to sell.
- Now, choose the “Credit card” option using the “Payment method” drop-down option.
- Click on the “Enter credit card details” option.
- Add the credit card details.
- In case you want to save this credit card detail for future reference, click the “Use this credit card in the future” option.
- Click the “Process credit card” option.
- Hit the “Save” button.
- Then, press the “Save and New” or “Save and Close” buttons.
This is how you can record and receive credit card payments in QuickBooks Online. Whichever method is convenient for you, follow that to record credit card payments.
How to Receive a Credit Card Payment in QuickBooks Desktop?
For QuickBooks Desktop users, there are different ways to record credit card payments. For instance, you can enter credit card charges, reconcile your credit card account, process payment to open an invoice or in person. A invoice is helps to track your items records, learn to create invoice in QuickBooks with the guide. Here are the steps for receiving credit card payments in the Desktop version.
Method 1: Use Enter Credit Card Charges Menu
QuickBooks provides this feature where you can add the credit card account, add the relevant details, and add items that you wish to track.
- Switch to the “Banking” menu from the toolbar on the top.
- When you see a list, choose the “Enter Credit Card Charges” option.
- In a new window, choose the “Credit Card Account” option.
- Here the “Purchase/Charge” option is marked by default. But if you wish to refund the credit then select the “Refund/Credit” option.
- Now, select your vendor using the “Purchased from” drop-down option.
- Add the relevant date.
- In the “Memo” section, add additional details related to your purchase. Although this is an optional step.
- Then, add the “Items” or “Expenses” that you want to track.
- Hit the “Save and Close” button.
Method 2: Reconcile Your Credit Card Account
Before you write the check, it is suggested to reconcile the credit card with your QuickBooks account. By doing so, it will be easier for you to record the payment. This will also prevent you from errors when creating payments.
- Click on the “banking” option from the top menu bar.
- Then, click on the “Reconcile” option.
- Choose the credit card account (that you wish to reconcile) using the “Account” drop-down option.
- Now, switch to the “Statement Date” and add the credit card statement date.
- Then, go to the “Ending Balance” field and add the ending amount as mentioned in the credit card statement.
- If necessary, add the finance charges by specifying the fees, date, and assign a category using the “Account” drop-down option.
- Hit the “Continue” button. This will take you to the “Bank Reconciliation” screen.
- Here you will find the card transaction. You can match this transaction with your credit card statement.
- Keep on checking the transaction until you see the difference becomes zero.
- In case the difference does not turn to zero, it indicates you have made mistakes. Find out the fault in your process.
- Once the difference is finally zero, you can continue reconciling.
- After the credit card is reconciled successfully, it takes you to the “Write a check for a payment now” option.
- Click the “OK” button.
Method 3: Proceed with Payments for Open Invoices
In case you send the invoice to the customer online but customers prefer to pay you in person then you can ask them to pay online. For this, customers need to hit the Pay Now button present in their email.
Once you get paid, match the payment details with the existing ones. Here are the steps for that.
- Click on the “Customers” option.
- Go to the “Receive Payments” option.
- Now, select the relevant customer using the “Received From” drop-down menu.
- Go to the “Transaction” section and check the box located next to the invoice to which you wish to apply the payment. Make sure it is the invoice you have sent them already.
- Then, choose the payment method. It can be Check, Cash, or Visa. For credit card payments, selecting a Visa will be beneficial.
- If selecting “Visa” as your payment method then select the following:
- Add the credit card details.
- Hit “Done”.
- If you use “Magtek card reader” then choose the “Insert/Swipe Card” option to swipe your card.
- Click the “Process Payment”.
- Once done, click the “Save & Close.
Note: If you select Check as your payment method then make sure that you receive a signed authorization form. By doing so your customer can permit you to debit their account.
Method 4: Process Payments in Person
Your customers can also pay online if you send them an invoice or you can process the payment in person. However, if a person calls you to make payment then you don’t need to send them an invoice; make a sales receipt instead.
- Click on the “Customers” option.
- Select the “Create Sales Receipt” option.
- Now, select the relevant customer using the “Customer:Job” drop-down menu.
- Add the item for which your customer is paying you.
- Enter the sales receipt details.
- Then, choose the payment method. It can be Check, Cash, or Visa. For credit card payments, selecting a Visa will be beneficial.
- If selecting “Visa” as your payment method then select the following:
- Add the credit card details.
- Hit “Done”.
- If you use “Magtek card reader” then choose the “Insert/Swipe Card” option to swipe your card.
- Click the “Process Payment”.
- Once done, click the “Save & Close.
If you add the email address of your customer, this will also send your customer a copy of sales receipts.
How to Write the Check?
Once you are done reconciling, proceed with writing the check. Alternatively, you can write the check directly from the QuickBooks Homepage. However, it is suggested to write a check after reconciliation.
- Click on the “Banking” option.
- Select the “Write a check” option.
- From the “Bank account” window, choose the payment account that you use to pay credit card charges.
- Now, choose the credit card account that you are paying.
- Then, search your vendor name (for whom you are making the payment) from the “Pay to the order of” drop-down option.
- Add the check number and the correct payment date.
- In the “$” field, add the amount of your payment.
- Now, in the “Memo” field, add the description related to the payment.
After adding all the details, you can review the fields. If everything looks fine, hit the Save and New or Save and Close button.
To Wind Up
Recording the credit card payment is one of the important tasks to keep your payment list organized. By doing so, you can track your sales and expenses as well. For your convenience, here, we have shown How to Delete Expense Transaction in QuickBooks Online? Hopeful you find this guide useful!
Besides that, if you want to know how to receive payments in QuickBooks Online, check this detailed guide.