
 +1-877-790-2297
When you receive a payment from your customer, it is required to add the payment to your QuickBooks account. Recording the invoices is also part of the Accounts Receivable workflow. Hence, it is important to record the payment in the Receive Payment section. If you have no clue how to receive payments in QuickBooks Online and QuickBooks Desktop, we will enlighten you.
- What Does Receive Payment Mean in QuickBooks?
- How to Receive a Payment in QuickBooks Online?
- How to Receive Payments in QuickBooks Desktop?
- How to Receive Multiple Payments in QuickBooks Online?
- How to Receive ACH Payments in QuickBooks?
- Method 1: Record ACH Payment by Adding the Customer’s Bank Account
- Method 2: Record ACH Payment by Adding the Outstanding Transactions
- How to View Payments Received in QuickBooks?
What Does Receive Payment Mean in QuickBooks?
If your customer pays an invoice, you process it outside of QuickBooks such as PayPal, Square, or POS system. This is important to record such customer payments in order to categorize them and keep them in the record. This will connect your payment transaction to the original invoices. It helps to keep your account balanced.
However, there are a few errors one can encounter while recording the payments in QuickBooks. For example:
- Invoices that are paid remain open: If you do not apply payments to the correct invoice, it appears as outstanding even after the customer has paid the amount. This leads to inaccurate collection efforts and affects customer relationships.
- Overstated balance: If you apply the payments incorrectly, the amount that your customer owns can be inaccurate.
- Overstated sales: Received payments can be recorded as deposits and the sales receipts can be recorded as income. However, the income was recorded already when you created the original invoice.
To prevent such errors, it is important to record your payments properly. To not fall into any mistakes, you should first search for the open invoices and then record the sales receipt. Learn with us how to receive payments in QuickBooks Online and QuickBooks Desktop with step-by-step instructions.
How to Receive a Payment in QuickBooks Online?
To receive payment in QuickBooks Online, you need to find the open invoice and apply the payment sent from the customer. Follow these steps carefully as some steps require considerable attention.
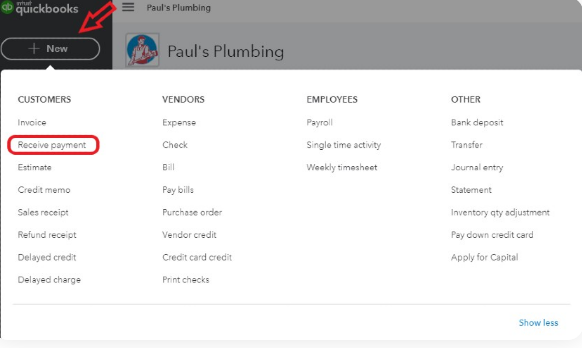
Open QuickBooks Online Receive Payment Page
- Log in to the “QuickBooks Online”.
- Go to the “New” button located on the top left.
- Click on the “Receive Payment” option from the “Customers” section.
Find the Open Invoice
- Now, locate the open invoice by selecting the customer located on the top right from the “Receive Payment” screen. This will show you the invoices in the “Outstanding Transactions” section.

- Here you can fill in the following details:
- Customer: Choose the customer who sent you the payment.
- Payment Date: Add the date when you received the payments.
- Payment Method: You can either select cash or check as a mode of payment.
- Reference Number: Add the check number. In case you received the case then leave it blank.
- Deposit To: If it is the only check you need to deposit then you can choose the relevant bank account. But, if the check can be combined with cash or other checks then record the payment that is received in Undeposited funds.
- Amount Received: Add the amount you received on the check or of cash.
- Invoice Detail: Once you select the customer in field A, you will see the invoice details for each outstanding invoice. Multiple invoices can also display if there are more outstanding invoices.
- Payment: Add the amount that you received in field F in order to apply it to every invoice available in field G.
- When done adding the details, click on the “Save and Close” button. This will record your transaction.
Verify If You the Payments Correctly
- Go to the “Menu” bar on the left.
- Hover your mouse cursor over the “Sales” option.
- Click the “Customers” option.
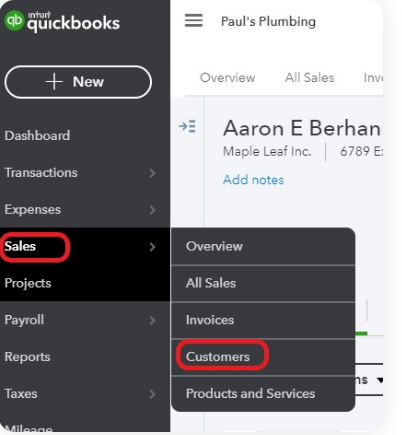
- Here, find the customer for whom you recorded the payment. Once found, click the customer name.
- Now, you will see the list of the latest transactions for a customer. Make sure you verify the following two items:
- Invoice marked paid: Check if the invoice for which you received the payment is not showing as “Paid”.
- Payment recorded: Check if the recorded payment is shown as “Closed”. If it shows “Open” then it indicates the invoice is not applied properly.
Thereafter, you can make the possible changes to the detail and apply the invoice again. Make sure you verify the status later if the payment is applied correctly.
How to Receive Payments in QuickBooks Desktop?
QuickBooks Desktop users can also record payments received by the customers. Here we will show the procedure of recording payments in Windows and Mac PC. If required then you can apply the discount for the early payments. Let’s know how to enter payments received in QuickBooks Desktop.
Record Payment in Windows
- Go to the “Homepage” or “Customers” menu.
- Click on the “Receive Payment” option.
- Select the name of the customer using the “Received From” drop-down menu.
- Add the “Amount received”.
- Ensure that you add the correct data and then select the “Payment method”.
- Click on the invoice that you want to pay.
- If there are any credits and discounts to add then select the “Discounts and Credits” option.
- Click the “Save & Close” button.
Record Payment in Mac
- Go to the “Customers” menu.
- Click on the “Receive Payments” option.
- Select the “Create a Payment” option.
- Fill in all the fields.
- Now, click on the charges and outstanding invoices for which you are receiving the payments. Then, you will see the check next to the charge or invoice.
- Select the way to deposit payment. You can select the “Deposit To” option in order to add the bank account. Or, select the “Group with other undeposited funds” option to hold the payment in the undeposited funds’ account.
- Hit the “Save” button.
In case you wish to edit the payment then click on the payment available in the list and then edit the details. To find the payment history for a customer, click the Show/hide customer information icon.
Apply Discount for Early Payment
- Go to the “Customers” menu.
- Click on the “Receive Payments” option.
- Add the payment of your customer in the “Receive Payments” window.
- Click on the “Discount Info”.
- Change the discount amount if required.
Note: QuickBooks program calculated the suggested discount depending on the payment terms with your customer and payment date.
- Add the account name that you use in order to track the discount.
- Click the “Save” button.
In case you wish to apply discounts to the statement changes then you can click on the Account Receivable register for your customer and add the Discount item.
How to Receive Multiple Payments in QuickBooks Online?
QuickBooks allows you to record and receive payments from your customer. However, you can apply it only one at a time. Here are the steps for that.
- Click on the “Sales” button.
- Switch to the “Invoices” tab.
- Search for the “Open Invoice”.
- In the “Actions” column, click on the “Receive Payment”.
- Select the “Payment Method”.
- Add the partial amount that you want to pay to the invoice.
- Place the checkmark on the invoice that you need to pay.
- Click on the “Save and Close” button.
By following these steps, you can select one or more invoices. This way you can apply payments to the multiple invoices.
How to Receive ACH Payments in QuickBooks?
To record the ACH payment (QuickBooks bank transfer) in QuickBooks, you are required to send and receive the payments electronically. This can be done in two different methods.
Things to Remember for ACH Payments
- If you are using QuickBooks Payments then you can accept the payment by credit card. However, the credit card can charge a fee for repeated sales.
- You can process ACH transactions, bank transfers, or e-check for the fee of 50 bucks for each transaction.
To record the ACH payments from invoices in QuickBooks, you can follow any of the two methods:
Method 1: Record ACH Payment by Adding the Customer’s Bank Account
- When creating a recurring sales receipt or one-time receipt on receiving a payment, you can select the “Check” or “ACH payment”.
- Now, add the information of your customer’s bank account.
- Complete the authorization from the customer.
- Fill in the entire form.
- Proceed with the transfer and get paid.
Method 2: Record ACH Payment by Adding the Outstanding Transactions
- Go to the “Sales” tab located on the left bar.
- Then, make sure that the “Invoices” option is selected at the top of the page.
- Click on the “Receive Payment” option next to the invoice you require.
- In the “Receive Payment” window, click on the “add any outstanding transactions”.
- Hit the “Save and New” button.
This way you can record and receive the ACH payment in QuickBooks Online and QuickBooks Desktop.
How to View Payments Received in QuickBooks?
By generating a report, you can view all the payments received by your customer for the past 12 months. Running the Transaction List by Customer report will be really helpful here. Here are the steps for that.
- Click on the “Reports” option.
- Find the “Transaction List By Customer”.
- Click on the “Customize” button.
- Select the “Report Period”, e.g., “Last 365 days”.
- Hit the “Filter” button.
- Click on the “Transaction Type” and choose “Payments”.
- Hit the “Run Report” button.
Once you perform these methods, your report will start running. Thereafter, it will list all the payments you have received from your customer in the past. It becomes easy to examine your past payments with the customers.
Final Thoughts
If your customers send the payments then you can easily add them to the Receive Payment section. This will help you to keep the payment recorded and organized. In this guide, we have discussed how to receive payments in QuickBooks Online and QuickBooks Desktop.
Besides that, you can record multiple payments, ACH payments, and view payments if required in the future. If you want to learn How to Create an Invoice in QuickBooks?, we have prepared this detailed guide for you. Read it now.