
 +1-877-790-2297
Creating an invoice in QuickBooks is helpful for a number of reasons. You can keep a track of what you have sold and to whom you have sold. To create an invoice in QuickBooks, you need to follow certain methods in the correct sequence. This post has been specially prepared to help you with several methods for correctly preparing invoices in QuickBooks, QuickBooks Desktop, QuickBooks Desktop Pro, QuickBooks Online, and QuickBooks 2016. We’ll be using differing methods. Based on the method that seems the most convenient to you, you can make the invoice in the Intuit accounting software.
- How Do You Create an Invoice in QuickBooks?
- How to Create an Invoice in QuickBooks Desktop?
- How to Create an Invoice in QuickBooks Desktop for Sales Order?
- Option 1: Creating an Invoice via the Window of Sales Orders
- Option 2: Creating an Invoice via the Window of Invoice
- How to Create a New Invoice in QuickBooks Desktop for an Estimate?
- Option 1: Creating an Invoice via the Window of Estimate
- Option 2: Creating Invoices via the Window of Invoice
- How Do I Make an Invoice in QuickBooks Desktop Pro?
- How to Create an Invoice in QuickBooks Online?
- How should I Make an Invoice in QuickBooks 2016?
How Do You Create an Invoice in QuickBooks?
For preparing an invoice in the QB software, you can prefer the Send Your First Invoice option available on the dashboard. Then you can write the details of your customer and save them. After that, you can use the Add option, input the details needed, and start preparing the invoice.
- Via the dashboard, choose the option of “Send Your First Invoice”.
- For a customer that hasn’t been added to QB, input the details now.
- Press “Save” for including that customer in the “Customer List”.
- Choose the terms of payment.
Remember: You may find “Net 30” here. This option will indicate that the invoice has to be paid within 30 days after the date of your invoice.
- This is followed by the inclusion of products or services sold. Press “Add” to do so.
- Input your customer’s “Email ID” for emailing the invoice to her/him.
- Scrolling to the bottom, select “Print”/”Preview”. Then select “Close”.
- Press “Customize” for customizing the invoice. Then click on “Edit Current” and introduce the changes.
- In case a logo has to be added, pick its file.
- Finalize a template for the invoice.
- For online payments, choose “Get Set up”.
- Now, your invoice will be ready for emailing. Press “Save and Send”. Then exit.
Creating Invoice in QuickBooks Desktop
To make invoices in QB Desktop, you can follow 4 different methods. These methods will assist you in making the document on QuickBooks Desktop and QuickBooks Desktop Pro using various ways. These ways will utilize the sales order and the estimate.
How to Create an Invoice in QuickBooks Desktop?
For preparing an invoice in QuickBooks Desktop, you can head to the Customers option on the software’s Home screen. You can choose the option of Create Invoices and then press the Customer: Job option. Here, you can select the required option and fill in the required information. In case you wish to include any discount, you can do so. In closing, you can save the changes you have made.
- Go to the “Home” screen of “QuickBooks Desktop”.
- Click on “Customers”.
- Then opt for the option of “Create Invoices”.
- Tap on the dropdown of “Customer: Job”.
- Choose either a “Customer Job” or “Customer”. In case these options are not available, you can press “Add New”.
- You will be asked to write the information required such as “Data Invoice”, “Sold to”, “Bill to”, “Terms”, etc.
- Navigate to the area of “Detail”. Choose items you can see here.
Remember: At the time of adding or choosing any time, the amount, as well as the description, will automatically come. This will depend on the unit cost and description at the time of setting it up. While preparing the invoice in the software, you can modify these options.
Alert: The steps 8 to 20 are optional.
- In case a discount has to be applied, an item of discount will have to be prepared. For this, click on “Home”.
- Opt for “Lists”.
- Choose the “Item List” option.
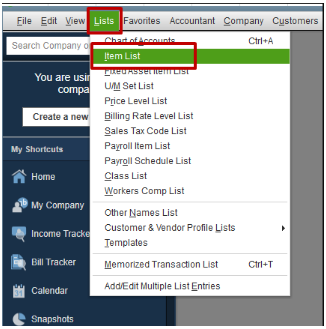
- Now, you have to right-tap anywhere on the screen and press “New”.
- Next, click on the dropdown of “Type”.
- Choose “Discount”.
- Either input the “Item Name” or “Number”.
- Now, add a “Description” in brief.
- In the field of “%” or “Amount”, the “Percentage” or “Discount Amount” has to be filled in.
Remember: In case the amounts of the discount differ, it will be suggested to leave the field of “%” or “Amount” blank. You can fill in this amount in the sales form.
- Click on the dropdown of “Account”.
- Select your income account that is used for tracking the discounts provided to your customers.
- Choose a “Tax Code” based on the item.
- Press “Ok”.
- Then tap on “Save & Close”.
How to Create an Invoice in QuickBooks Desktop for Sales Order?
Here, you can learn how to create an invoice in QuickBooks Desktop for the sales order. This will be done by using 2 options. The first option will make use of the sales order’s window while the second one will use the invoice window.
Option 1: Creating an Invoice via the Window of Sales Orders
Using the sales order’s window, you can open the software and move to the tab of Sales Orders. Using the Create Invoice option, you can move forward. You’ll come across an option informing Create Invoice for All of the Sales Order(s). After choosing it, you can make any adjustments as per your choice and then save them.
- In QuickBooks, go to the tab of “Sales Orders”.
- Click on “Create Invoice”.
- Next, choose “Create Invoice for All of the Sales Order(s)” in case you would like to include every item. Or choose “Create Invoice for Selected Items” in case only certain items have to be added to the invoice.
- In case any changes have to be made, make them now.
- Press “Save & Close”.
Remember: For adding the changes, you can go through the item list. In “To Invoice/Invoiced”, you add a quantity for every item. Should you like to not add any item to the list, please input “0” in the place of quantity.
Option 2: Creating an Invoice via the Window of Invoice
This is a short way of preparing the invoice in QuickBooks using the invoice window. This window will give you the Customer option. Followed by this, you can tap on Create Invoices. This is accompanied by choosing that sales order in which the items have been placed. Using that sales order, you can create the invoice in QB Desktop.
- Enter the software’s “Home” screen.
- Click on “Customer”.
- Press “Create Invoices”.
- Pick a sale order(s) carrying the items which have to be entered in the QB invoice.
- You can initiate certain changes as per your choice. In the item list, you can fill in every item’s quantity in the column named “To Invoice/Invoiced”. If the items do not have to be listed, you can write “0”.
- Tap on “Save & Close”.
How to Create a New Invoice in QuickBooks Desktop for an Estimate?
To create invoices in QuickBooks Desktop, many users utilize the estimate option. For the payment details explanation you can create Proforma Invoice. Should you like to try out the same, you can either visit the window of estimate or the window of invoice. The details for both of them have been mentioned as follows.
Option 1: Creating an Invoice via the Window of Estimate
In this 5-step method, you can first opt for the right estimate. Next, you can push the Create Invoice option. After that, check whether or not progress invoicing has been enabled. In case it has been turned on, the items, as well as their quantities, have to be specified. Once they have been specified in the invoice, you just have to save the changes.
- The right estimate has to be opened.
- Tap on “Create Invoice”.
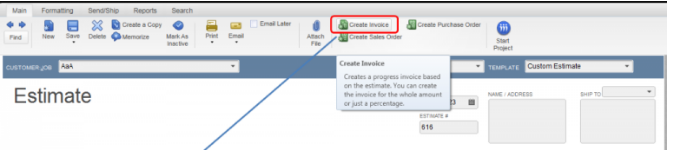
- In case progress invoicing has been enabled, mention the items and their quantities for entering in the invoice.
- Now, the invoice will be available. Make the changes you wish to.
- Then save everything and close it.
Option 2: Creating Invoices via the Window of Invoice
Answer one of the most asked questions, “How do you create an invoice in QuickBooks Desktop using the invoice window?”, we have laid a method right here. On the home screen of QuickBooks, you have to opt for Customer. Then you can choose the Create Invoices option. After making a selection for Customer: Job, you can move to the Estimates window and perform the remaining directions.
- Via the “Home” screen, select “Customer”.
- Now, opt for “Create Invoices”.
- Tap on “Customer: Job” for picking “Customer Job”/”Customer”.
- In the window of “Estimates”, that estimate has to be selected which you wish to add to the invoice.
Remember: Only 1 estimate can be selected for the invoice. In case progress invoicing has been enabled, you can select what has to be added to the invoice when a prompt is received.
- When you see the invoices, make the changes you wish to.
- Lastly, choose to save and then exit.
How Do I Make an Invoice in QuickBooks Desktop Pro?
The users of QuickBooks Desktop Pro should definitely take a look at this method for easily making an invoice. In the Menu Bar, you’ll come across Customers/Create Invoices. Selecting this, you can pick Template. The option of Customer: Job will help you in adding your customer’s information. After filling in Bill to, Ship to, Tax, and other such fields, you’ll be closer to making the invoice.
- Via the “Menu Bar”, click on “Customers” or “Create Invoices”.
- Tap on “Template” given at the top-right.
- For including the information of the customer, use “Customer: Job”.
- Pick one customer using the option of “Customer List”.
- Fill in “Bill to” as well as “Ship to”.
- In case the dropdown is being used for choosing the customer, his/her information will be automatically taken. For manually adding it, click on “Terms”. Additionally, tap on “Tax” and “Customer Tax Code” for specifying the other information.
- Choose the date via the “Date” field.
- The field of “Invoice #” will get auto-filled.
- Scrolling to the bottom, input every purchased item via the “Item” column.
- Fill in the “Qty” field and “Rate” field.
- In the field of “Amount”, provide the line item’s total. In case a rate or quantity has been specified by you, the amount will be auto-calculated.
- In case the invoice has to be printed later, click on “Main” and select “Print Later”.
- Then tap “Save & Close”.
- If more invoices have to be prepared, then “Save & New” will have to be chosen.
The users of QuickBooks Desktop Pro 2019 can visit the link for “See History” near “Invoice” for viewing the “Invoice History”. Also, once the invoice has been made, a record for the same will be made in the account of “Accounts Receivable”. In the “Chart of Accounts”, you can check the balance for that account.
How to Create an Invoice in QuickBooks Online?
Should you like to learn how to create an invoice in QuickBooks Online, you can initially tap on +New. After that, you can pick Send Invoice/Invoice as well as Customer. Next, you can ensure your customer’s information and verify the invoice’s date. For adding a due date, you can select the Terms option. To know the other steps for making your invoice, please read below.
- Press “+ New” in QBO.
- Select “Send Invoice”/”Invoice”.
- Click on “Customer” pick a customer.
- Check the information about your customer.
- Ensure the date of the invoice.
- Click on “Terms” and opt for the due date.
Remember: “Net” will indicate the days till the payment will remain due. By default, it will be thirty days but can be changed as well.
- Navigate to the column named “Product” or “Service”. In case a new service/product needs to be created via the invoice, you can tap on “+Add New”.
- This is followed by adding a rate, quantity as well as the change amount in case required.
- Choose the option of “Tax”.
Remember: In the “Business” view, options such as “Flat Rate”, “By Item”, and “By Hour” will be seen. You can pick these options and input the amount as well as quantity.
- Tap on “Save and Send”. You can choose “Save and Close” if you don’t want to send the invoice right away.
Remember: In “QuickBooks Simple Start”, this option will be given as “Send”.
For reviewing the invoice, you can go to “Sales” and choose “All Sales”/”Invoices”. In Status, you can review it. For viewing the invoice of your customers, you can visit the tab of “Customers”.
How should I Make an Invoice in QuickBooks 2016?
If you’re a user of QuickBooks 2016, you can select Customers and then go to Create Invoices. To pick the template, tap on the dropdown for Template. Then navigate to Customer: Job. Followed by this, a class can be provided to the document. Moving forward, you can set its date. The steps that remain can be found as follows:
- In QB, opt for “Customers”.
- Tap on “Create Invoices”.
- Going to the “Template” dropdown, choose the invoice form or template.
- Choose the options you prefer in the dropdown list of “Customer: Job”.
- Now, your invoice has to be given a class. This is an optional step.
- Add a date for the invoice by pushing its tab multiple times.
Tip: Pressing these keys/symbols will perform the following functions:
- “+” – For moving the date forward
- “-” – For moving the date behind
- “T” – For selecting today’s date
- “M” – For changing the date to the month’s 1st day
- “H” – For changing the date to the month’s last day
- “Y” – For changing the date to the year’s 1st day
- “R” – For changing the date to the year’s last day
- To view the calendar, press the button given towards the right.
- As an optional step, fill in the invoice number in the box.
- If required, enter “Bill to” as well as “Ship to”.
- In “P.O. Number”, enter the number of the purchase order.
- Choose the terms of payment. Also, provide the sale representative’s name if needed.
- In case the shipping date is not the same as the invoice date, specify it. Also, mention the method of shipping.
- Enter “FOB” or “Free-on-Board”.
- Provide the items to be sold. Also, include the special items, if any, via “Code”.
- Fill in “Customer Message” if required.
- Mention the sales tax. Also, create a memo if you wish to.
- Opt for “Print Later” as per your preference.
- Then press save “Save & New”/”Close”.
We hope this method easily helped you know how to create an invoice in QuickBooks 2016.
Final Verdict
This post walked you through many methods for preparing invoices in QuickBooks and its different versions. For carrying out each method, we provided every piece of direction needed. These directions were laid in simple language for easy understanding and execution. We hope these methods did their job and you were able to successfully create your invoices. In case any of your doubts were left uncovered, do make sure that you check out the section of FAQs given at the end of the post. Lastly, keep reading our posts to understand all the features of this accounting software.
Frequently Asked Questions
This section will introduce you to 4 FAQs for a better understanding of preparing invoices in this accounting software.
Ans. QuickBooks does allow you to prepare a batch of invoices. After selecting “Create”, you can opt for “Multiple Invoices”. As you press the “Add” button, you’ll be able to prepare the invoices.
Ans. As the need for recording the sales transactions arises, you can choose to create an invoice in QB. You can also make it when you wish to track the accounts receivable.
Ans. In QB, you can form an invoice. It would work as a bill. It will state the sold items, their cost, and other crucial information related to the selling of the items.
Ans. QuickBooks invoicing may not require a subscription fee on a monthly basis. In the case of online payments, your customer would pay online. So, the transaction fees will be applied.