
 +1-877-790-2297
Direct Deposit is a smart way to send fast payments to your employees. With this paperless transaction method, vendors or suppliers can receive payment on time. However, due to some reasons, you may require to update or change the bank information from where your payroll taxes and direct deposits are withdrawn. With this easy guide, we want to enlighten how to change direct deposit bank account in QuickBooks Desktop Payroll. If you are seeking the same help, continue reading this guide and find out the relevant information.
In this detailed discussion, you will learn how to change direct deposit bank account in QuickBooks Desktop for different versions including Payroll Standard, Assisted, Basic, or Enhanced.
- Important Things to Consider
- How to Change Bank Account for Direct Deposit in QuickBooks Desktop Payroll?
Important Things to Consider
Before moving forward, we want you to consider a few things regarding changing bank account details. If you are planning to change the bank account details immediately due to any suspicious activity, check out the following points based on the version you are using:
- If you are using QuickBooks Desktop Payroll Standard, Basic, or Enhanced then you have to do the following:
- You will have to download a form for the Direct Deposit Bank Account Change.
- After completing the form, you need to contact the team of QuickBooks Desktop Payroll to send the form through Intuit File Exchange.
- In case you have QuickBooks Payroll Assisted and wish to change the bank account details, we suggest you do the following:
- Use the QuickBooks Assisted Bank Change Form. Please note that this type of form opens in an Adobe Reader. Also, be sure that you complete the form properly and ask the payroll admin or primary principle to sign it.
- Then, you will have to upload the bank change form after completing it. Remember that the bank account change time is 3:00 PM P.T. In case you process the request after this time then it will be processed the next day (business day).
Once you ensure the aforesaid details, you can continue changing the bank account details in QuickBooks Desktop Payroll.
How to Change Bank Account for Direct Deposit in QuickBooks Desktop Payroll?
QuickBooks Desktop software uses the Direct Deposit feature to pay employees in a smart manner. For security reasons, you may need to update the bank account details. To proceed with this, one has to perform a series of steps.
For instance, you are required to collect the correct information for a bank account, payroll PIN, and the address of the officer of principle. After that, you need to set up the bank account using the Chart of Accounts menu. Once done, search for the pending payroll transactions and pending tax payments. At this point, you can change the bank account with the payroll service and verify the details of your bank account. You can even change the default bank account if needed.
To learn this entire procedure how to change direct deposit bank account in QuickBooks Desktop with steps by step instructions, check out the following discussion:
1: Collect the Bank Account Information
The first step is to make sure that you have the accurate details for the bank account, the address of the officer of principle, and the correct PIN of payroll.
- Bank account information should include the bank name, account number, routing number on the check. However, it is suggested not to use the routing number from the deposit slips.
- Having the officer’s address of principle is also necessary. This should not be a P.O. Box. Please note that as a licensed money transactions sender, Intuit payments should meet the legal requirements and applicable laws.
- Also, get the correct Payroll PIN that will be required to send the payroll to Intuit.
Now that you have collected the required information regarding the bank account, you can continue following other steps.
2: Create the Bank Account
For creating the bank account, you need to go through the Chart of Accounts menu. You will require this account so that the payroll transactions can be posted to the appropriate register. Follow these steps to set up the bank account in the QuickBooks Chart of Accounts.
- Go to the “Lists” menu.
- Now, move to the “Chart of Accounts” menu.
- Then, click on the “Accounts” tab.
- Press the “New” button.
- Select the “Bank” option.
- Hit the “Continue” button.
- At this point, you need to add the bank account details.
- Press the “Save and Close” button to save changes.
The account setup process is now completed. After this step, you are required to ensure that there are no pending payroll transactions and tax payments.
3: Verify the Pending Payroll Transactions and Tax Payments
Here, you will have to make sure that there are no pending payroll transactions and pending tax payments in your account. Carry out these steps to verify the information.
Pending Tax Payments (Payroll Enhanced Only)
- Click on the “Employees” menu.
- Move to the “Payroll Center” option.
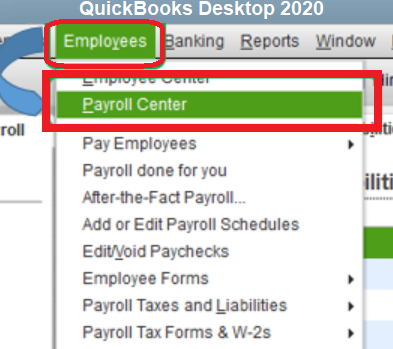
- Choose the “Pay Liabilities” tab.
- Now, click on the “E-payments” tab. Here, you will see if there are any pending tax payments.
Pending Payroll Transactions
- Go to the “Employees” menu.
- Then, click on the “Payroll Center” option.
- Choose the “Payroll” tab to see the pending payroll transactions.
This step is important to ensure that your bank account change has been done successfully. It also helps to be sure that the payroll funds withdraw from the correct account.
Step 4: Change the Bank Account with the QuickBooks Desktop Payroll
After setting up and tracking the bank account, you can update the details in QuickBooks Payroll Management Portal. This can be done based on the QuickBooks Desktop Payroll version. Let’s know how to change direct deposit bank account in QuickBooks Desktop for the following versions:
QuickBooks Desktop Payroll Standard, Basic, and Enhanced
- Click on the “Employee” menu.
- Choose the “My Payroll Service” option.
- Now, click on the “Accounts/Billing Information” option.
- Here, you can sign in with the “Intuit Account” sign-in details.
- Then, move to the “Payroll Info”’ section.
- From the “Direct Deposit Bank Account” section, click on the “Edit” button.
- After this, add the “Payroll PIN”.
- Then, press the “Continue” button.
- Here, you can add your bank account details. Once done, you will receive a confirmation message.
- Now, press the “Close” button.
QuickBooks Desktop Payroll Assisted
- Click on the “Employees” menu.
- Then, select “My Payroll Service”.
- Now, click on the “Billing/Bank Information” so that you can access the “Payroll Service Account Maintenance” page.
- From the “Bank Account Information”, click on the “Edit” button located next to the “Bank Account”.
- Here, you enter the “Payroll PIN”.
- Press the “Continue” button.
- Once done, add the new bank details and hit the “Update” button.
- When you get the confirmation message, click the “Close” button.
By following these steps, you can easily change the bank account information with the QuickBooks Desktop.
Step 5: Verify the Bank Account
Once the bank account details are added, it usually takes 2-3 business days. The new account will be verified with two test transactions. But, before you verify your accounts, there are a few things you should be aware of the test transactions:
- When you update the bank account details, the two test transactions will display in the bank statement within 2-3 business days.
- You must check the amount by Intuit Payroll Service. It must be less than $1.00.
- To check the amount, users can connect with the bank or verify the bank statement online.
- You will get the refund of the account within 3-5 business days for these amounts.
Now, in order to verify the bank account, you can check out the following details based on the QuickBooks Desktop version.
QuickBooks Desktop Standard, Basic, and Enhanced Payroll
- Launch “QuickBooks Desktop” on your PC.
- Then, click on the “Employees” menu.
- Select the “My Payroll Service” option.
- Then, click on the “Account/Billing Information” page.
- Now, log in to the account using Intuit Account sign-in credentials.
- After that, click on the “Payroll Info” option.
- From the “Direct Deposit Bank Account” page, click on the “Verify” button.
- At this stage, you need to add the “Payroll PIN” and confirm the details.
- Once done, click on the “Submit” button.
- When you receive the confirmation message, you can click on the “Return to QuickBooks”.
QuickBooks Desktop Assisted Payroll
- In “QuickBooks Assisted”, click on the “Employees” menu.
- Then, click on the “My Payroll Service”.
- Here, select the “Billing/Bank Information” page to access the page of “Payroll Service Account Maintenance”.
- Go to the “Bank Account Information” page and hit the “Verify” button.
- As the “Verify Bank” window displays, add the two test transaction amounts. These amounts should be from the bank statement with no decimals into the fields of “Amount 1” and “Amount 2”. Please note that it is not important to follow orders when entering the amounts.
- Here, you can type and confirm the “Payroll PIN”.
- Press the “Continue” button.
- Select the “Submit” button.
- After receiving the confirmation message, you can click on the “Return to QuickBooks”.
These steps will help you to verify your bank account with two test transactions. Now, you can use the bank account with the payroll service.
Step 6: Change the Default Bank Account
In the payroll preferences, you have made changes for the default accounting. This is to make sure that the tax payment and payroll transactions post to the right account. Carry out these steps to change the account preferences:
- Navigate to the “Employees” menu.
- Then, click on the “Send Payroll Data”.
- Now, go to the “Send/Receive Data” screen and choose the “Preferences” option.
- From the “Account Preferences” section, pick a bank account using the drop-down menu.
- Click the “OK” button to save changes.
- Now, click on the “Close” button to close the “Send/Receive Data” screen.
After that, you are required to change your default bank account for the Payroll Service liability check. Here are the steps for that:
- From the “Employees” menu, click on the “Send Payroll Data”.
- Now, select the “Preferences” option. This will open a “Payroll Service Accounts” screen.
- From here, you need to choose a new bank account. This can be done by using the “Pay Payroll Liabilities with” drop-down menu.
- Then, press the “OK” button.
- Click on the “Send” button.
- Now, enter the Payroll PIN.
Now you have performed all the necessary steps for changing the direct deposit bank account details in QuickBooks Desktop Payroll Standard, Basic, Enhanced, and Assisted version.
Final Verdict
There can be any reason to change the bank account details for payroll service. Here, we have shown you how to change direct deposit bank account in QuickBooks Desktop. This series of steps can be performed on QuickBooks Desktop Standard, Basic, Assisted, and Enhanced Payroll.
Learn more about the post petty cash and inventory tracking feature in QuickBooks through the following links: