
 +1-877-790-2297
Chart of Accounts keeps the necessary details of your business. It contains a list of financial transactions, items, vendors, customers, classes, and more. With these categorizations, you can manage your accounts properly. QuickBooks’s feature Chart of Accounts also helps you to gain insights into the financial health of your business. This data can also be exported so that you can analyze where your business stands. In case you have no idea, we will guide you on how to export chart of accounts from QuickBooks Desktop and QuickBooks Online.
What is the Purpose of the Chart of Accounts in QuickBooks?
If you are planning to create an organized company file, this may take a lot of time as it requires effort. Although you can use the inbuilt templates and reports, exporting the Chart of Accounts can simplify your task while saving tons of hours. Once you export the Chart of Accounts in the supported format, you will get the standard chat format where you can see the insights into your expenses and other details. The data you export can also be shared with others or you can use or create a portable file in QuickBooks.
To export the Chart of Accounts of vendors, customers, and employees, you can continue following our guide.
How to Export Chart of Accounts from QuickBooks Desktop?
To follow the procedure of exporting the Chart of Accounts in QuickBooks Desktop, one has to take a backup of the QuickBooks company files. This is important to create a backup of all your mandatory files so that you can restore the data that you may miss during or after the export.
In addition, you are required to use QuickBooks with administrative rights. This way you can easily commence the process of export or import. Moreover, you need to make sure that you are not using the multi-user mode as the other user can create conflicts during the export process.
Once the backup of company files is taken, you can continue following the steps for exporting the Chart of Accounts in QuickBooks Desktop.
- Open the company file in QuickBooks Desktop.
- Search for the “Chart of Accountants” that you wish to export.
- After that, select the “File” menu using the taskbar on top.
- Then, switch to the “Utilities” option.
- Here, you can click on the “Export” button.
- Press the “IIF Files Lists” option.
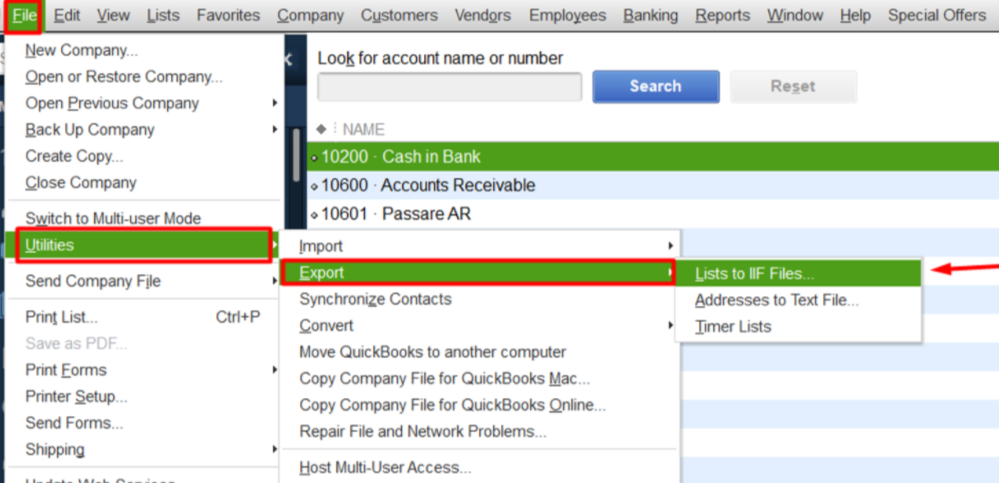
- At this point, you will see a pop-up window that contains a checkbox list.
- From here, you can select the “Chart of Accounts” option.
- Now, hit the “Save as” button using the “Save as” dropdown menu. This must be located at the top. Also, select the folder in which you want to keep the file saved.
- After that, add the “File Name”. Make sure your file name is descriptive.
- Once done, press the “Save” button.
- After exporting the file, you can select the QuickBooks file where you wish to export your “Chart of Accounts”.
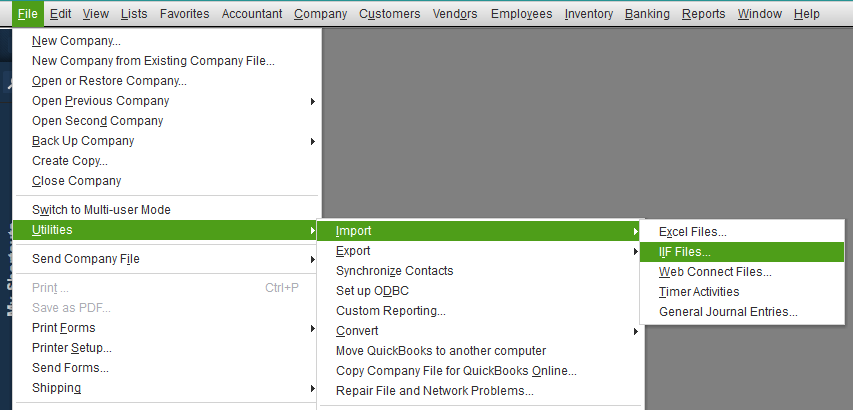
- For that, go to the “File” menu.
- Select the “Import” button.
- Choose the “IIF Files” option.
- Here, you will see an “Import” dialog box.
- Now, select “The Current Export File”.
- Then, click on the “Open” option. In doing so, the QuickBooks program -combines the information index with your current company file using the export file.
- After that, select the location where you want to import the file.
- Now, select the present worksheet.
- Press “OK”.
- Use the “Save as” dropdown menu to save the file. This will save the file in Excel format.
This is how you can export the Chart of Accounts in QuickBooks Desktop. This should be noted that the file will be exported in the IIF format. Follow the guide to import IIF files into QuickBooks. However, while importing the file, it can be saved in the Excel sheet.
Note:- learn here about How to Rearrange Chart of Accounts in QuickBooks Online & Desktop
How to Export Chart of Accounts from QuickBooks Online?
QuickBooks Online also allows you to export the Chart of Accounts. However, the procedure is quite different from the desktop version. Hence, we are showing you how to export a chart of accounts from QuickBooks Online in the following steps:
- Open your company file in QuickBooks Online.
- Then, click on the “Chart of Accounts” that you wish to export.
- Now, switch to the “Accounting” option.
- After that, select the “Chart of Accounts” option.
- Press the “Run Report” option.
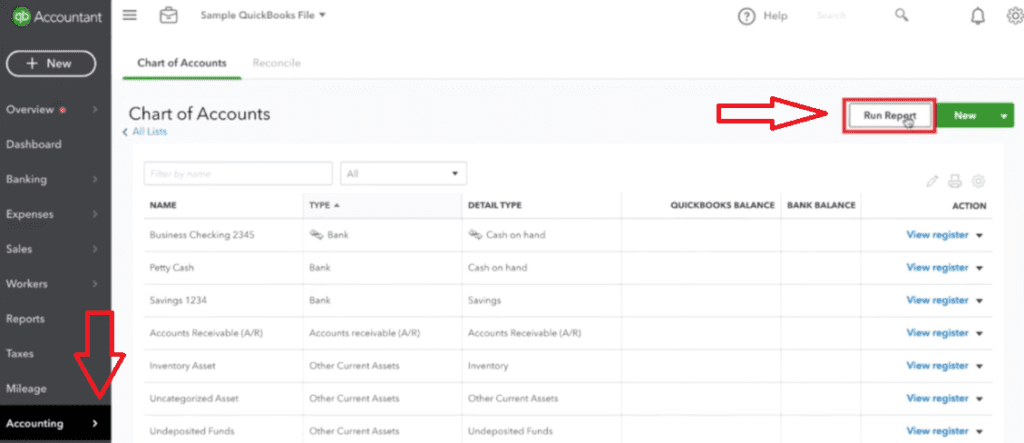
- At this point, you will see the online version of the “Chart of Accounts”.
- Now, you can press the “Export” button.
- Once done, hit the “Export to Excel” option.
- Here, you will see a “Save as” dialog box.
- Now, you can browse the location to which you want to keep this file.
- Then, add the “File Name”. Make sure that you enter the descriptive file name.
- Press the “Save” button.
Once you are done following these steps, the Chart of Accounts exports successfully from the online version of QuickBooks. After that, you can import it as per the requirement.
Move the Exported Data to Excel
When you successfully export the details of your company, it gets saved in IIF format. If you require converting the exported chart of accounts to Excel, this can be done effortlessly. Here, we will show you the procedure of moving the exported data in Microsoft Excel format.
- Open the “Microsoft Excel”.
- Then, click on the “Text Import Wizard”.
- Now, open the export file (IIF file) that you wish to convert.
Note: The users of Microsoft Office 2007 can find this option in the Data tab. This must be located under the “From Text” option.
- At this stage, you will see the “Import Text File” dialog box.
- From here, you can select the “All Files” option.
- Now, you can find the “IIF file” option.
- After this, you can hit the “Open” button in order to access the file.
- Once done, select the file type and go next.
- Then, click on the “Tab” from the checklist.
- Press the “Next” button.
- Here, you may get a prompt to choose the data format column. You can click on the “General” option and hit the “Finish” button.
- Now, you will receive a prompt to choose the location to put the data. For that, you can choose the “Existing Worksheet” option.
- Once done, navigate to the “File” menu.
- Then, click on the “Save as” option to save files in Excel format.
- As you save the exported file in the specified location, it appears with the .xls extension. Now, whenever you open this file, it will open in Microsoft Excel format. Thereafter, you can see the company details in organized columns.
In a Nutshell
QuickBooks keeps your company data organized in a Chart of Accounts. If you want to export it to the Excel file, you can do it easily. All you are required to do is to export the chart of accounts in an IIF file and import it in Excel format. This way you can find all the details organized in columns. If preferred then you can use inbuilt templates and reports (provided by QuickBooks) to export Chart of Accounts in QuickBooks Desktop and Online.