
 +1-877-790-2297
QuickBooks provides an Advanced Inventory feature to take care of the inventory needs. The feature helps you to manage barcode scanning, discounts order fulfillment, in-depth reports, lot number tracking, and more for businesses. In case you no longer wish to use this Advanced Inventory feature, QuickBooks allows you to disable it. To avoid any kind of conflicts, we recommend you read this guide and learn how to turn off inventory tracking in QuickBooks Desktop and QuickBooks Online.
In this comprehensive guide, we will show you the easy steps to disable Advanced Inventory and every feature of inventory in QuickBooks Desktop Enterprise and QuickBooks Online Plus.
Turn Off Advanced Inventory in QuickBooks Desktop Enterprise
This should be noted that the Advanced Inventory feature is provided to the QuickBooks Enterprise users under a Platinum subscription. If you are using Advanced Inventory features that are no longer required by you then turn it off from the settings. Please note if you are disabling the Advanced Inventory feature, you will have to turn off every single feature in the same field such as Multiple Inventory Locations, Serial/Lot Numbers, Barcode scanning, and FIFO.
For better vision, you can go through the following steps and learn how to turn off inventory tracking in QuickBooks Desktop Enterprise.
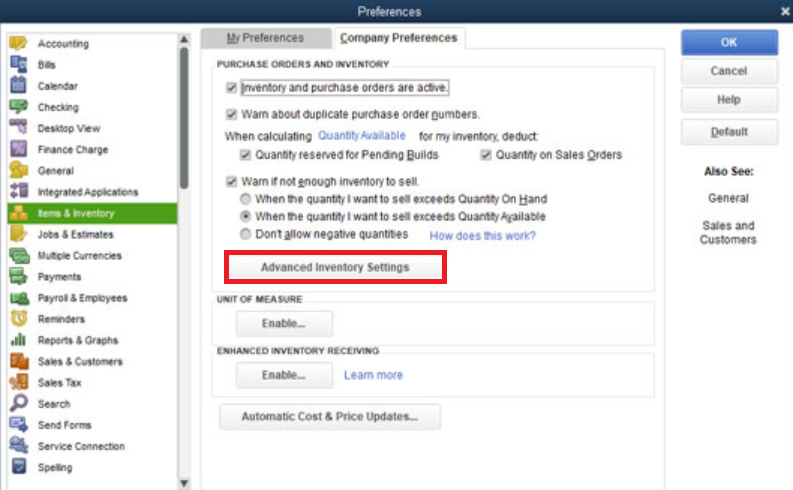
- Go to the “Edit” menu.
- Then, click on the “Preferences” option.
- Click on the “Items & Inventory” option.
- Now, move to the “Company Preferences” tab.
- After this, click on the “Advanced Inventory Settings” button.
- At this point, you are required to disable every feature you are using.
- For instance, if you are using the “Multiple Inventory Locations” then remove the checkmark for this option.
Turning off the Multiple Inventory Locations in QuickBooks
- Maintain the data you have entered that is related to the website. However, you will not be able to see this data once the “Multiple Inventory Locations” feature is turned off.
- QuickBooks will also hide the columns, reports, and fields related to the site. You will not be able to see the information in the QuickBooks interface.
- Once you disable the “Multiple Inventory Locations”, QuickBooks stops assigning the inventory-related transactions to the website.
But, if you ever enable this feature again in the future then you should consider the following steps:
- Make sure you provide a temporary site to the inventory-related transactions that have been added since the time you turned off the feature.
- Also, you need to transfer an inventory from the temporary site to your actual site.
Now, there are other features that you are required to disable such as:
- If you are using “Serial/Lot number” then go to its tab and clear the checkbox for “Enable Lot or Serial Numbers.
- Now, move to the “FIFO” tab and clear the checkbox for “Use FIFI starting” to disable this feature.
- After this, you need to switch to the “Barcodes” tab. Then, clear the checkbox for the “Enable Barcode Scanning” option.
When you disable the Barcode Scanning, QuickBooks will retain all the barcodes of the company files. But, if you enable this barcode scanning feature later, the barcodes will appear automatically in the company file.
- Once you are done turning off every single feature you were using then press the “OK” button in the “Advanced Inventory Settings” window.
- Press the “OK” button in the “Preferences” window.
- When you see a prompt of warning, press the “OK” button to finish the procedure.
Now you have learned how to turn off inventory tracking in QuickBooks Desktop Enterprise. Along with this, we have shared the best possible details on how QuickBooks will show or not show information in the company file.
In case you are wondering how to turn on inventory tracking in QuickBooks then you just need to place a checkmark for the same options you have removed the checkmark for.
How to Turn Off Inventory Tracking in QuickBooks Online Plus?
Inventory feature is also available in QuickBooks Online Plus. If you don’t wish to use Advanced Inventory in your account, the feature can be disabled. All you have to do is make sure that you disable every feature you are using in QuickBooks related to inventory. Follow these steps to disable the Inventory features:
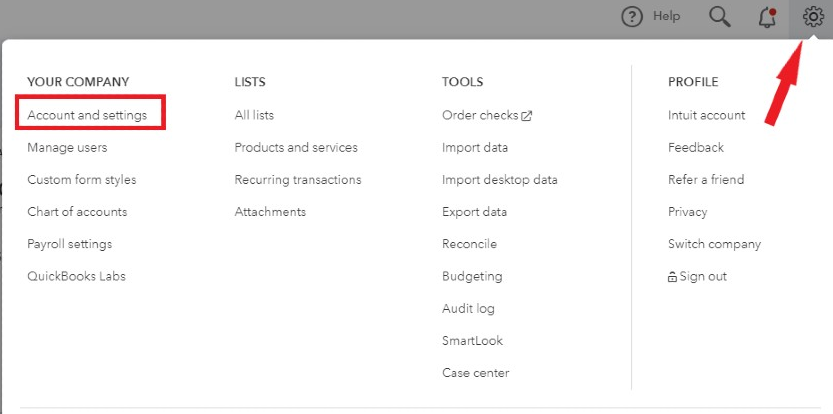
- Click on the “Settings” icon.
- Then, move to the “Accounts and Settings” option.
- Press the “Sales” icon.
- Now, move to the “Edit” button located in the “Products and services” section.

- Turn off the “Show Product/Service” option on the sales forms.
- Now, turn off the “Track inventory quantity on hand” and “Track quantity and price/rate” options.
- Once done turning off the inventory feature, you can click on the “Save” button.
- To finish the process, click on the “Done” button.
Once done saving your preferences, you can close the QuickBooks Online Plus. If you ever wish to track inventory then you can enable the same inventory features in the future.
Conclusive Words
There are numerous benefits of using the inventory features in QuickBooks. However, there can be instances when a user does not wish to use the Advanced inventory features. If that is the case, you can disable the feature along with other features you are using currently in your QuickBooks. Here, we have shown you how to turn off inventory tracking in QuickBooks Desktop Enterprise and QuickBooks Online Plus. Hopefully, you find this guide simple to read.
Also, learn How to Resolve QuickBooks Error Missing Name List Problem with this simple guide.