
 +1-877-790-2297
The multi-currency feature plays a major role in QuickBooks. By enabling this feature in your account, you can track foreign transactions. In addition, the multi-currency feature allows you to assign the particular currency to different profiles and accounts. If you have no earthly clue how to turn on multicurrency in QuickBooks Online and QuickBooks Desktop, we are here to help you with the right details.
In this curated guide, you will learn how to turn on multicurrency in QuickBooks Desktop and QuickBooks Online along with other important details. We will also highlight how you can add foreign currencies to different profiles & accounts, update the exchange rate, and create foreign currency transactions.
How to Turn On Multicurrency in QuickBooks Online?
QuickBooks Online Plus editions supported multi-currency features that can be used when you sell the products and services to your customer. In addition, you can use multiple currencies to purchase the services and products whose base currency is different from the domestic currency.
Important Note: If you have no wish to add transactions in multiple currencies then you don’t need to enable this feature because you will not be able to disable it later.
What Happens When You Enable Multi-Currency Feature in QuickBooks Online?
Before proceeding further, one should understand how this multi-currency feature changes your QuickBooks Online. The following are the changes you may encounter after you enable the multi-currency option:
- When you open the “Gear” menu, you will find the “Currencies” option under the “Lists” section. With the exchange rate, you can use the currencies so that you can establish the foreign currency you prefer to use.
- In the “Chart of Accounts” menu, you will find the “Currency” column that shows the currency dispersed to every account. Here, you will also find a new account which is an expense account (also called exchange profit or loss).
- When you go to the bank or credit card registers, you will see the currency of each transaction in parentheses in Deposit, Payment, Balance Payable, and Sales Tax columns.
- Also, purchases and sales use foreign currency and home currency. QuickBooks will perform all the changes on your screen.
- You will also notice changes in QuickBooks reports. It changes all the foreign currency amounts to the amount of domestic currency. And, it will automatically reflect the changes in the exchange rates.
Enable Multi-Currency Feature in QuickBooks Online
The home currency can be adjusted from the same area where you turn on the multi-currency feature. You can go through the following steps to know how to turn on multicurrency in QuickBooks Online:
- Click on the “Gear icon“.
- Then, select the “Account and Settings” option.
- Here, you can click on the “Advanced” tab.
- Now, scroll down to the “Currency” option.
- Select the “Home Currency List” option and set the home currency.
- At this point, you can choose the currency based on the country. Please note if the currency does not belong to the US then you don’t need to set the US as the home currency.
- Thereafter, you can select the “Multi-Currency” option. While you enable this feature, QuickBooks Online notifies you with the following:
- Users cannot turn it off
- Users cannot change the home currency.
- You can agree to the statement and hit the “Save” button.
- Click on the “Done” button to finish the process.
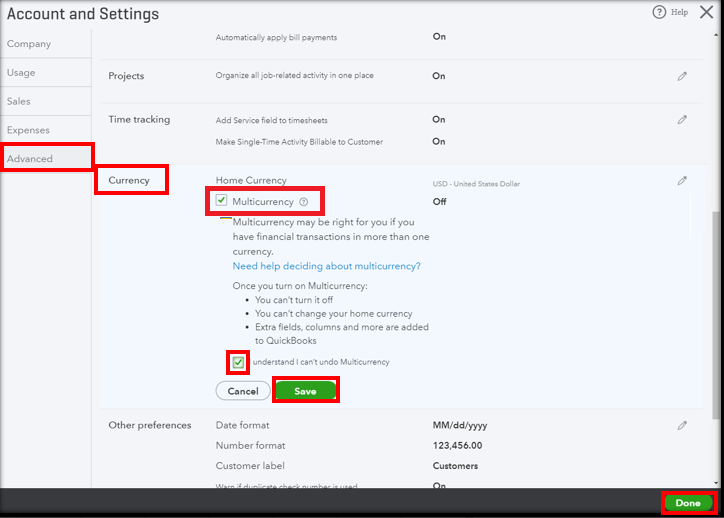
As you execute these steps, the multi-currency feature will be enabled in QuickBooks Online. This should be remembered that multi-currency features cannot be undone.
Set Up Currencies
Once you are done enabling the multi-currency feature in QuickBooks Online, you will see the Currencies List option after clicking on the Gear icon. Here, you can set up the currencies based on your preferences. Let us help you with this in the following instructions:
- Click on the “Gear” icon.
- Look for the “Currencies” option. QuickBooks will show the currency page.
- Here, you can click on the “Add Currency” located at the top right of your screen.
- When you see the drop-down menu, you can select the preferred currency.
- Hit the “Add” button to proceed.
Please Note: Once you enable the multi-currency feature in QuickBooks Online, you will not be able to modify the domestic currency.
QuickBooks records the exchange rates regularly shown on the currencies section because the number of domestic currency units is required to equal the unit of foreign currency. In addition, QuickBooks Online downloads the exchange rate after every 4 hours from Wall Street on Demand. However, you can add your exchange rate as well. All you have to do is click on the Currency Exchange link located next to the supply of rate you wish to modify and then add the rate as per your choice.
How to Turn On Multicurrency in QuickBooks Desktop?
To keep a track of transactions in foreign currency, enabling the multi-currency feature in QuickBooks Desktop is required. By doing so, you can assign a certain currency type to the accounts and profiles. The following are the accounts and profiles to which you can make changes for specifying currency type:
- Vendors
- Customers
- Price Levels
- Credit Card Accounts
- Bank Accounts
- Accounts Payable
- Accounts Receivable
Important Points to Consider
Before you learn how to turn on multicurrency in QuickBooks Desktop, we want you to go through the following points that are important to be considered:
- Once you enable the multi-currency feature, you cannot disable the feature. Thus it is important to back up your company files.
- When you activate the multi-currency feature, it will not affect the add-ons in QuickBooks Desktop such as Statement Writer, Fixed Asset Manager, and US Currency.
- After turning on the multi-currency feature, you will not be able to use Income Tracker, Insights, and Bill Trackers.
- If you are a QuickBooks Enterprise and Accountants user then you will not be able to add batch invoices or delete/void batch transactions.
- Multiple customers cannot be selected in invoices for time and expense pages.
- Users will not be able to send information or copy the company file in QuickBooks Desktop for Mac.
- Online invoice payments might not work with a few currencies.
Enable Multi-Currency Feature in QuickBooks Desktop
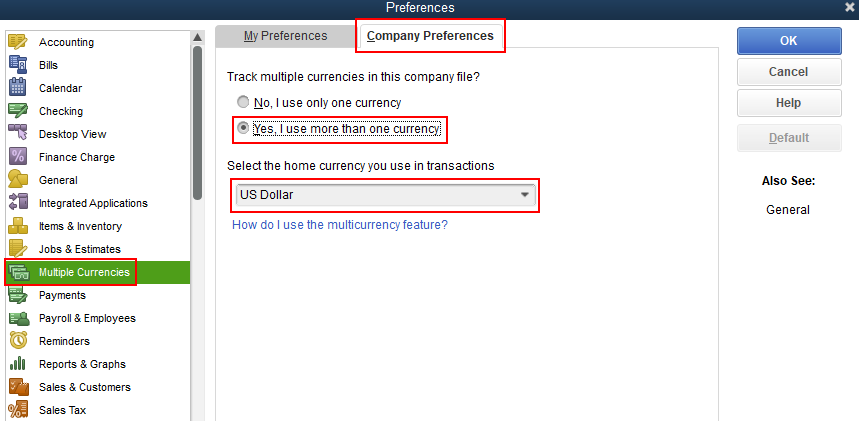
Now that you are aware of the important details, you can continue following the steps for using the multi-currency feature. To do so, you can go to the Edit menu, select the Preferences and Multiple Currencies feature. After that, you can confirm your action in the Company Preferences tab and select your home currency. You can also go through the following steps:
- Launch QuickBooks Desktop on your computer.
- Then, select the “Edit” menu.
- Click on the “Preferences” button.
- Here, you can select the “Multiple Currencies” option.
- Now, you can switch to the “Company Preferences” tab.
- Then, select the “Yes” button to agree to use more than one currency.
- After this, you can select the home currency using the drop-down menu.
Add Foreign Currency to Profiles
As we stated earlier, you can assign a particular currency to the vendor or customer profile. If you are willing to add foreign currencies to customers and vendors, make sure you go through the following instructions first:
- All the current sellers and customers will be permitted to use the home currency based on the commissioning of the facility. Also, the currency will not be modified for names that have transactions that are registered against them.
- As you close the open balance, you can use the home currency sellers or customers. You can also use the foreign currency sellers or customers for new purchases or sales you have made earlier. Please note that you may need to use the domestic currency name until the open transactions are completed.
- Users can use the seller centers and customers to make foreign exchange sellers or customers. In case you find the name already listed that is using the home currency then you should add a different name for the foreign currency seller or customer you have created.
After keeping the aforementioned points in your mind, you can continue adding foreign currency for Customers’ and Vendors’ profiles. Here are the instructions for the same:
- Go to the “Vendors” or “Customers” menu.
- Then, search for the “Vendor Center” or “Customer Center” options.
- If you choose the Customer Center” then click on the “New Customer: Job” option from the drop-down menu. And, if you select the “Vendor Center” option, you can choose the “New Vendor” option using the drop-down menu.
- Once you are done selecting the “New Vendor” or “New Customer” options, you can assign your preferred vendor or customer name along with the currency.
- After that, click the “OK” button.
By performing these instructions, you can easily assign foreign currency for your vendor or customer profiles in QuickBooks Desktop.
Add Foreign Currency to Accounts
Foreign currencies can also be allocated to the account such as Credit Card Accounts, Bank Accounts, and Account Receivable. To proceed with the same, you should be aware of the following pointers:
- All the current accounts will be permitted to the home currency. Also, the currency will not be modified for accounts that have transactions that are recorded.
- As you close the open balance, you can use the domestic currency accounts. You can also use the foreign currency for transactions after closing the open balances
- Currencies will only be assigned to the bank credit cards, accounts payable (A / P), and accounts receivable (A /R). Please note that the currency of A /P and A / R accounts have to meet with the currency of a seller or buyer used in the transaction. QuickBooks creates a distinct account automatically for specific currency while making the transaction.
- You can also use the chart account in order to create credit card accounts and foreign currency banks as per the requirement.
After you get aware of the important details, you can continue adding the foreign currencies to the bank credit cards, accounts payable, and account receivable in QuickBooks Desktop:
- Launch “QuickBooks Desktop”.
- Then, click on the “Lists” menu.
- Select the “Chart of Accounts” option.
- Now, click right on the “Chart of Accounts” window and select the “New” button.
- At this point, you can pick the relevant account “Type”.
- Once done, give it a name and hit the “Save and Close” button.
These steps will help you to add foreign currencies to the specific account in QuickBooks Desktop. Make sure you select the right type of account.
Update the Exchange Rates
QuickBooks downloads the rates for current currencies only. However, you can download the rate if you have domestic currency like the US dollar. In the following discussion, we will show you how to download the latest exchange rates and update them accordingly.
- Go to the “Lists” menu.
- Then, select the “Currency List”.
- Click on the “Activities” button.
- Select the “Download Latest Exchange Rates” option.
- To manually add exchange rates, you can again click on the “Lists” menu.
- After this, click on the “Currency Lists” and click twice on the currency.
- Here, you can go to the “Edit Currency” option to edit the currency exchange rate for a particular date.
Now you have successfully located and updated the currency exchange rates for a specific date in QuickBooks Desktop.
Prepare Foreign Currency Transactions
To create the foreign currency transactions, be sure that you only use the name or accounts that you have used for the new foreign currency transactions. Please note if you own any open invoice for the existing customer who has the home currency then we suggest you not use the new foreign currency version for that particular customer to get the payment against the invoice.
As an alternate option, you can use a home currency version of a customer to complete the transaction. Read the following details you need to be aware of:
- You cannot assign currency for sales and transactions as they are already the currency of a seller or customer recorded in a form.
- The exchange rate is a component of each transaction and it also manages the transaction’s domestic currency value.
- Dependencies on purchase and sales transactions are in the currency of the seller or customer. Also, the equivalent of home currency is already listed for your transaction.
- The reports regularly show the domestic currency in spite of the currency that is used in the transaction.
Final Words!
In QuickBooks, the multi-currency feature helps to track income, expenses, and previous exchange rates. By enabling multi-currency features, you can assign the currency type to the multiple currencies and the account as per your choice. It may include Vendors, Credit Card Accounts, Bank Accounts, Account Receivable, and Customers. We hope you have understood how to turn on multicurrency in QuickBooks Desktop and QuickBooks Online.