
 +1-877-790-2297
QuickBooks, all software for financial tasks, has several features that can be accessed through the gear icon. The QuickBooks gear icon is used to display the program’s settings.
This icon appears as soon as a user logs into QuickBooks. However, depending on the version, its placement might change relatively.
Furthermore, the methods for locating gear or settings may differ between QuickBooks Desktop, QuickBooks Online, and year versions, such as where is the gear icon in QuickBooks Desktop 2021 and where is the gear icon in QuickBooks Desktop 2022.
- What is the Gear Icon in QuickBooks?
- What Does the Gear Icon Look Like in QuickBooks?
- Where is the Gear Icon in QuickBooks?
- Where is the Gear Icon in QuickBooks Desktop?
- Where do I Find the Gear Icon in QuickBooks Online?
- Where is Gear Icon in QuickBooks 2013/2017/Pro 2018/2020/2021/2022?
- How can one fix the “No Gear Icon” in QuickBooks Desktop?
Above all, you should first learn what the Gear icon in QuickBooks does before trying to locate it. So, in this article, we will discuss what this gear icon is, how to use it, and other relevant segments.
What is the Gear Icon in QuickBooks?
In QuickBooks, there is a button called the gear icon. It is essential to give you access to a number of Intuit software capabilities. In addition to features, you can use the QuickBooks gear icon to access tools that will help you manage your profile and company files.
To be clearer, this icon is useful for the following:
- With just a tap, significant options like “Tools” are available.
- It allows you access to the software’s settings. This is the primary function of the icon.
- The list of transactions can be seen through the same.
- The Gear icon provides access to features like importing data from other platforms or from Stripe into QuickBooks.
Note: You can rely on the same characteristics and operation outlined above to determine what the gear icon in QuickBooks Desktop and Online represents.
What Does the Gear Icon Look Like in QuickBooks?
You should be aware of how to recognize the gear symbol in addition to its capabilities. A wheel-like symbol is used in QuickBooks to symbolize the Gear icon.
When you launch the accounting program, it is shown. As a result, accessing this icon’s use and recognizing it from its symbol is simple.
Where is the Gear Icon in QuickBooks?
This symbol may be seen in the top right corner of the QuickBooks page. In the place mentioned, there are three choices. The gear symbol is one that resembles a wheel among them.
Launch “QuickBooks” to begin the process of locating the icon, then perform the actions listed below:
- Look at the software’s upper-right corner.
- On the right, you’ll see a circular symbol that resembles a wheel. Click this icon.
- This icon’s functionality will become available to you as soon as you click on it.
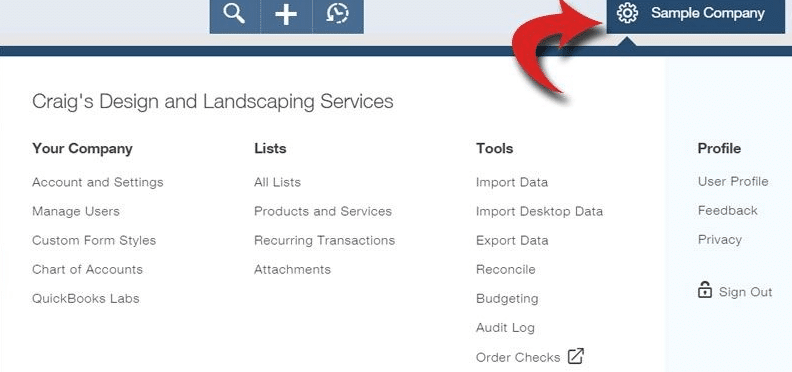
Where is the Gear Icon in QuickBooks Desktop?
In QuickBooks Desktop, whether you want to access settings or lists, the first step is to click on the Gear icon. It is crucial to ascertain the location of this indicator or symbol as a result.
In the desktop version, the symbol is available near the Company Name. However, depending on which software version you are using, it may be in a different place or position. QuickBooks Desktop 2017 and Pro 2019 users can locate it at the top between 2 other icons.
● In QuickBooks Desktop
In QuickBooks Desktop, a company name is an option. This option is helpful if your file name is important. The gear symbol is conveniently located close to this. Once you have access to it, you may start the necessary procedures and access the settings.
You may follow these methods to find out where the gear icon is in QuickBooks Desktop in more detail:
- Ensure that “QuickBooks Desktop” is running.
- Click the “Company Name” from the menu.
- Look at the button available next to “Company Name”. It’s the QuickBooks Desktop Gear icon.
● On QBDT Pro 2022/2019/2017
Pro 2019, 2017, and other versions of QuickBooks Desktop are available in the basic editions. You may find the gear symbol in the top right corner of the page, namely in QuickBooks Desktop 2022, 2017, or Pro 2019.
In either version, the symbol is close to the Help menu. This is where you may find the aforementioned icon or symbol in software versions from the same year.
- Run “QuickBooks Desktop Pro 2019” or “QuickBooks Desktop 2017” as appropriate.
- Verify the software’s upper corner. Here, you can see the following options:
- “Plus” or “+”
- “?” or “Help”
- You must identify a round icon. This will indicate to you where the gear icon in QuickBooks Desktop Pro 2022, 2019, or 2017.
Where do I Find the Gear Icon in QuickBooks Online?
Most of the time, it is available in the upper corner. Speaking of which, the top-right corner of the screen displays the gear icon QuickBooks online. So, you may press this symbol in a matter of seconds to start any procedure swiftly.
It is advised that you read the instructions below to get further assistance finding the gear button in QuickBooks Online:
- Adequately start the “QuickBooks Online” software.
- Look for the “Create” (represented by +).
- On the side of the said symbol, find “Help” (represented by?)
- See between these two icons. You will be able to locate “Gear”.
When a user clicks on this button, QuickBooks Online’s options become available. Then, you can utilize Gear to do things like import your budget*, set up a depreciation account in QuickBooks Online, and more.
Where is Gear Icon in QuickBooks 2013/2017/Pro 2018/2020/2021/2022?
You might discover certain buttons positioned similarly across some QuickBooks versions. You can locate the gear symbol in QuickBooks 2021, 2017, 2013, and Pro 2018.
Consequently, you can run this software’s version from any year. The QuickBooks online gear icon will be positioned somewhere around the top and on the right. If not, you should be able to find it between the Create and Help symbols.
How can one fix the “No Gear Icon” in QuickBooks Desktop?
For QuickBooks Desktop, Internet Explorer is often set as the default browser. The influence of the accounting software is felt when this browser builds up a cache. As a result, buttons like “Gear” might not be there. You can erase this cache if the QuickBooks Online gear icon is missing.
Here is how to restore the gear icon in QuickBooks Desktop by clearing the cache and history:
- Launch “Internet Explorer“.
- View the icon for its “Settings“.
- You have to select “Extras”.
- Then opt for “Internet Options”.
- See the tab that says “General”.
- Here, please locates the option called “Browser History”.
- Press “Delete”.
The “gear icon QuickBooks” is vital for many reasons. For a user, it becomes important to know where it can be found, what to do if you cannot locate it, what can be accessed through it, and so forth.
While its usage remains the same, its position does vary from version to version, as cited above. With the aforementioned details, you can certainly locate the gear icon and go along with its functionalities smoothly.
Frequently Asked Questions
Start by launching QuickBooks Desktop. The icon may be seen in the top right corner of the screen. The setting symbol, commonly known as the gear icon, is shown next to the company name.
Users of QuickBooks Online may access their settings by clicking the gear icon. Simply choose Edit from the top menu in QuickBooks Desktop, then click Preferences.
Numerous functions in your QuickBooks Online account may be accessed by clicking the Gear symbol.
You will see this QuickBooks Online Gear symbol at the top of the corner in the QuickBooks software.
In many versions of accounting software, the gear symbol can be found in a place similar to this one. This will most likely be in the upper corner. You will see this QuickBooks Online Gear symbol at the top of the corner.
Within a year, you should update. You will receive the most recent features and operational continuity as a result.