
 +1-877-790-2297
QuickBooks Messenger is a service that can be used when Multi-User mode is enabled. Just like multi-user mode allows multiple users to work on the same company file, QuickBooks messenger enables its users to chat with the other users of the company within the QuickBooks platform. There can be instances when you wish to switch to the Single User mode. In such a scenario, you may wish to turn off QuickBooks messenger. If you have no earthly clue how to turn off QuickBooks messenger, we will help you with the details.
The dedicated guide explains how to turn off QuickBooks messenger. In addition, you will learn to close or log off the company file for other users.
How to Turn off QuickBooks Messenger?
QuickBooks Messenger service allows you to connect with other users of the company. If you no longer wish to use the messenger, you can disable it. All you have to do is make sure that you are signed in as an administrator. Thereafter, you just need to go through the File menu, click on the Utility option. Once done, click on the Disable QuickBooks Messenger option.
If you want to know how to turn off QuickBooks messenger with detailed steps, check out the following points:
- Log in as an administrator when you are in multi-user mode.
- Now, go to the “File” menu.
- Select the “Utilities” option.
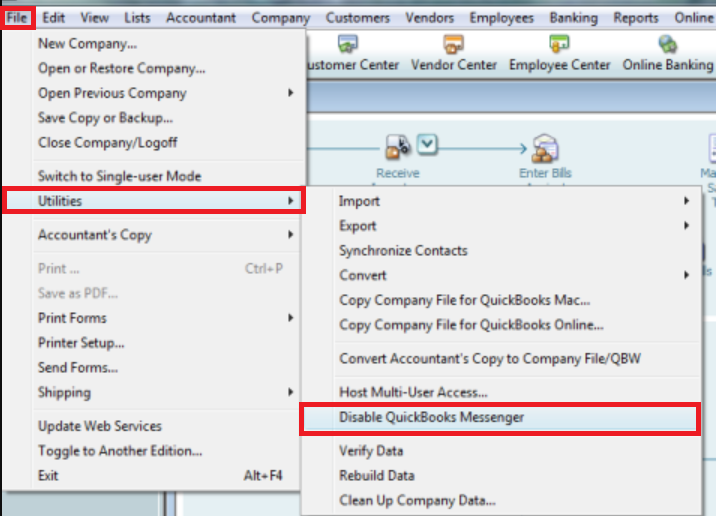
- Click on the “Disable QuickBooks Messenger” option.
After you perform these steps, you can log out of your company file. Once done, log in to the account again to reflect the changes. Now, the QuickBooks Messenger service will no longer work until you enable it again.
How to Close or Log Off the Company File for Other Users?
If you wish to close the company files for another user in QuickBooks, you can do it effortlessly. Please note that you have to sign in as an administrator to make changes to the service. To log off the user from the QB company file, you just open the chat with a coworker, click on the Actions dropdown and select the Close Company File for Users option. This will stop the service for a specific user in QuickBooks. For step by step guide, you can pursue the following steps:
- Launch the “QuickBooks Messenger” service.
- Then, go to the “Company” menu.
- Click on the “Chat with a Coworker” option.
- Move to the “Actions” drop-down menu.
- Click on the “Close Company File for Users” option.
- Here, you need to choose the user whose account you want to close.
- Once selected, click on the “Close Company File” option.
- To confirm the action, click on the “Yes” button.
By implementing these steps, you can easily log off the company file for a specific user. Doing so, that particular user will not be able to access the company file.
Bonus Tip: Change the Activity Status
QuickBooks Messenger also allows users to change the activity status. For instance, you can make the status Busy, Away, and so on. Whatever the status you set, other users will see that in your profile. This will indicate to them if you are available on QuickBooks Messenger or busy with some other duties. To change the status, you can do the following:
- In “QuickBooks Messenger”, click on the dropdown menu that shows your username.
- Then, choose the status that applies to your situation (Busy or Available).
This activity status can be changed at any time depending on your availability. You can use this trick when you don’t want to disable QuickBooks Messenger but by showing the Busy status, you can take a break from users.
In a Nutshell
QuickBooks Messenger is a helpful service to connect with other users of the company within QuickBooks. But, if you wish to disable the chat process, you can do it by disabling QuickBooks Messenger. Remember you have to be signed in as an admin so that you can make changes while in the multi-user mode.
Find out how you can read QuickBooks file without QuickBooks by reading this guide.