
 +1-877-790-2297
QuickBooks Online provides paying bills service as a helping hand in your business. If you have tons of bills but having difficulties making these payments on time, QuickBooks helps you to pay bills smartly. By using convenient features such as Pay Bills, you can send payments fastly. All you just have to do is enter the bill and pay it to the vendor or supplier. To get into depth, let’s have a look at the following guide on how to pay bills in QuickBooks Online.
How to Enter and Pay Bills in QuickBooks Online?
To take advantage of this paying bills service, first, you will have to enter the bills in your account. After that, you can pay the recorded bills using the bill payment feature. Doing so, QuickBooks makes the accounting entry automatically display that the bills are paid and hence they are not outstanding any longer.
For better insights, you can continue following these steps and learn how to pay bills in QuickBooks Online:
1: Reach the Pay Bills Option
- Log in to “QuickBooks Online”.
- Go to the “+New” button located on the top left.
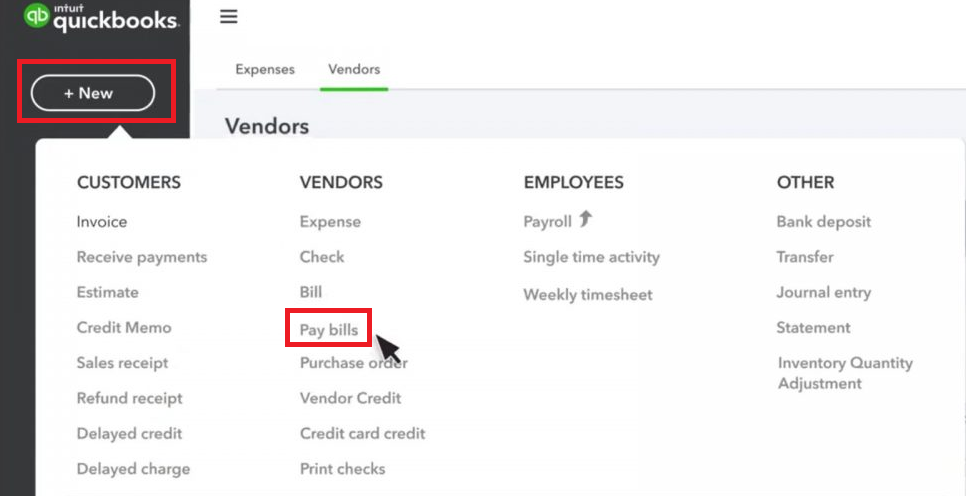
- When the options appear, you can select the “Pay Bills” option from the “Vendors” section.
2: Choose the Bills for Payments
- As you do so, the “Pay Bills” window appears on your screen where you will see a list of all your bills you have entered but are still outstanding.
- At this point, you can select the bills by placing the checkmark before the bill. You can select the multiple bills that you want to pay then continue to pay them together.
- Before proceeding further, you will have to specify a few details which are as follows:
- Payment account: Pick the checking account you want to use for making the payments.
- Payment date: Add the date that you want to print on your checks. Usually, the current date is entered here.
- Starting Check Number: For this section, you can enter the starting number of your check. As an alternate option, you can select the check mark located next to the “Print later” to keep your checks saved and then print them later.
- Select Bills: Here, you need to choose the bills that you want to pay. For this, you can place the check mark located before the bill.
- Payment: Once you choose the bill to pay, QuickBooks will automatically default this payment amount to the whole open balance. But, you have the right to edit the payment and make the amount lesser if you wish to make a partial payment.

3: Pay Your Bills
When you are done entering the required details, you can pay your bills. The bills can be paid by signing, printing, or mailing checks. You can even use the QuickBooks Online bill payment feature to pay bills. Let us introduce you to all the available options.
Way 1: Print Checks
If you want to know how to pay bills and print checks in QuickBooks Online, read the following instructions:
- To print the check, you can click on the drop-down menu located next to the “Schedule payment online” option.
- Then, click on the “Save and Print” button.
- But, if you have printed the checks already then you will see the “Save and Print” button
- The “Print Checks” window shows all the checks you have been saving and waiting for the print. You can verify your checking account using the drop-down menu located at the top corner and make sure that it is your correct account.
- In the same window, you will also see the check that you have written from the checking account you have specified.
- Now, check the box located next to the check that you want to print. Make sure you enter the starting check number and hit the Preview and Print button.
After that, you can continue following the instructions on your screen and complete the steps for printing the checks in QuickBooks Online.
Way 2: Use the QuickBooks Online Bill Pay Feature
If you are wondering how to pay bills in QuickBooks Online using the QuickBooks Online Bill Pay feature, pursue the following steps:
- To pay the bills online, you can click on the “Schedule payments online” option This should be located at the bottom of the “Pay Bills” window.
- If you are using this feature for the first time then QuickBooks will guide you through the setup process.
- You can pay the bill with a debit card for free, bank transfer, or pay by credit card at 2.9% charges.
- Vendors can get the payment either by direct deposit into the bank account or with a paper check that is mailed on behalf of you.
- When you see the “Schedule Payments” window, you will find all the bills selected by you for the payment. If required, you can enter a different payment method, deduction date, and method of delivery for each bill.
- Then, select the name of the “Vendor” for each bill. This will open a window where you can enter the details for making the payment online. These are the following details you will have to mention:
- Payment Method: As you select this option, you will have the following options to choose the payment method:
- Debit card (free)
- Bank account (free)
- Credit card (2.9%)
- Funds deduction date: Choose the date when you wish the funds to be deducted from the account. Please note that transfers take time so you can select the date that is a few days before your due date.
- Select how the vendor receives: Here, you can mention how your vendor will receive the payment. You can do a bank transfer or ACH method in 1-4 business. Or, you can send the paper check that will be received within 1-5 business days.
- Estimated payment delivery: QuickBooks will offer the estimated date on which your vendor will receive the payment. If the given date is after the due date, we suggest you mention the date earlier than the due date.
- Payment Method: As you select this option, you will have the following options to choose the payment method:
As you provide all the necessary details for bill payments, you can click on the Schedule all payment option. Once you do so, QuickBooks will automatically make all the payment and accounting entries in your account.
If you are concerned about how to pay multiple bills in QuickBooks Online, we suggest you add the invoices separately and then go with the Pay bills option to pay all the bills at once. This can be possible if you are using QuickBooks Online Plus, Essentials, or Advanced versions.
Summing Up
Now, you have learned how to pay bills in QuickBooks Online. If you receive bills in your account, you can simply make payments using the QuickBooks Online bill payment option or prepare printing checks. Remember if you want to pay multiple bills then you will have to record each invoice separately that you have received and then pay all at once using the Pay bills feature you can also learn How to Delete a Bill in QuickBooks Desktop & Online?.
Read more about QuickBooks guides based on undeposited funds and the ways to import bills in QuickBooks Online: