
 +1-877-790-2297
If you want to track the expenses and revenues across multiple lines of your business, setting up the QuickBooks cost center accounting will be a great help for you.
QuickBooks program supports features such as profit center and cost center. To enable this feature on your QuickBooks, you can activate the Class Tracking or Location Tracking options. By doing so, you can easily track your revenues and expenses for different departments. To understand more in detail, stick through this guide till the end.
What is QuickBooks Cost Center Accounting?
Cost Center and Profit Center are management accounting terms. These two features supported by QuickBooks help you to identify how your business is contributing in various parts. Cost centers and profit centers are denoted by Class List. By tracking the expenses and income by classes, you can collect information on the profits for different parts of the operation.
Profit Center: Profit Center is a domain of the business where you operate your account with the objective of earning profits.
Cost Center: Cost Center is a domain of your business that can be operated to service the requirements of one or more profit centers.
How to Use Cost Centers in QuickBooks Online?
To track your expenses and income for different departments, you can activate location or cost tracking. By enabling this feature, you can go through the account balances based on departments, location, business office, separate properties, and other segments that you want to track.
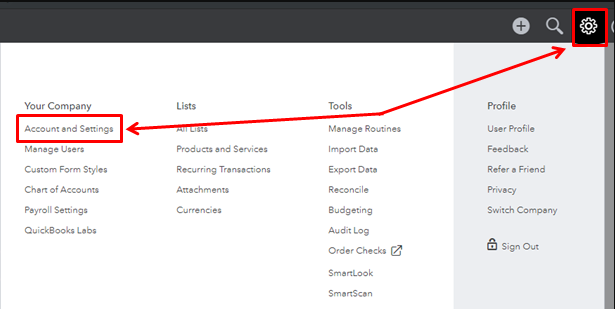
To proceed with the expense and income tracking, one has to enable the Track classes or Track locations feature. This can be done through Account and Settings. Check out these steps for more clarification:
- Login to your “QuickBooks Online”.
- Click on the “Gear” icon.
- Select the “Account and Settings” option.
- Switch to the “Advanced” tab.
- Select the “Categories” section.
- Enable the “Track Locations” or “Track Classes” options.
- Click the “Save” and “Done” buttons.
Once you apply this setting, you are capable of keeping an eye on your income and expenses by department.
Note: In case different branches report separately to payroll taxes or state taxes then it is suggested to create an additional account. However, you need to purchase a second subscription to create an additional QuickBooks Online company.
Learn to Set Up Cost Center in QuickBooks Online Plus
QuickBooks Online Plus users can enable the Class Tracking feature in order to establish Cost and Profit Centers. To do so, pursue the steps stated below:
- Go to the “Homepage” screen.
- Click on the “Company” menu located in the top corner.
- Click the “Company Settings” option located under the “Settings” menu.
- Here, choose your “Company”.
- Under the “Categories” section, select the “ Track Classes On” feature in order to enable it.
This way you can enable the Track Classes option in both QuickBooks Online and QuickBooks Online Plus.
How to Set Up Cost Centers in QuickBooks Desktop?
Those who use the QuickBooks Desktop version can also enable the Class Tracking feature. This helps you to track the balances by the department. All you have to turn on the class tracking and set up the class categories for accounts and expenses. Here is how to do this.
Step 1: Enable Class Tracking
- Open your company file.
- Click on the “Edit” button.
- Select the “Preferences” option.
- Go to the “Accounting” section.
- Click on the “Company Preferences” tab.
- Here, select the checkbox; “Use class tracking for transactions”.
- In case you need a reminder to assign a class then click on the “Prompt to assign classes” checkbox.
- Hit the “OK” button.
Step 2: Setting Up the Class Categories for Accounts and Expenses
- Click on the “Lists” menu.
- Go to the “Class List”.
- Click on the “New” button using the “Class” drop-down menu.
- Add the name of the class.
- In case it is a subclass then click on the “Subclass of” checkbox and check the class.
- Click the “OK” button in order to add the class.
This is how you can set up class tracking in QuickBooks Desktop. Remember that you can assign classes for several transactions such as:
- Estimate
- Sales receipt
- Invoice
- Statement Charges
- Check Credit card charges
- Sales order
- Refunds and credits
- Purchase order
- Bill
- Paycheck
Class tracking features can be applied in most transactions. This becomes easier to generate reports so that you can compare the balances across departments, multiple classes, or locations.
How to Assign Cost Center to Products in QuickBooks Online?
If you want to sync your documents to work then you need to make sure that your products are allotted a cost center under the Product details section. Then, the cost center will match the Chart of Accounts using your QuickBooks Online account.
This should be noted that you can assign only one cost center per product. To assign the cost center to the product in QuickBooks Online, check out these steps:
- Click on the “Settings” menu.
- Choose the “Products” option.
- Pick any of the products in order to view the “Product Details” section.
- Click on the “Cost Center” option.
- Now, select the cost center in order to assign it to a particular product. Make sure you select one cost center for one product.
When you are done following these steps, you will see the numerical value on the Product Details page. This product can now be synced on Quote, Estimate, or invoices to your QuickBooks Online account.
Winding Up
The class tracking feature lets you track your account balance by the business office, department, and separate properties. If you want to track segments then start setting up the QuickBooks cost center accounting.
Here we have discussed the ways to enable class tracking features in QuickBooks Online, Online Plus, and QuickBooks Desktop versions. Enable cost centers in your account and track your income and expenses now.
Frequently Asked Questions (FAQs)
Ans. Profit Centers and Cost Centers can be set up by enabling the Class Tracking or Location Tracking feature in QuickBooks Online.
Ans. Both Class Tracking and Location Tracking allow you to track your expenses and income. You can use either one or both features. The only difference between them is Class tracking mentioned different classes for each transaction detail line. On the other hand, Location tracing lets you assign a location to the entire transaction.
Ans. Users can turn on the Class Tracking feature even in the QuickBooks Desktop version. This helps you to track the balances by the department. All you have to enable the class tracking and set up the class categories for accounts and expenses.
Enabling the location and class tracking feature is so easy. I am glad I met this guide to find deep details about this feature.