
 +1-877-790-2297
To make your business easier to manage and in less time, QuickBooks enables you to take classes and sub-classes. Tracking your account balance can also get easier with this functionality of the Intuit software. While this feature is much in demand, you may be wondering “How do I set up classes in QuickBooks”.
Here is a post that you can refer to for getting the help you need. Reducing your time to look for every method required, we’ll show you how to add class in QuickBooks, QuickBooks Online, QuickBooks 2015, QuickBooks Desktop, etc., on Windows and Mac. We’ll also tell you how you can enable class tracking or inactivate a class in the software.
- What are Classes in QuickBooks?
- Methods to Establish Class Tracking in QuickBooks
- Method 1: How to Set up Class Tracking in QuickBooks?
- Method 2: Manage and Set up Class Tracking in QuickBooks Desktop on Windows?
- Method 3: Set up Class Tracking in QuickBooks Desktop on Mac?
- Method 4: How Do I Set up Class Tracking in QuickBooks Online?
- Method 5: Set up Class Tracking for Online Payroll in QBO?
- How to Make a Class Inactive in QuickBooks?
What are Classes in QuickBooks?
Users of the Intuit QuickBooks software can use the feature of creating classes for introducing greater convenience in their work. Classes can be made and assigned to your transactions in this accounting software. Using this feature, you can maintain a track of the account balance via breakdowns like department, location, business office, etc. You can also create a breakdown of your own choice.
In the following sub-sections, you can please yourself with two methods for setting up classes in QuickBooks. In case you happen to be a user of QuickBooks 2015, then you should opt for the second method.
Method 1: How to Set up Classes in QuickBooks Online?
Learn how to add classes in QuickBooks Online by accessing the settings of the software. In its Settings, you will find Classes. After selecting this option, you can click on New and set a name for the class you’re creating. You can also decide whether you want to add any sub-class. Then you can start using the classes for categorizing your transactions.
Must Read: How to Remote Access QuickBooks
Note for You: It will be helpful to know that for making a class in QuickBooks, you need to be an admin. Otherwise, you may not get the option to do so.
- Head to “Settings” of “QuickBooks Online”.
- Click on the option of “Classes”.
- Press “New”.
- Now, fill in a name for the class.
- For the addition of a sub-class, you need to click on “Is a Sub-class”.
- The main class has to be chosen.
After completing the sixth step, a class will get created in QuickBooks Online. You can initiate the procedure to track the transactions via this class.
Method 2: How to Add Class in QuickBooks 2015?
For adding classes in QuickBooks 2015, you will find the Class List option in Lists. Once this has been chosen, you can enter the Preferences and select Accounting. Via Company Preferences, you can also enable class tracking. As you push the Class button, you’ll be closer to preparing a new class in QB 2015.
To get the remaining information for knowing how to add class in QuickBooks 2015, you can read below.
- When “QuickBooks 2015” is open, go to “Lists”. Then select the option of the “Class List” command.
- In case the option of the “Class List” command isn’t available, click on “Edit”.
- opt for “Preferences”.
- Press the icon of “Accounting”.
- Visit the tab of “Company Preferences”.
- Click on “Use Class Tracking”.
- For adding a class, press the “Class” button available at the window’s bottom.
- Press the “New” option given in the menu of “Class”.
- For providing a name to this class, input a “Name”/”Abbreviation” in “Class Name”.
Note for You: The class name should be entered by you when a transaction is being recorded and lies within that particular class. Ensure that the name you are giving to the class is easy to type and not lengthy.
- In case the class you’re making is a subclass, then tick “Subclass of”.
- Then click on the dropdown for “Subclass of”. You can select the parent class from this list.
- Press “Ok” after describing the class.
Note for You: Due to some reason, if you do not wish to continue with the class you have made, you can press “Cancel”. This class will not be saved. You can also press “Next” and go to the window of “New Class” again. In case, at some point, the class has no usage, then you can select the checkbox for “Class is Inactive”.
Methods to Establish Class Tracking in QuickBooks
These methods will help you enable class tracking in QuickBooks Desktop on Windows as well as Mac. We will also improve your knowledge about enabling this feature on QuickBooks Online and for Online Payroll.
Method 1: How to Set up Class Tracking in QuickBooks?
Once you’ve mastered how to set up classes in QuickBooks, enabling class tracking will be the next thing to do. In QB, you can head to the company profile via the main page. Using the Lists option, you can opt for Class List and set up different class categories. Afterwards, you can tap the button titled Class. Once this process gets over, class tracking will get enabled.
- The “QuickBooks” software’s main page has to be opened.
- In the company profile, the option of class tracking will be available. You will also find a menu bar above. In “Lists”, select “Class List”. Then you can establish the class categories for the accounts as well as expenses.
- You will find an arrow near the button of “Class”. Press it.
- Press “New” for making a class.
Note for You: The class types which you will be making will be helpful for multiple expenses. These expenses are inclusive of travel costs, outsourcing costs, technology solutions, additional common payments, etc.
- Enter a name for the class.
- In case the class you are making can be divided into several other classes, tick the checkbox for “Sub-class”. Then add the information in the visible fields.
- In this step, the class has to be linked to a particular expense. You can make use of the input form for the expense.
Note for You: Classes can be linked with every entry made by you in the QuickBooks software. In particular, creating these classes will be the most helpful for payroll costs as well as bills.
Method 2: Manage and Set up Class Tracking in QuickBooks Desktop on Windows?
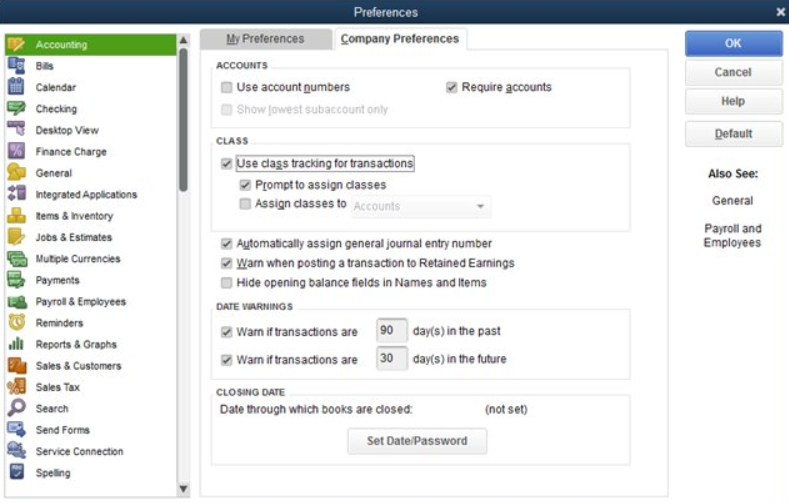
Some of you may know how to add class in QuickBooks. However, you may be seeking assistance for tracking the class in this software. On Windows, to enable class tracking, you can first access your company file. Using the Edit option, you can pick Preferences as well as Accounting. By entering Company Preferences, you’ll be able to see the option of Use Class Tracking for Transactions.
Let’s know what you need to do next by reading below.
- Ensure that your “Company File” is open. If not, then open it.
- Press “Edit”.
- Then click on the “Preferences” option.
- Click on “Accounting”.
- Find the tab named “Company Preferences”. Then enter it.
- Tick the checkbox for “Use Class Tracking for Transactions”.
- In case you would like to receive a reminder when a class has not been assigned, you can tick the checkbox for “Prompt to Assign Classes”.
- Lastly, press “Ok”.
Note for You: It will be suggested that you use classes only for a single category. For example, in case a class is being made for the department, then it shouldn’t be used for the locations of the stores. For more clarity, you can go through the option of “Sample Classes by Industry”. You will be provided with assistance.
- For setting up the class categories for accounts and expenses, click on “Lists”.
- Then choose “Class List”.
- Press the dropdown for “Class”.
- Opt for “New”.
- Write a name for the class.
- In case the class you are making is inclusive of subclasses, then choose “Subclass of”. Then you can decide the class in which it falls.
- Press “Ok” to complete this method.
Method 3: Set up Class Tracking in QuickBooks Desktop on Mac?
The users of Mac can turn on QuickBooks Desktop class tracking by selecting Preferences from the menu. Then you’ll find Transactions in the section of Workflow. A checkbox will now be seen. It will carry the option of Use Class Tracking. You can choose it and then continue with the remaining prompts.
- Open the menu of the accounting software.
- Tap on “Preferences”.
- Navigate to the section of “Workflow”.
- Choose “Transactions”.
- Ensure that the checkbox for “Use Class Tracking” has been selected.
- Now, you can leave the window of “Transactions” for saving the changes.
Note for You: It will be helpful to use classes for one category. It will make your work easier. You can also click on “Sample Classes by Industry” for greater clarity.
- Open the menu of “Lists”.
- Choose “Classes”.
- Click on “+” (plus icon).
- Name the class.
- For adding a subclass, click on the checkbox. Then choose the class under which it will fall.
- Press “Ok” as the final step of this method.
Note for You: For using the class tracking feature of QuickBooks Desktop, a class can be assigned to transactions like sales orders, invoice, check, sales receipt, credit card charges, purchase orders, pay check, etc.
Method 4: How Do I Set up Class Tracking in QuickBooks Online?
In the sections above, we taught you how to set up classes in QuickBooks Online. Now, we’ll focus on tracking them. To do so, you can move to the Settings. Then select Advanced by entering Account and Settings. Now, you can select the Track Classes option by navigating to the section of Categories.
Note for You: This method will be suitable for enabling class tracking in QBO Plus and QBO Advanced.
- Navigate to the “Settings” of QBO.
- Choose “Account and Settings”.
- Click on “Advanced”.
- Go to the section of “Categories”.
- Choose “Track Classes”.
- The option “Warn Me When a Transaction isn’t Assigned a Class” has to be selected. This is an optional step.
- Under the option of “Assign Classes”, choose “One to Entire Transaction”/”One to Each Row in Transaction”.
- Press “Save”.
- Then click on “Done”.
Note for You: The option “One to Entire Transaction” should be chosen if you don’t want to include a class for every product sold by you to the customer. By assigning just one class to the sales receipt or invoice, you will save your time.
Method 5: Set up Class Tracking for Online Payroll in QBO?
In the final method, you can discover the steps for enabling class tracking for Online Payroll. This method will be the best for QuickBooks Online. You can enter the Payroll Settings by clicking on Settings at first. In Preference, you need to pick the Accounting option. Then you can specify the class for the employees.
- In QBO, click on the “Settings”.
- Choose “Payroll Settings”.
- Go to “Preferences”.
- Pick “Accounting”. You can also select “Accounting Preferences” if the other option isn’t available.
- In “Classes”, you can choose to use one class for all your employees. You can also make multiple classes for them.
- Then press “Ok”.
- Select one class for every employee or assign different classes.
- Press “Ok” for saving the selection.
- Press “Ok” again.
How to Make a Class Inactive in QuickBooks?
As a consequence of certain reasons, you may decide to disable a class. Or you may not be requiring that class any longer. You can tap on the gear-like icon and select All Lists. In Classes, you can pick a class that you would like to make inactive. Via the column of Action, you can choose the Make Inactive option to complete this method.
- Press the icon of “Gear”.
- Choose “All Lists”.
- Pick the “Classes” option.
- Choose the class you want to make inactive.
- In the column of “Action”, press the arrow of the dropdown. You will find this arrow next to “Run Report”.
- Select “Make Inactive”.
- Press “Yes”.
Note for You: In case you wish to see all the classes in QuickBooks including the ones which are inactive, then you can go to the page of “Classes”. Access the “Gear” icon. You will find it above the “Action” column. From this icon, you’ll be able to get a list of all the classes.
In Summation of the Above
Convenience while managing your business is one of the significant purposes of creating classes in QuickBooks. By creating them and enabling class tracking, you can easily track your transactions and other things. For creating classes in QuickBooks and its different versions, as well as for tracking them, we outlined several methods on this page. These methods were equipped with every piece of information needed to execute them in a successful manner. In case you find these methods absolutely great, do acknowledge the efforts of our tech experts. Lastly, we hope you keep reading and sharing our posts!