
 +1-877-790-2297
QuickBooks accounting software allows its users to create a backup of accounting data online or in local storage. In addition, QuickBooks offers different types of backup such as automatic backup and scheduled backup. If you update the backup settings and set it to automatic or vice versa, you may confront errors. This eventually ends up stating “QuickBooks Scheduled backup not working” or “QuickBooks automatic backup not working” error on your screen.
If you are facing problems while proceeding with scheduled or automatic backup, one has to diagnose the main cause and troubleshoot the error accordingly. Read more for in-depth details.
This guide demonstrates the leading causes of the failed backup issue. Besides this, we will provide different solutions for both automatic or scheduled backup issues in QuickBooks.
Why is QuickBooks Backup Not Working on Windows 10?
In QuickBooks, automatic backup initiates when you close the company file whereas scheduled backup can be initiated if it can access the backup location regardless of the open or closed status of the company file. However, certain problems can affect the backup process due to which you encounter QuickBooks Online backup not working.
Whether you encounter backup issues in QuickBooks Online and Desktop, the following pointers could be the main reasons behind the backup error.
- If your QuickBooks file name contains more than 65 characters, the issues are likely to appear. Using a lot of spaces, special characters or underscores between the file names can also be a problem.
- Improper configuration of QuickBooks’s login credentials.
- If the company file path or backup file is long, you may face problems. Along with this, if the company file is not present in the root drive, it will create conflicts.
- Huge file size also seems to be a problem. If the backup file size is more than 3 GB or the QB file is too large, it will cause problems.
- Having insufficient permissions to access Windows can also be the reason behind this error.
- Wrong drives such as pen drives or external drives also affect the backup process.
- QuickBooks settings can be the main cause for scheduled or automatic backups.
Be it scheduled or automatic backup, the above-mentioned are the main reasons that affect the backup process. To overcome this problem, one has to execute the repairing solutions which we will discuss in further detail.
How to Fix “QuickBooks Scheduled/Automatic Backup Not Working” Error?
As specified earlier, QuickBooks lets you use a type of backup. It includes automatic, scheduled, and manual backups. Each type of backup helps you in different ways. Using the Automatic Backup (ABU) is quite beneficial as it creates a backup of QuickBooks company files as you close it. However, in some situations, backup seems to fail. We have already discussed the leading causes and now we will move to the repairing solutions.
To avoid such issues related to automatic or scheduled backup, we suggest you upgrade your accounting software, change the backup preferences, and use QuickBooks in Compatibility Mode. Besides that, you can change the directory, remove the temporary folders, and run the Verify & Rebuild Utility.
Let’s have a look at the following methods manually.
Fix 1: Download the QuickBooks Updates
QuickBooks functions properly when it is updated to the latest version. Running QuickBooks with old updates might not support all the features and eventually breaks into errors such as “QuickBooks 2016 scheduled backup not working”.
To avoid such issues, it is suggested to check the new updates and install them on your computer to keep QuickBooks updated.
- Open “QuickBooks” software on your computer.
- Then, move to the “Help” menu.
- After this, select the “Update QuickBooks” button.

- Now, press the “Update Now” button.
- Here, one has to select the “Get Updates” option. This will start downloading the new updates.
Once the update is successfully downloaded, you can restart QuickBooks programs. As the software launches, accept the prompt of terms and conditions.
Fix 2: Check the Backup Settings
Preferences that you have set for automatic or scheduled backup can be problematic. Hence, one should verify the backup settings in QuickBooks. For this, you can follow these steps stated below:
- Move to the “File” menu in QuickBooks.
- Then, select the “Backup/Save Copy” option. As you choose this option, the “Backup” or “Save Copy” window will open.
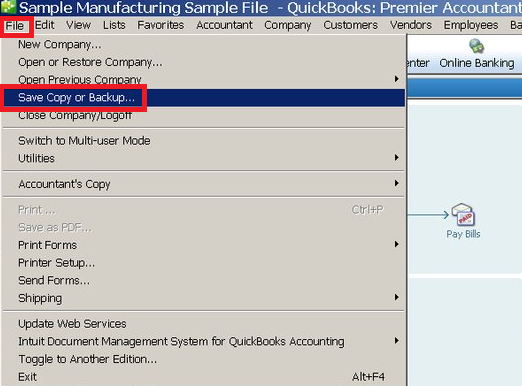
- After that, click on the “Backup Copy” section.
- Press the “Next” button.
- Now, click on the “Options” to set back the defaults.
- Once done, click the “Next” button.
- Then, select the “Change the Location” or “Use This Location” option.
- Choose the “Next” button.
- At this point, you need to click on the “Only scheduled future backups” button or choose the “Save it Now” option.
- After clicking on the “Next” option, you can add the number for taking the backup of your QuickBooks files.
- Press the “Finish” button.
When you are done setting the preferences for the scheduled backup, you can continue using the backup. If you do not see the “QuickBooks 2017 scheduled backup not working” error, it indicates the error has been fixed.
Fix 3: Run QuickBooks in Compatibility Mode
When the QuickBooks program shows errors, you should try running the problem in the Compatibility Mode. This will prevent your program from errors and you can use QuickBooks without conflicting the errors.
To run QuickBooks in Compatibility Mode, you can carry out the following instructions:
- Go to the desktop screen and click right on the “QuickBooks” software icon.
- Then, choose the “Run QuickBooks in Compatibility Mode” option from the right-click menu.
- As you move to the “Compatibility Mode” window, select the “Compatibility” option.
- Now, place the checkmark for “Run this program in Compatibility Mode for”.
- After this, you have to select the “Windows” version from the dropdown.
- Once done, move to the “Privilege Level” option.
- Now, place the checkmark for the “Run this program as an administrator” option.
- Later, you can click the “Apply” button.
Once you apply this setting, the QuickBooks program starts running in the Compatibility Mode. If you are still having issues with the backup then you can switch to the next step.
Fix 4: Run Verify and Rebuild Data Utility
QuickBooks Verify and Rebuild Data Utility help you to fix several types of problems related to the QuickBooks data. With the advantage of using this utility, you can detect the error and repair it automatically.
- Open “QuickBooks Desktop”.
- Navigate to the “File” menu.
- Hover the mouse cursor on the “Utility” section.
- Then, select the “Verify Data” from the drop-down list.

- After this, QuickBooks starts finding the company file that contains errors.
- If it displays “Your Data has Lost Integrity” then close the message and move to the “File” menu.
- Now, again place your mouse cursor on the “Utility”.
- Choose the “Rebuild Data” option.
- Press the “OK” button when it appears on the “Backup Company Data” window.
- After that, you can create a backup of the company file information on your desktop.
- Once done, hit the “OK” button.
As you execute these steps, QuickBooks rebuild data utility repairs the corrupted or damaged company file. When the process is finished, you can press the OK button. To verify if the error has gone, attempt to schedule a backup.
Fix 5: Change the Directory
When nothing works for you, changing the directory will be beneficial for you. All you are required to do is rename the QuickBooks company file. To rename the QuickBooks file, first, you need to locate it and browse the file to the specified location.
Note: Before moving forward, we recommend you take a backup of your QuickBooks company files.
- To check the file location, go to the “QuickBooks” homepage.
- Press the “Ctrl + 1” or “F2” key. This will open a “Product Information” screen.
- Here, you are required to note down the file location provided in the “File Information” tab.
- Moving forward to the “File” menu.
- Then, click right and choose the “Rename” option.
- Here, you need to add the new name for the QB file and press the “Enter” key.
- Once done, click the “Yes” button to confirm the action.
- Now, set up the QuickBooks program to use a new name for the company file.
- For this, you will have to click on the “File” menu.
- Click the “Open or restore an existing company” option.
- Choose the “Open a company file” option.
- Press the “Next” button.
- Then, click on the renamed file and click the “Open” button.
This way you can open the file after changing its name. Henceforth, you can use the new file that you have just renamed in QuickBooks.
Fix 6: Delete the Temp Folder
By removing the temporary files and folders, you can fix a number of errors. If you encounter a “QuickBooks automatic backup not working” error, you should try removing the temp folder.
- Open the “Run” command by pressing the “Windows” and “R” keys together.
- In the “Run” dialog box, start typing “%TEMP”.
- Now, click the “OK” button or press the “Enter” key.
- In the “Temp folder” window, you can select all the folders. For this, you can press the “Ctrl + A” keys together. This will select all the files at once.
- Now, hit the “Delete” key.
- Press the “Yes” button to confirm your action.
This is how you can delete all the temporary files from your system. This will help you to get rid of minor bugs or QuickBooks errors.
In a Nutshell
It is strongly recommended to take a backup of QuickBooks data and company files. Users can enable automatic or scheduled backup based on their preference. However, you may bump into the “QuickBooks automatic backup not working” or “QuickBooks 2016 scheduled backup not working” error. To fix this backup issue, you can implement the troubleshooting methods. Changing the directory and backup settings can help to overcome this error.
We have more such guides requested by the users. Check out the following links to repair QuickBooks software errors: