
 +1-877-790-2297
QuickBooks auto data recovery is a feature cum tool. In times wherein you have lost your important business data, you can implement it to recover that data or file. Since not each one of you may be an expert at using this tool or feature, we decided to help you out. We have also authored well-instructed methods for recovering your lost data and recent transactions by running this tool.
- What is QuickBooks Auto Data Recovery?
- What Does QuickBooks Auto Data Recovery Do?
- Things to Keep in Mind Before Using the QuickBooks Data File Recovery Feature
- How to Recover Recent Transactions with QuickBooks Auto Data Recovery Tool?
- Option 1: Recover Lost Data via Your Original “.TLG” File Along with “.QBW.adr” File
- Option 2: Recover Your Recent Transactions via “.QBW” File and “.TLG.adr” File
- How can I Disable or Turn off the QuickBooks Auto Data Recovery Feature?
What is QuickBooks Auto Data Recovery?
QuickBooks comes with a popular feature known as ADR or Auto Data Recovery. It can also function as the QuickBooks Auto Data Recovery tool. Using this, you can prepare your company file’s backup for the purpose of recovering the lost financial data as well as the QuickBooks files which have been harmed.
Sometimes, losing crucial files can affect your business. When you have access to such a tool or feature, recovering the files and data can be possible. Using the tool, .QBW.tlg or QuickBooks Transaction Log File and .QBW or QuickBooks Company File can also be duplicated for auto-recovery. With the QuickBooks auto data recovery files, you can resume your business operations.
What Does QuickBooks Auto Data Recovery Do?
The auto data recovery tool helps in executing internal diagnostics on your QuickBooks company file. It will be helpful to know that this feature can take approximately an hour to do so after the file has been launched by you. In case your company file opens and clears the tests, this feature will identify whether the file is fine. After that, one backup copy of your company file will be made. You can find this file in the Auto Data Recovery folder. Starting from this point, once the first copy has been created for it, the transaction log of auto data recovery will include every transaction which has been added to your file.
Then after a period of 12 hours of making the first copy, another copy of your file will be made. However, you will be required to keep the software open. On the off chance that the file is closed, the copy will be made when QuickBooks is launched the next time. This means that two copies of your file will be prepared. The initial file will be as old as 12 hours while the second one will be 24 hours old. Later, the older copy will be removed.
Things to Keep in Mind Before Using the QuickBooks Data File Recovery Feature
In this section, we have mentioned 3 crucial things that you should know prior to using the Auto Data Recovery feature of this accounting software.
- The QuickBooks Auto Data Recovery tool can be used by the users of QuickBooks Pro, QuickBooks Premier, and QuickBooks Enterprise on Windows computers.
- You may not find the ADR feature for the software’s Accountant Editions.
- Users may not be able to attempt auto data recovery for any backup that is bigger than 1.5 GB.
How to Recover Recent Transactions with QuickBooks Auto Data Recovery Tool?
When you lose your recent transactions, some of your business tasks may get interrupted. It may be possible that the data may have been accidentally deleted by you. Using the ADR feature, QuickBooks data file recovery can be initiated. There are two ways of attempting the same. Using the first option, you can use the ADR feature along with the “.TLG” file and “.QBW.adr” file. The second option will make use of this feature along with the “.QBW” file and “.TLG.adr” file.
Option 1: Recover Lost Data via Your Original “.TLG” File Along with “.QBW.adr” File
To recover the data you’ve lost using the ADR feature, “.TLG” file, and “.QBW.adr” file. In the beginning, you can add a new folder named QB Test on the Desktop. Then visit the Company File’s location and browse the “.tlg” file. Afterwards, you can go to File Explorer. After making a few changes here, you can head to the QuickBooksAutoRecovery folder to finish all the steps.
Below, you can learn how to recover QuickBooks data step-by-step.
- Go to your system’s “Desktop” and prepare a new folder.
- Name the new folder as “QB Test”.
- Visit the folder where your “Company File” has been stored.
Pro Tip: You can enter the screen of “Product Information” and “No Company Open” window to know the location of your “Company File”. For opening the screen of “Product Information”, you can tap the “F2” key or press a combination of “Ctrl” key and “1” key to access the same.
- In the folder of the “Company File”, look for the file with “.tlg” as its extension. The file which you’re looking for will have the same name as that of the “Company File”.
Alert: In case you are unable to find the “.tlg” file, you can press the “Ctrl” key and “E” key. The “File Explorer” will be launched. Click on “Organize”. Then select “Folder to Search for options”. This will be suitable for Windows 8, Windows 8.1, and Windows 10. Then press “View”. Now, select “File Name Extension”. Click on “Hide Extensions for Known File Types”. Press “Apply”. Then click on the “Ok” tab.
- After the “.tlg” file has been located, make a copy of it.
- Visit the “QB Test” folder and paste the copy in it.
- Rush to the folder named “QuickBooksAutoRecovery”.
Pro Tip: The “QuickBooksAutoRecovery” folder can be found in the location where you have saved the company file.
- Ensure that the “QB Test” folder is open.
- In the folder, right-click on the file named “.QBW.adr” and press “Rename”.
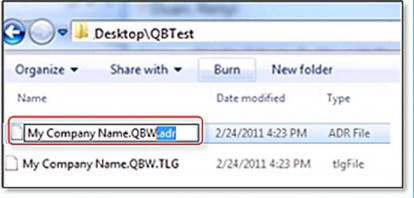
- In the file’s name, choose “.adr” and remove it.
- Now, go to “QuickBooks”.
- Launch your “Company File”. This should be the file which has been saved in the newly made “QB Test” folder.
- Ensure that all the transactions exist in the file. You can utilize the account register for this purpose.
- Then click on “File”.
- Select “Utilities”.
- Choose the “Verify Data” option.
- Place the file that is damaged in another location.
- From the “QB Test” folder, move the file’s copy to its original location.
Option 2: Recover Your Recent Transactions via “.QBW” File and “.TLG.adr” File
This option will also help you find out how to recover QuickBooks data via the ADR tool. You will also require the “.QBW” and “.TLG.adr” files for recovering the data. In this option too, you’ll have to add a new folder with the name QB Test on the Desktop. Using your Company File, you can move to the QuickBooksAutoDataRecovery folder. The steps followed by this have been written below.
Alert: It will be helpful to know that the QuickBooks Auto Data Recovery tool can take as many as 12 hours for getting back the data you have lost.
- Initially, head to the “Desktop”.
- Make one “New Folder” here.
- Enter “QB Test” as the name of this folder.
- With the help of the QB company file feature, you have to launch the “QuickBooksAutoDataRecovery” folder.
Pro Tip: In case you would like to know the company file’s location, you can visit the screen of “Product Information” by hitting the “F2” key or a combination of “Ctrl” key and “1” key. You can also check the window of “No Company Open” to know the same.
- Find the “.TLG.adr” file and “.adr” file. The name of both the files will be the same as that of the company file.
Alert: If you’re unable to find the “.TLG.adr” file and “.QBW.adr” file, press together the “Windows” and “E” keys to enter the “File Explorer”. Choose the “Organize” option. Then pick “Folder and Search Options”. Click on “View”. Select the option of “File Name Extension”. Ensure that the “Hide Extensions for Known File Types” option has been selected. Hit “Apply”. Then push the “Ok” button.
- Make a copy of the “.TLG.adr” file as well as the “.QBW.adr” file. Paste the copies of the files in the “QB Test” folder.
- Then choose both the files placed in the “QB Test” folder. Remove “.adr” from the names of these files.

- Visit “QuickBooks”.
- Go to the “QB Test” folder and launch the company file stored here.
Pro Tip: It will be helpful to utilize the “Account Register” for the verification of the transactions.
- Now, select “File”.
- Next, pick “Utilities”.
- Click on the “Verify Data” option.
- In the “QB Test” folder, see to it that the data which has been recovered isn’t damaged. If the data has no issues, then copy it.
- In the folder of the original QB company file, paste the data.
How can I Disable or Turn off the QuickBooks Auto Data Recovery Feature?
It may not be recommended by us to turn off the QB Auto Data Recovery feature. However, if the need arises due to some reason, you can use this method for disabling it. You can trace a path to find the “qbw.ini” file. You can make certain edits to this file and restart your PC.
- Open the location given as follows:
“C:ProgramDataIntuitQuickBooks Enterprise Solutions 13.0” - Here, look for the “qbw.ini” file.
- After opening the file, look for two lines. The second line “QBAUTOBACKUP” has to be changed from “1” to “0”. Now, QuickBooks auto data recovery will turn off.
- Finally, you can start over your computer to give effect to the changes.
Alert: As you disable or turn off this feature, you may face difficulties in case you lose the data.
What is the QuickBooks Auto Data Recovery Folder?
The users of QuickBooks Pro and QuickBooks Premier versions are likely to find one additional folder. It will carry certain new files. This folder can be understood as the QuickBooks Auto Data Recovery folder. It functions as a backup for a user’s QB company file. It is important to understand that this folder is automatically created by the accounting software. Also, the users of the software should refrain from removing this particular folder.
Alert: Whenever a user opens the QuickBooks company file, the software will initiate certain tests on it. This will be done in order to keep the data updated. Also, it will be useful to know that not every piece of information will be supported by the folder. So, to prepare a backup of all the crucial information, you can back up the data on your own and store it in another location.
Thoughts in Closing
QuickBooks ADR feature is one of the many helpful features of the software. It helps you recover your lost files and transactions in an effortless way. To run this tool cum feature of QuickBooks, you can use files like “.TLG” file, “.QBW.adr” file, and “.QBW” file. Within some time, your transactions or files will get recovered.
Should you also like to know the way to remote access QuickBooks, our blog will assist you. Click here to read easy QuickBooks remote access methods. Additionally, you can learn how to fix the QuickBooks error H202 with this helpful read.