
 +1-877-790-2297
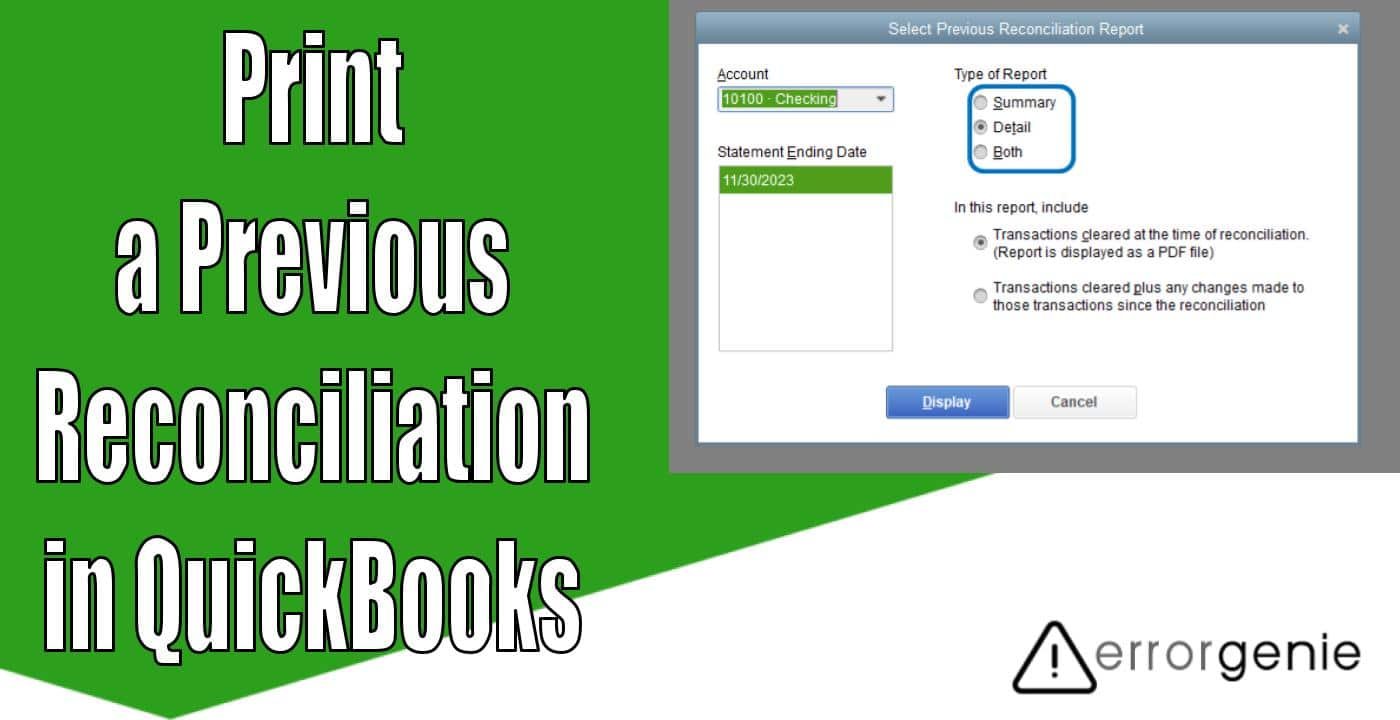
Intuit software provides numerous types of reports to run through which you can view your account details. Uncleared Transaction Report, Previous Reconciliation Report, and others are helpful in many ways. For instance, you can run the report to view important information for a selected time period, report type, and account type. This Previous Reconciliation Report also helps you to detect discrepancies and other errors so you can fix the issues and reconcile the account successfully. If you are thinking “how do I print a Previous Reconciliation in QuickBooks”, don’t worry. All you need to do is run the Previous Reconciliation Report, apply the customization to narrow down your result, and then take prints. Besides printing, users can export the report as PDF or Excel.
Introduction to Previous Reconciliation Report
By running the Previous Reconciliation Report, you can find reports for the recent 120 reconciliations in your QuickBooks account. It includes QuickBooks Accountant, Enterprise, and Premier. However, in QuickBooks Desktop Pro, you can view the most recent reconciliation by running the Previous Reconciliation Report. This is also recommended to save the reconciliation report in PDF format. Alternatively, you can export the report to an Excel format every time you proceed with account reconciliation. This will always make a copy of the report available for your reconciliation.
How to Print a Previous Reconciliation in QuickBooks?
There can be instances when you complete the bank reconciliation of the current month but want to print a copy of the previous bank reconciliation. To do so, you just need to run the reconciliation report and select the time period, account type, report type, and other details to narrow down the result. After this, you can print or export the report in QuickBooks. The procedure of printing previous reconciliation reports can be different in QuickBooks Desktop and QuickBooks Online.
How Do I Print a Previous Reconciliation in QuickBooks Desktop?
To print the Previous Reconciliation Report, you need to run the same report. All you have to do is choose the account you have reconciled, select the reconciliation period, report type, and type of transactions you want to view. This will show you the details you have searched for. Thereafter, you can print or export the report.
- Click on the “Reports” menu.
- Then, hover your mouse over the “Banking” option.
- After this, choose the “Previous Reconciliation” option.
- Press the “Account” drop-down option.
- Now, choose the account you have reconciled.
- Go to the “Statement Ending Date” area, you need to choose the reconciliation period for which you want to take prints.
- Here, you can choose the “Both” or “Detailed” option for the report type.
Tip: If you open the Previous Reconciliation Report to fix the reconciliation discrepancies, It is recommended to select the Detailed option for the Report Type.
- Here, you need to choose what transactions you would like to view on your report. For instance,
- You can select the transactions that are cleared during the time of reconciliation.
- Or, you can choose the transactions that are cleared as well as any modification made to the transaction that will also appear in the report.
- When everything is ready, you can run the report by clicking on the “Display” button.
- At this point, you will see the “Print” button. Click on it to print your reports.
On the top menu bar, you will also see the Excel option here. Click on this Excel drop-down menu to export your report in Excel format or PDF format. By running the Previous Reconciliation Report, you can also review the issues or discrepancies. If required, you can customize your report to narrow down the details.
How Do I Print a Previous Reconciliation in QuickBooks Online?
In QuickBooks Online, you will have to run the Reconciliation Report to print the previous bank reconciliations. When you complete the bank reconciliation, QBO prepares the reconciliation report automatically. By selecting the account, statement ending date, and report period, you can view the report. Thereafter, you can get the print of your previous reconciliation report.
- Click on the “Reports” menu from the left.
- Then, search for the “Reconciliation Report” using the “Find report by name” bar.
- Choose the “Reconciliation Reports” option.
- Once done, you can select the “Account” that you wish to view.
- Similarly, you need to choose the “Reports Period” for the account reconciliation you wish to print.
- Now, select the “View Report” link from the “Action” section.
- Click on the “Statement ending date” option.
- When your reconciliation report is ready, click on the “Print” button located on the top right of your report.
This is how you can take prints of the previous reconciliation report in QuickBooks Desktop and QuickBooks Online. All you have to do is run the reconciliation report, apply the preferences, and take print of the report. You can also export the reconciliation report if required.
How to Print the Bank Reconciliation in QuickBooks?
If you are willing to print the bank reconciliation then you will have to run the report so you can get the print. All you have to do is make sure that you open the reconciled accounts from the company file settings. Then, start printing your bank reconciliation report.
- Click on the “Settings” option from the company file of QuickBooks.
- Here, you can choose the “Reconcile” option through the drop-down arrow.
- At this point, you will see all the lists of accounts. You can select the account you want to print off.
- Once done, switch to the “Reconcile Reports” tab. Here, you will see the list of reconciled entries.
- Now, scroll down to the end of the screen and click the “Print” button.
By following these steps, you can easily print the reconciliation report in QuickBooks. If required, you can print the bank reconciliation summary report and cleared transaction report as well.
How to Print the Cleared Transaction Report in QuickBooks?
QuickBooks also allows you to print all the cleared transactions. This can be done by running the report by applying filters.
- Go to the “Settings” menu.
- Then, select the “Chart of Accounts” option using the drop-down menu.
- When a new window opens, click on the “Run Report” button.
- Click the “Customize” button.
- Now, you can create the filter.
- At this point, you need to specify the date range. This will show you the list of cleared transactions. In case you have confusion then do the following:
- Skip the “Form” field.
- Choose the end date as the date of the statement.
- Click the “Rows and Columns” tab.
- Here, you can also select the “Change” columns.
- Now, click the “Last Modified” button.
- Select the “Add” button.
- Once done, filter the entries by the status. Then, click the “Status” tab and choose the “Cleared” button.
- Select the reconciled entries and run the report.
- When you see all the entries of cleared reconciliation then find the one you are looking for.
- After this, search for the last modified date of that particular entry.
- Once you have the last modified date, you can start over and select the “Customized” button located on the top.
- Here, you can enter the dates for the “From” and “To” columns.
- Select the “Columns” and “Rows” tabs located on the left.
- Now, filter the entries by the “Transaction Type”.
- Then, scroll down to the bottom and run your report.
- When you see the report ready, click the “Print” button.
The aforementioned steps will help you to view and print the cleared transaction report. By using the filtration feature, you can view only the details you want. Then, print the report in just one click.
Summing Up!
After you reconcile your account, QuickBooks automatically prepares the reconciliation report. By running the bank reconciliation report, you can view all the transactions including the beginning balance and ending balance. If you want to print or export the report, you can do that easily. All you have to do is run the report to view the transaction summary and get them printed.
To print the customer notes and journal entries in QuickBooks, you can check out the following guides: