
 +1-877-790-2297
QuickBooks users can import different types of data into their accounting software. If you wish to import inventory, this can be done by preparing the Excel sheet. All you have to do is enable the inventory feature, create a worksheet, and upload it to the QuickBooks account. This will populate each detail in the right column. For more information, learn with us how to import inventory into QuickBooks in different versions.
- How to Import Inventory into QuickBooks Desktop?
- Step 1: Enable the Inventory Tracking Feature
- Step 2: Prepare the Spreadsheet
- Step 3: Import and Update Inventory
- How to Import Inventory into QuickBooks Online?
- Step 1: Enable the Inventory Tracking Feature
- Step 2: Prepare the Inventory Sheet
- Step 3: Import the Inventory Sheet into QBO
- How to Import Inventory into QuickBooks POS?
How to Import Inventory into QuickBooks Desktop?
To import the inventory in QuickBooks Desktop, you are required to follow a series of steps. First, you will have to enable the inventory tracking feature in your account. After this, you need to prepare a spreadsheet with curated rows and columns. Once done with the material, you can import and update the inventory into a QuickBooks account.
In the following discussion, you can learn here how to import inventory into QuickBooks Desktop with detailed steps:
Step 1: Enable the Inventory Tracking Feature
To turn on the inventory tracking(Turn Off Inventory Tracking in QuickBooks), one has to log in with admin rights. Thereafter, you need to add the new account with different types such as Inventory Asset, Sales Income, and Cost of Goods Sold. Check out the following steps to understand the whole procedure of enabling the Inventory Tracking feature.
- Go to the “Edit” menu.
- Then, click on the “Preferences” using the drop-down menu. While performing these steps, you have to make sure that you are logged in as an administrator if the multi-user mode is enabled.
- Now, go to the “Preferences” window, select the “Items & Inventory” option.
- Click on the “Items & Stock” option.
- After this, click the “Company Preferences” tab.
- Here, you can place the checkmark for the “Inventory and Purchase Orders are Active” option.
- Press the “OK” button to continue.
- Now, move to the “Lists” menu.
- Then, click on the “Chart of Accounts” option.
- Click the “Account” option.
- Go with the “New” button from the options.
- Here, you need to choose the “Inventory Asset” as your account type.
- Click on the “Continue” button.
- Now, move to the “Account Name” section, enter “Inventory Asset”.
- Press the “Continue” button.
- Click on the “Next” button.
- Then, click on the “Sales Income” as your account type.
- Select the “Continue” option.
- In the “Account Name” field, enter “Sales Income”.
- At this point, you need relevant account details in the required fields, for example, the account number.
- Once done, click the “Continue” button.
- Hit the “Next” option.
- After that, move to the “Cost of Goods Sold” account. Please note the Cost of Goods Sold is also known as a COGS account. So, you will see the “COGS” option from the “Type” drop-down menu.
- Now, you can add “Cost of Goods Sold” in the field of “Account Name”.
- Hit the “Continue” option.
- Press the “OK” button.
As you follow these steps, the inventory tracking feature will be enabled. In addition, the new account with different types will be created successfully in QuickBooks Desktop.
Step 2: Prepare the Spreadsheet
Now that you have enabled the inventory tracking feature, the next step is to create an excel with dedicated columns. If you are not sure what all columns you should add, we will help you with that. Let’s have a look at the following steps:
- Navigate to the “Insert” menu.
- Then, click on the “Worksheet” in “Excel”.
- When the new sheet is opened, you can continue creating columns with the following information:
- In Column A, type “Inventory”. Make sure you include this text for every time available on your spreadsheet.
- Now, enter the “Items’ name” in Column B.
- In Column C, type “Description” of the item.
- Then, enter “Sales Income” in Column D.
- Move to Column E and enter the “Cost of Goods Sold”.
- In Column F, enter the “Inventory Asset” option.
- In Column G, add the number of inventory items in numeric form.
- Moving ahead to Column H, enter the cost of your item relating to each unit. Make sure that you don’t use any dollar sign. Just type the cost in the standard format of “0.00”. Please note that the cost you have paid is the total for the inventory item, not for the amount you charged to your customers.
- Now, move to Column I and enter the “Sales Price”.
- In Column J, enter your reorder point. This is basically the number of units remaining before the QB prompts to order additional items.
- You can leave Column K blank because this will automatically calculate the total value of the inventory depending on the cost per unit.
- In Column L, enter the date when the current inventory stock affects the account. Here, you can use the past or future date. Make sure you use the date format as MM/DD/YYYY.
- Move to Column M, add the manufacturer part number if required.
After completing all the columns, you can finish the process for each in the QuickBooks inventory. This way you can properly prepare the spreadsheet.
Step 3: Import and Update Inventory
Since you have enabled the inventory feature and prepared the spreadsheet, it’s time to upload this sheet and update the inventory. To do so, you can read the following steps:
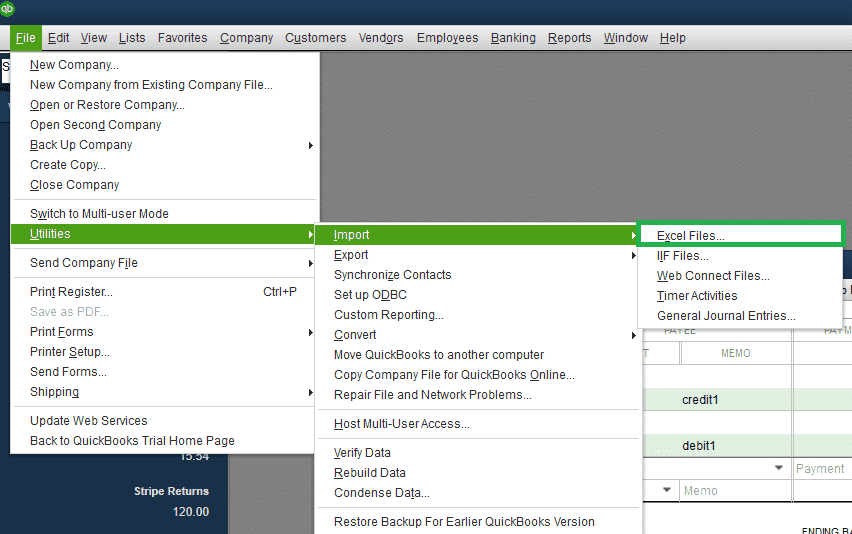
- Go to the “File” menu.
- Then, click on the “Utilities” option.
- Select the “Import” button.
- Click on the “Excel Files” option.
- Then, click on the “Advanced Import” option.
- Hit the “Browse” button.
- Now, you can find the spreadsheet you have just created.
- Click the “Open” button.
- Choose the sheet with the data added to the spreadsheet.
- Now, clear the checkbox for the “This Data File Has Header Rows” option.
- Press the “Choose a Mapping” drop-down menu.
- Click on the “Add New” button.
- Here, you need to type “Inventory Import” in the field of “Mapping Name”.
- Once done, select the “Import Type” drop-down menu.
- Choose the “Item”.
- Click the “Save” button and click the option to import the items.
As you perform these steps, it will import the items and update incorrect values. This is the entire process to import inventory adjustments(Delete Inventory Adjustments in QuickBooks) into QuickBooks Desktop.
How to Import Inventory into QuickBooks Online?
Inventory can also be imported in QuickBooks Online. All you have to enable the inventory tracking feature. Then, create the inventory sheet with dedicated columns and import the sheet into QuickBooks Online. In the following discussion, we will show you the whole procedure. Please note, these steps can be performed in QuickBooks Online Advanced or Plus.
Step 1: Enable the Inventory Tracking Feature
To enable the inventory tracking feature, you have to go through the QuickBooks settings. Here are the steps one can follow:
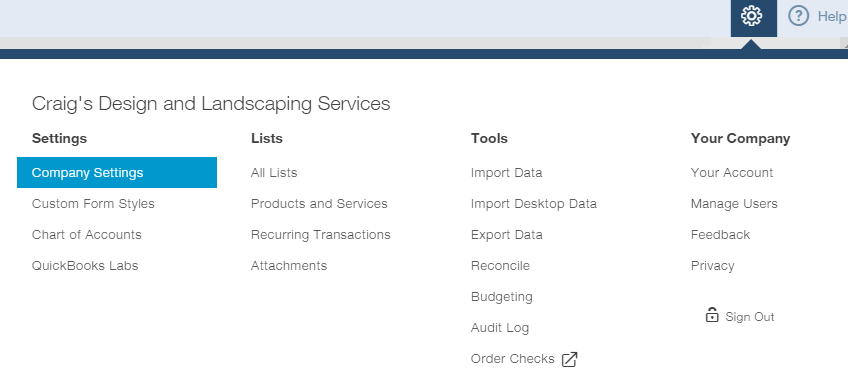
- Navigate to the “Gear” icon located on the top right.
- Then, select the “Company Settings” option.
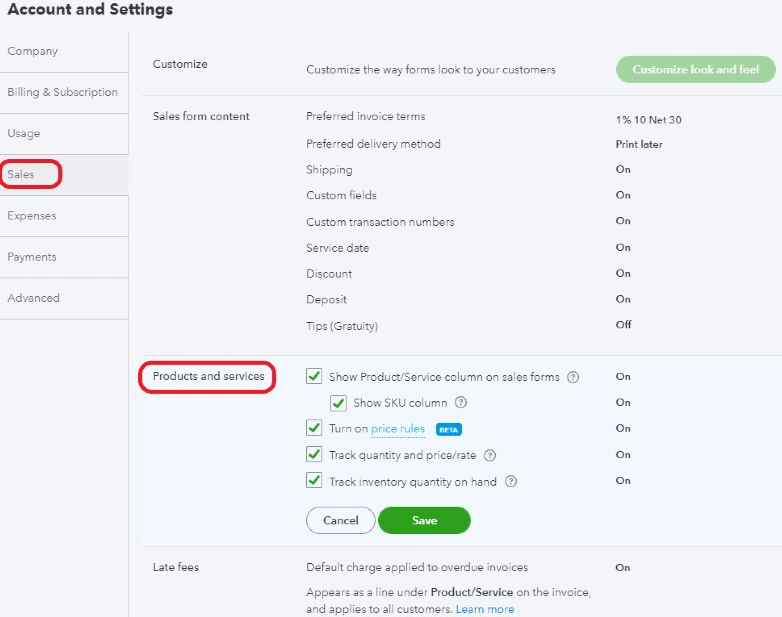
- Now, click on the “Sales” option from the “Products and Services” option.
- At this point, you are required to enable the “Track inventory quantity on hand” or “Track quantity and price/rate” options.
- Once you enable the option, you can continue downloading the sheet from QuickBooks Online to fill out the details automatically so that you can easily import the inventory.
- To download the inventory sheet, you can click on the “Sales” menu.
- Then, select the drop-down menu from the “New” section.
- Click on the “Import” button.
- When the next screen appears, download the form so that you can edit and upload it.
Once the form is successfully downloaded, you can open it by using Google Docs, Microsoft Excel, or another spreadsheet app that you use such as OpenOffice or LibreOffice.
Step 2: Prepare the Inventory Sheet
After enabling the inventory tracking feature, you are supposed to create a sheet in which you will have to make columns with dedicated headings. Here, we will show you what all fields you are required to add:
- Product/Service Name: You should add a unique name for the product or service. In case you integrate the inventory with other apps then changing the product or service name can cause errors. Also, remember that if you are a seller on Amazon then add the same name you have mentioned for Amazon SKU.
- Sales Description: Here, you can add the product name or the title from Amazon. This field will automatically populate on your invoice when you choose the product or service for the documents. Although this field is optional, you can still use it if you have no descriptive item SKU/Names.
- SKU: This field creates confusion among sellers because SKUs remain unique or status for most retailers. This means you can have several products in QuickBooks Online that share the same SKU. We recommend using the ASIN of your product here.
- Type: In this field, you can add the Inventory, Non-inventory, or Service in this field.
- Sales Price/Rate: You can leave this blank so that the transactions entered by the user are forced to add the correct price.
- Taxable: QuickBooks Online by default makes the product taxable. So, if your product is not taxable, you can add “No” here.
- Income Account: QuickBooks use the sales of product income account by default for all the sales starts from this item.
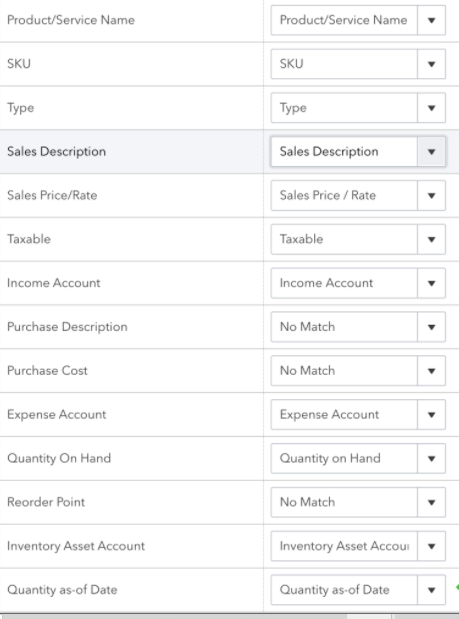
- Purchase Description: A few sellers may want to add the description. Although this field can be optional.
- Purchase Cost: QuickBooks Online does not use this field to calculate the purchase cost or COGS. If there is an absence of the number, QB will refer to this column.
- Expense Account: Cost of Goods Sold account is the default account chosen by QuickBooks. If you have any other income account, you can consider using another expense account.
- Quantity on Hand: Here, the quantity of products can be added. However, if you are setting up the company from scratch, add zero here.
- Reorder Point: This field will help you know if you need to reorder any product.
- Inventory Asset Account: You may require to change this if you change the income and expense account.
- Quantity as-of Date: The date you will add here, QuickBooks will use it as a limit. You will not be able to backdate the transaction to the date before the products’ as-of date.
As you fill the required fields carefully, you can easily import this sheet to QuickBooks Online. Continue to read how to import inventory into QuickBooks Online.
Step 3: Import the Inventory Sheet into QBO
When your sheet is ready, you can upload it. But, be sure that you use the correct format of date such as MM/DD/YYYY. To upload the sheet, you can perform the following steps:
- Click on the “Sales” menu.
- Then, select the “Products and Services” option.
- Click on the “Import” button from the “New” drop-down menu.

- Here, you can click the “Browse” button to choose the sheet you create in Step 2.
- Now, hit the “Next” button.
- At this point, you can verify all the sections if all the data fields are selected.
- If you wish to change the labels, you can choose them in the next screen to map the labels correctly.
- Hit the “Next” button after verifying the labels.
- After this, you need to check the products and services details for the final time. If any changes require then cancel the import and make the required changes.
- Once done, click the “Import” button located at the bottom.
As you import the report, you will have all the details properly. In case you miss out on any column, reimport the sheet.
How to Import Inventory into QuickBooks POS?
QuickBooks Point of Sale (POS) is a sales application that is integrated with QuickBooks Desktop. If you wish to import inventory into QuickBooks POS, it is possible to make it happen. The procedure would be quite similar to the one we have discussed above.
Before getting into the main procedure, you need to be aware of the important points mentioned below:
- First of all, make a backup of the data.
- Scan the worksheet before mapping and then search for any strange data or anomalies. For this, you can do the following:
- Run the spreadsheet in a notepad so that you can make sure there is no irregularity.
- Then, copy-paste the problematic file into a new worksheet by using paste special > values.
- Besides that, convert your lists into smaller sections.
Once done, you can find the template for importing the data. Thereafter, you can set up and import the data to QuickBooks POS. Let’s find out how to import inventory into QuickBooks POS.
Step 1: Find the Import Template
To perform this step, you need to make sure that the QuickBooks Point of Sale is not running on your computer. After that, you can do the following:
- Launch the “Windows Explorer” on your computer. For this, you can use the “Windows + E” keys.
- Now, navigate to the following location:
- C:\Users\Public\Public Documents\Intuit\QuickBooks Point of Sale (x.0).
- Press the arrow sign located next to the folders.
- Then, click right on the “QuickBooks POS Import Template.xls”.
- Here, you can click on the “Delete” button using the drop-down menu.
As you have finished implementing these steps, you can continue setting up and importing the data into QuickBooks Point of Sale.
Step 2: Set Up and Proceed with Import
Here, you have to select the type of data you wish to import and then choose the default template to which you want to import the data. Here are the steps for the same:
- Launch “QuickBooks Point of Sale”.
- Then, go to the “File” menu.
- Now, click on the “Utilities” option.
- Select the “Import” button.
- Press the “Next” button from the “Data Import” window.
- Select the type of data you wish to import.
- Press the “Next” button.
- Click the “Default Template”.
- Click the “Import Template”
- If you have chosen a different template then you can perform the following steps:
- Click on the “Custom File”.
- Then, click the “Next” button.
- Locate the saved templates and be sure that you have picked the right worksheet tab.
- To match the columns from the template you have imported, you can locate the data manually. For that, you can click on the “Choose File Mapping” option, Select the “Add” or “Mapping”, and then select the “Manage Mappings”.
- When the mapping is completed, you can click the “Save” button.
- Press the “Next” button.
- Follow the on-screen instructions to proceed with the import.
- Once done, select the “Next” button and follow the prompts given on your screen.
- Click the “Import” button after verifying the import wizard.
After performing these steps, you can close the wizard. If required, you can export the data to store a copy of the file.
To Conclude
It is pretty easy to import the inventory into QuickBooks. As you enable the inventory tracking feature, you can create the spreadsheet. In this whole procedure, the worksheet plays the main role. While preparing the CSV file, you have to make sure that each column is created properly with correct details so that when you upload the worksheet into QuickBooks, it shows the details correctly. Here, we have already shared each step for how to import inventory into QuickBooks Online and Desktop versions.
To know more about import, you can check out the following blog links: