
 +1-877-790-2297
Sales representatives (Sales rep) are either contractors or regular employees of the company. If you are having an employee or vendor that is a sales representative then you can add their details to the Sales Rep List. By doing so, you can track the income. You can even edit and view the sales rep anytime. For those who are not aware of how to add sales rep in QuickBooks, we will enlighten you. In addition, we will teach you to set up a sales rep in QuickBooks Online and Desktop on Mac PC.
In this tutorial, we will show you how to add sales rep field to invoice in QuickBooks Desktop and Online.
How to Add Sales Rep in QuickBooks Online?
QuickBooks Online has no feature to record the sales rep. However, it offers an alternative way to add a sales rep. Location tracking is the feature that is used by QuickBooks users for the salespeople.
All you are required to enable Location tracking from the Company categories in QuickBooks. Thereafter, you can add the names of the reps in the Location List. This way you can track the income of the sales representatives.
To know how to add a sales rep in QuickBooks Online using the Location tracking feature, follow these steps:
- Go to the “Settings” icon and choose the “Company Settings”.
- Then, click on the “Categories” option. This should be located on the left.

- Now, you need to place the check mark for the “Location Tracking” feature.
- After that, you can choose a name that you wish to use.
- Once done, click the “Save” button.
- To add the name of the sales representative to the list, you can click on the “Gear” icon.
- Go to the “All Lists” option.
- Select the “Location List”.
- Press the “New” button. This will add the names of the rep to a list.
Whenever you prepare the sales receipt or invoice, you will see an extra field so that you can select the name of your salesperson. By selecting the salesperson’s name, the form will automatically link to it. After that, you can run the Profit and Loss report by Location.
Tip: You can also use the Class and custom fields to add and track the sales rep in QuickBooks Online.
Add Sales Rep in QuickBooks Desktop
If you are using QuickBooks Desktop for Mac and want to manage sales reps, it is even easier. By adding the sales rep in QuickBooks for Mac, you can allow different sales reps on the sales forms. This way you can track the income of your sales representatives.
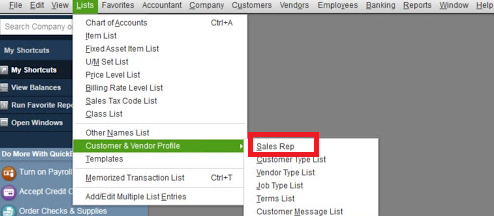
All you are supposed to do is go to the Lists, select Customer & Vendor Profile, locate the Sales Reps option, hit the Plus icon to add the Sales Rep names.
To manage and learn how to add sales rep to invoice in QuickBooks Desktop (Mac), you can pursue the steps stated below:
- Click on the “Lists” menu.
- Then, choose the “Customer & Vendor Profile”.
- From here, you can find the “Sales Reps” option.
- Now, you can click the “+” icon. This will show a “Sales Rep” window.
- After that, start selecting the employee and vendor. You can add them using the “Sales Rep Name” drop-down menu.
- Once done, press the “OK” button. Or, you can click the “Next” button to add more sales reps.
Note: If there is no sales rep in your employee, vendor, or other lists then you may be prompted to add the new. To do so, you can click on the Set Up button to add the sales rep with proper information. You can also use the Quick Add option to add only the name of the sales rep. Other details can be saved later.
- In case you want to edit the sales rep, click on the “Lists” menu.
- Click on the “Customer & Vendor Profile” option.
- Select the “Sales Reps” option.
- Click twice on the sales rep. This will open the “Edit Sales Rep” window.
- Now, you can make the necessary changes and press the “OK” button when done with editing.
Note: You can even make the sales rep inactive. All you have to do is choose the Inactive checkbox and uncheck the Include Inactive checkbox. This will hide a particular sales rep from the list.
- If you want to view the sales rep report, you can click on the “Reports” option.
- Then, click on the “Sales” option.
- After that, you can click on the “Sales by Rep Summary” for viewing the summary report. To view the detailed report, you can select the “Sales by Rep Detail” option.
This is how you can add the sales representatives in QuickBooks for Mac. We have also shown the best ways to edit and view the sales reps in QuickBooks Desktop.
In a Nutshell
The income of the contractors or regular employees of the company becomes easy to track if you add sales reps to the QuickBooks list. Although there is no sales rep feature in QuickBooks Online, an alternative way can make it happen. For instance, you can add the sales reps in QuickBooks Online using the Location tracking feature. Whereas, on the QuickBooks for Mac, you can directly go to the lists and add sales reps in the Customer & Vendor Profile. We hope you have understood how to add a sales rep in QuickBooks Online and QuickBooks Desktop for Mac.
Also learn the procedure of Delete Budget in QuickBooks Desktop and Online.
Ans. To set up the sales rep in QuickBooks Desktop for Mac, you can navigate to the Lists menu, choose the Customer & Vendor Profile, and find the Sales Reps option. From here, you can click on the Plus button and start adding the Sales Rep names to track the income of the sales representatives. QuickBooks Online users may not have a dedicated feature for adding Sales Reps, however, they can use the Location Tracking feature (as an alternative way) from the Company categories.