
 +1-877-790-2297
QuickBooks error 61 is the common error that users encounter while using QuickBooks accounting software. Due to the presence of this error, users fail to update the software and face difficulties while performing certain tasks. Understanding the cause of error 61 in QuickBooks is important so that you can execute the right troubleshooting method. Let’s see what you can do to fix this error.
- What are the Main Causes of QuickBooks Error 61?
- Fast and Effective Ways to Fix Error 61 in QuickBooks
- Fix 1: Verify and Rebuild Company Files
- Fix 2: Restore the Company Files
- Fix 3: Update QuickBooks to the New Version
- Fix 4: Run Reimage Repair Tool
- Fix 5: Repair Microsoft .NET Framework
- Locate .Net Framework
- Correct Settings for .NET Framework 3.5 SP1
- Correct Settings for .NET Framework 4.5 (or later)
- Fix 6: Update Windows System
What are the Main Causes of QuickBooks Error 61?
There can be numerous reasons due to which you confront QuickBooks error 61- verify account balance failed. Some of the possible factors are listed below:
- When you move the QBW file to some other location that is not specified in QuickBooks, it may cause error messages.
- Damaged ND and TLG files can also bring errors.
- When upgrading QuickBooks Desktop, your company files may get corrupted.
- When an important framework or registry page is removed from your system, it may cause error code 61 in QuickBooks.
- QBW file is corrupted.
- If your banking institution provides an account number or a credit card that you have not linked yet, it may cause errors.
- Malware attack, Spyware, or virus can also welcome QuickBooks rebuild error 61
Other minor bugs in your Windows system or QuickBooks misconfiguration can also be the reason for QuickBooks error 61. Once you diagnose the main cause of this error, you can implement the right solution to get rid of the unexpected error.
Fast and Effective Ways to Fix Error 61 in QuickBooks
To fix QuickBooks error 61, the first and foremost solution you can implement is to rebuild the data. By verifying and rebuilding the company files, you can repair several issues on your QuickBooks software.
Apart from this, you can implement other methods such as restoring the company files from the latest backup, updating QuickBooks Desktop to the latest version, running Reimage Repair tool, updating Windows computers, and repairing .NET Framework on Windows computers.
To be more clear, we are explaining these methods in detail.
Fix 1: Verify and Rebuild Company Files
The major reason you are viewing QuickBooks rebuild error 61 is that your company data is damaged. By running verify utilities, you can find out the error. If it detects any error, you can run rebuild utilities.
All you are required to do is go to the File menu, click on the Utilities, and choose if you want to verify or rebuild the company data.
Run Verify Utilities
- Launch your “QuickBooks Desktop”.
- Navigate to the “File” option.
- Choose the “Utilities” button.
- Click on the “Verify Data” option.
- The “OK” button has to be pressed.
After performing these steps, your QuickBooks program will show if there is an error. If it cannot find any problem with the QuickBooks company data then press the “OK” button. In case of finding any kind of problem with the data then you can simply click on the “Rebuild” option
Run Rebuild Utilities
- In “QuickBooks Desktop”, go to the “File” option.
- Choose the “Utilities” button.
- Choose the “Rebuild Data” option.
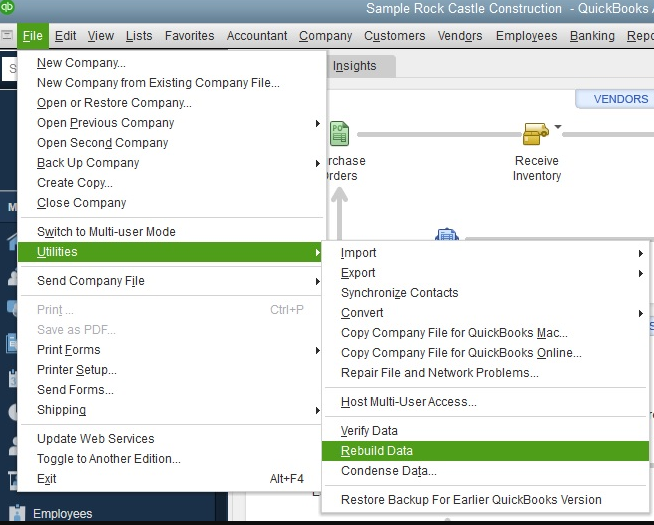
- Select the “OK” button.
- To create a backup, press the “Save” button.
- As the process is over, you can click on the “View Results” button.
If you are facing any error related to rebuilding then you should verify and rebuild your file in QuickBooks. This way you can get rid of error 61 in QuickBooks.
Fix 2: Restore the Company Files
Due to the corrupted company files, you may encounter issues unexpectedly. To repair these files, you can restore the company data. This will place your data back in place.
To restore the company files in QuickBooks, you can pursue the following steps:
- From the “File” menu.
- Then, click on the “Open or Restore Company”.
- Select the “Open a Company File” option.
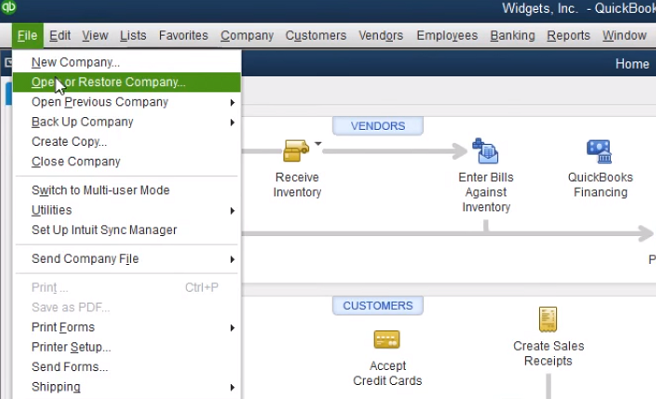
- Click the “Next” button.
- Find the backup file on the device and select the “Open” button.
- Now, follow the prompts given on your screen.
- Write down the details on the “Update Company File for New Version”.
- Press the “Update Now” button and follow the instructions given on your screen.
- As you finish the backup process, click on the “Yes” button.
Make sure you save the backup file to the secured location on your computer. Whenever you lose the data, you can restore it using the latest QuickBooks backup file. QuickBooks backup can also be restored QuickBooks Files Recovery tool, TLG with QBW.ADR file, Recycle Bin or create duplicates to restore your data.
Fix 3: Update QuickBooks to the New Version
By upgrading your accounting software, you can solve several issues affecting the QuickBooks company files. If you are bothered by error 61 in QuickBooks then you should update the QuickBooks software.
To download and install QuickBooks update, you can go through these steps. Make sure the QuickBooks program is not running on your computer.
- Hold down the “Ctrl” key on the keyboard until you see your QuickBooks opened on your Windows computer.
- Then, go to the “Help” button.
- Select the “Update QuickBooks” option.
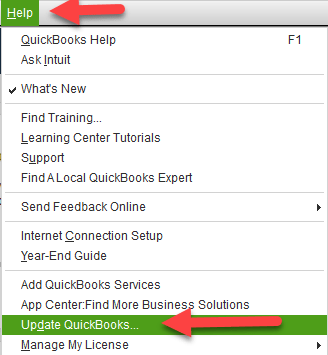
- Then, the “Update Now” button should be selected.
- Go to the “Get Updates” option.
- Press the “OK” button when prompted.
- Now, you can close the “QuickBooks” window. Then, you can relaunch it on your computer.
- As it restarts, you can press the “Yes” button to install new updates.
When you are done performing these steps, the new QuickBooks update will start installing on your Windows system. Once done, you can check if you can open your company files.
Fix 4: Run Reimage Repair Tool
Reimage Repair Tool helps to clean your computer. When you run this tool on your Windows computer, it scans your devices and detects errors. As you click the Start repair button, it starts repairing the corrupted files.
- Visit the “Intuit” website.
- Download the “Reimage Repair Tool”.
- Install the tool on your computer.
- Run the tool to perform.
- As your tool scans and finds the error, click the “Start Repair” button.
When the process is finished, your files will be repaired. Make sure you restart your computer and verify if QuickBooks error 61 reflects on your screen.
Fix 5: Repair Microsoft .NET Framework
Windows components such as Microsoft .NET Framework are required to run certain programs on your computer. If these components are corrupted then you might not run QuickBooks and access the company files properly.
Thus, in this fixation method, we will show you to repair the .NET Framework 3.5 SPI along with the .NET Framework 4.5 or later. Before proceeding, you need to locate .NET Framework via the Control Panel.
Locate .Net Framework
- Go to the Windows “Start” button located on the bottom left.
- In the search bar, type “Control Panel”.
- Select the “Control Panel” when you see the results.
- Switch to the “Program and Features” option.
- Press the “Uninstall a Program”.
- Select the “Turn Windows features on or off”.
- Here, you need to find the “.NET Framework” in the list.
After you locate the Microsoft .NET Framework, you can continue correcting the .NET Framework 3.5 SPI and .NET Framework 4.5 or later.
Correct Settings for .NET Framework 3.5 SP1
- If the “.NET Framework 3.5 SP1” checkbox is not selected then you can select the checkbox to enable this.
- Press the “OK” button to save the changes.
- After this, restart your Windows computer.
- If the “.NET Framework 3.5 SP1” checkbox is already selected then you can select the checkbox to disable this.
- Press the “OK” button to save the changes.
- After this, restart your Windows computer.
- When you go to log in to your computer, you can follow the on-screen prompts to turn on the “.NET Framework 3.5 SP1”.
Correct Settings for .NET Framework 4.5 (or later)
- In case the “.NET Framework 4.5 (or later)” option is not chosen then you should select this checkbox.
- Hit the “OK” button to save your changes.
- Now, you can restart your computer.
- At this point, if you find the “.NET Framework 4.5 (or later)” checkbox is selected then you should disable this.
- Now, you can click the “OK” button to save your changes.
- After that, restart your PC.
- While logging in to your computer, you can follow the on-screen prompts to turn on the “.NET Framework 4.5 (or later)”.
As you follow these steps, your .NET Framework will be repaired. After that, you can reinstall QuickBooks on your Windows computer and check if you can view QuickBooks error 61- verify account balance failed.
Fix 6: Update Windows System
Running a Windows system with an old version can create problems between the programs. Hence, it is important to check for new updates and install them as soon as possible. This will avoid errors.
To install the new updates on Windows 10, you can jump to the following steps:
- Click on the “Start” button or press the “Windows” key on your keyboard.
- Write “Settings” in the search bar.
- When “Settings” appears in the result, click on that to open.
- Switch to the “Update and Security” option.
- Hit the “Windows Update” option.
- Select the “Check for Updates” option.
- The “Restart Now” button should be pressed.
When your system restarts, the new updates will start installing on your computer. With the updated version, you can run QuickBooks Desktop properly without conflicting errors.
To Wind Up
It is common to encounter QuickBooks error 61- verify account balance failed when accessing QuickBooks software. By knowing the actual reason for this error, you can repair the error effortlessly. For instance, running the rebuild utility can solve the QuickBooks error. However, you can use other methods which we have already discussed in this blog.
Do you want to resolve other types of errors in QuickBooks? Check out the following links you may be interested in: