
 +1-877-790-2297
QuickBooks Sync Manager is an integrated feature of QuickBooks that helps you to sync company files with the third-party app. It is also useful in communicating with the add-on services by Intuit. However, the QuickBooks Desktop Sync Manager can come up with certain errors. To avoid the impact of error, users prefer to disable or stop the service of the sync manager. If you are facing any issues exchanging the data between applications, turning off the Sync Manager will be helpful. If you have no idea how to disable QuickBooks Sync Manager, stick through this guide till the end.
This quick guide will help you to understand the impact of disabling Sync Manager. Along with this, you will learn different ways for how to disable QuickBooks Sync Manager.
Impact of Disabling QuickBooks Online Sync Manager
It is common to confront technical issues while using Sync Manager with QuickBooks. By disabling this feature, you can get rid of certain errors you are facing currently. However, disabling the sync manager can have an impact on your data exchange. As you disable QuickBooks Sync Manager, users will not be able to exchange data between other applications.
Moreover, you will be unable to sync the applications ( use QuickBooks information) with QuickBooks Desktop. It includes applications Intuit 1099 e-file service, Abacus, 3PointData, CRM for QuickBooks – Crik-IT, and B2B & Rep Portal. However, if you disable Sync Manager, you can run QuickBooks Web Connector tool as an alternative to Sync Manager.
Ways to Disable QuickBooks Sync Manager
To disable or stop the services of QuickBooks Sync Manager, one has to perform a number of steps. First of all, you are required to clean company files that are synced currently. Only after that, you can disable the QuickBooks Sync Manager. Let’s have a look at the following details.
Disable QuickBooks Sync Manager
To stop QuickBooks Online Sync Manager, you need to locate the Intuit Sync Manager. After that, move to the Sync Enabled tab and hit the Disable button using the drop-down menu.
See below for step by step guide:
- Open the “Taskbar”.
- Then, look for the “Intuit Sync Manager” through the system tray.
- Once you find “Intuit Sync Manager”, click right on it.
- At this point, you will see the company files that are syncing.
- Here, you need to go to the “Sync Enabled” option.
- Now, click on the “Disable” option. This option can be selected from the drop-down menu.
Clear the Sync Settings
As you disable the QuickBooks Desktop Sync Manager, you are required to clear the synchronization settings. You can implement this setting within your QuickBooks software. Let’s have a look at the following steps:
- Launch “QuickBooks Desktop” on your computer.
- Move to the “Help” menu located on the top.
- Choose the “Manage Data Sync” option.
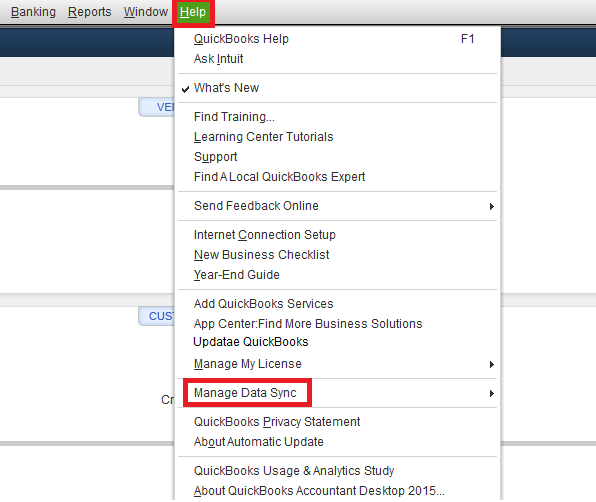
- Select the “Clear sync settings” option.
- Press the “Yes” button in order to confirm changes.
Once you are done clearing the sync settings in QuickBooks, you need to make sure that the QuickBooks Sync Manager error does not occur. To prevent errors in the future, one should remove the Sync Manager from the company settings to stop Intuit Sync Manager update messages or automatic updates.
Uninstall the QuickBooks Sync Manager to Avoid Errors
To disable the updates or uninstall the Sync Manager, you need to perform a series of steps. For instance, you need to stop the Sync Manager service from the Task Manager. After that, you can rename the Sync Manager files. Later, you can open the Run dialog box and remove QuickBooks Sync Manager from the Startup menu. Go through the following instructions to understand better:
- First of all, open the “QuickBooks Desktop” from the Windows “Task Manager”.
- Then, you need to make sure that the services like “Inuitsyncmanager.exe” are stopped in the “Task Manager”.
- Now, move to the system tray icons and click right on the “Sync Manager” icon.
- Here, you can click the “Exit sync manager” option.
- After that, open the local drive files or you can navigate through the following path: C:\Users\AppData\Local\Intuit\SyncManager.
- Once done, change the name of “SyncManger” by adding “.OLD” to it. E.g., SyncManager.OLD.
- Thereafter, you can open the “Run” dialog box by pressing the “Windows + R” keys together.
- Then, type “msconfig.exe” in the text field.
- After that, move to the “Startup” tab.
- Here, you can remove the checkmark for “Intuit sync manager” in “Microsoft configuration utility.
Once you are done with these steps, you will not encounter any issues related to the Sync Manager. All you have to do is stop the Sync Manager service in the Task Manager, rename the Sync Manager files, and remove QuickBooks Sync Manager from the Startup menu.
To Sum Up
QuickBooks Sync Manager is useful to exchange data between apps and sync QuickBooks details. But, you may bump into unexpected errors. To avoid such issues, you can turn off the Sync Manager. All you have to do is make sure that no important data is syncing before disabling the sync manager. If required, you can use QuickBooks Web Connector. Here, we have already shared the idea of how to disable QuickBooks Sync Manager.
If you ever find problems working with Web Connector, read this guide to solve QuickBooks Web Connector errors.