
 +1-877-790-2297
In QuickBooks, users deal with multiple items that need to be inactivated or deleted. It happens when you add the items twice and you want to filter them to avoid confusion. In some situations, the transactions have not been used due to which you no longer want to keep the items on the list. If you have the question “how do I delete inventory items in QuickBooks Online” in your mind, then we will help you to understand.
- Important: Create a Backup of QuickBooks Company Files
- How to Delete an Inventory Item in QuickBooks Desktop?
Important: Create a Backup of QuickBooks Company Files
Before taking any action for deleting or making inventory items inactive, you need to remember that taking a backup is the essential step. In case you mess up with the process and lose any of your QuickBooks data or customer details, you can restore them by using the recent backup.
Hence, it is important to create a backup of your QuickBooks company files. If you are not aware of how to take backup, here are the steps for that:
- Open your “QuickBooks” account.
- Click on the “File” menu.
- Search for the “Back Up Company” option.
- When you find multiple options, click on the “Company backup” option.

- Click on the “Create Local Backup” option.
- Hit the “Finish” button.
- When a user confirmation page displays, click on the “OK” button.
As you follow these steps, your backup file will be created automatically. Thereafter, you can continue following the guide for removing the inventory items.
How to Delete an Inventory Item in QuickBooks Desktop?
In QuickBooks Desktop, all the inventory items can be deleted that you copied earlier. This can be done by going through the Lists menu where you can find the Item List. Then, you can select the items you wish to delete and press the Delete Item button.
This should be noted that you can only delete the inventory items manually in QuickBooks Desktop as the batch delete feature is not available currently. For a step-by-step guide, you can follow these steps to learn how to delete an inventory item in QuickBooks Desktop.
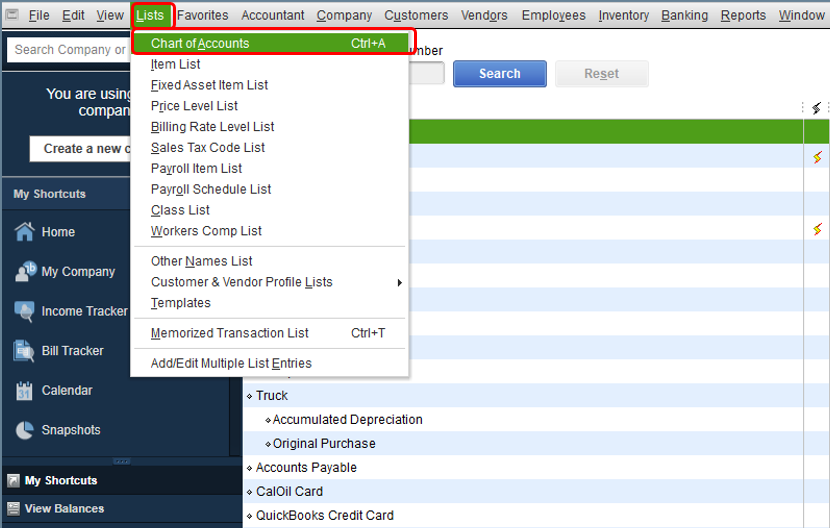
- Go to the ‘Lists” option located on the top menu bar.
- Then, click on the “Item List”.
- Here, select the item that you wish to remove.
- Now, click right on it and press the “Delete” button.
This way you can easily delete the inventory items from your QuickBooks Desktop. Since the batch deletes feature is not supported by QuickBooks Desktop, so you have to delete other inventory items one by one. However, integrating a third-party app can help you to delete multiple inventory items at once.
How to Delete Multiple Inventory Items in QuickBooks Online?
QuickBooks Online users are blessed with a Batch action feature. Using this feature, you can delete even multiple inventory items. To do so, you can navigate through the Gear icon, click on the Product and Services, select the items you want to delete, select the Make Inactive button.
You can follow these steps carefully and learn how to delete multiple inventory items in QuickBooks Online.
- Login to your “QuickBooks Online”.
- Click on the “Gear” icon located on the top.
- Choose the “Product and Services”.
- Select the items that you wish to delete.
- Hit the “Batch actions” drop-down.
- Click on the “Make inactive” option.
- Hit the “Yes” button in order to finish the process.
This way you can make your inventory items inactive. Remember that there is no direct option to delete the inventory items entirely. All you can make them inactive so that they can be reactivated later when needed.
Important Things To Know If You Delete the items in QuickBooks
- Users cannot remove the multiple items or the whole item list at once.
- You can reverse your deletion action once you delete the item. But, if you take any other action then you will not be able to undo the deletion action. In case you mistakenly delete the item then you can click on the “Edit” menu and select the “Undo Delete” button.
How to Delete Inventory Starting Value?
Keeping the books accurate is one of the important moves of your business. Besides inventory items, if you want to remove the starting value of inventory then you have to delete the amount that is linked with the inactive inventory product.
For that, first, you need to reactivate the items in the settings. Once done, you can change the initial cost. We are writing down each step for your convenience.
Reactive the Item
- Go to the “Sales” menu.
- Then, select the “Products and services” tab.
- Select the “Filter” icon.
- Click on the “Inactive” button by clicking on the “Status” drop-down menu.
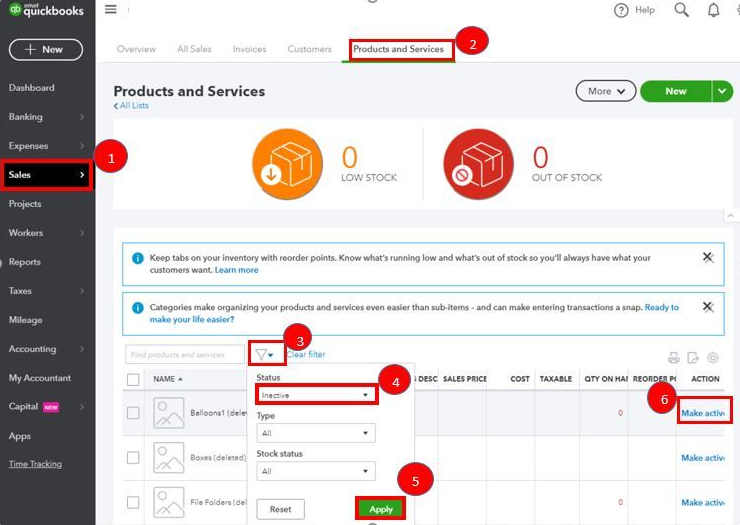
- Click the “Apply” button.
- Choose the items that you wish to reactivate.
- Select the “Make active” button by clicking on the “Action” drop-down.
- Click on the “Clear Filter” option to return to the active items list.
Remove the amount
- Go to the “Products and services” tab.
- Find the items.
- Select the drop-down button located near the “Edit” button.
- Click on the “Adjust starting value”.
- Now, change the $50 amount to zero which shows as the “Initial cost”.
- Hit the “Save and close” button.
This way you can delete the amount to ensure that your book records remain accurate. All you have to do is make the inactive items active again and set the cost to zero. This will delete the inventory starting value.
How to Delete Inventory Adjustment in QuickBooks Desktop?
QuickBooks Desktop users often find it difficult to remove the inventory adjustments. If that is the case then you should create a new adjustment. This will offset the duplicate entries. Later, you can add a memo to avoid confusion.
To do so, you can follow these steps:
- Go to the “Vendors” menu.
- Then, click on the “Inventory Activities” option.
- Select the “Adjust Quantity/ Value on Hand”.
- Add the required information.
- If you decrease the quantity then you will see “QTY Difference” as negative.
- Then, you can add a note in the “Memo” field.
- Hit the “Save & Close” button.
Once done following these steps, you can review the Inventory Valuation Detail report and make sure that the details are correct. Here are the steps you can follow:
- Click on the “Reports”.
- Then, select the “Inventory” option.
- Click on the “Inventory Valuation Detail” report.
- Select the items that you adjusted and make sure the details are correct.
When you are done creating a new adjustment and adding a memo to it, you can offset the duplicate entries that you have added for the inventory adjustments.
Delete Entry from the Inventory Part
By deleting the entry from the inventory part, you can remove the particular item from the list. To do so, you can do the following:
- Open “QuickBooks”.
- Login to the account.
- Click on the “New” button.
- Then, select the “Inventory part”.
- Now, go to the “The Particular Item to be Deleted” option.
- Select the “Quick Reports” option.
- Click on the “All Tab” and choose the date range.
- Now, click right on the entry that is located next to the product entry you want to remove.
- Click the “Delete” button.
If you want to delete multiple inventory adjustments then you can follow the same procedure as above and delete the multiple inventories in bulk. Make sure that you click on the Save button. This will save the preferences and inventory adjustments.
How to Hide Inventory Items in QuickBooks?
To keep a good record, QuickBooks, of course, will not want you to delete the items especially if it has been used in transactions. If you do not use or sell these items then you can simply hide them.
- Go to the “Lists” option.
- Click on the “Item List” on Windows. If you are a Mac user then click on the “Items” option.
- Now, click twice on the item that you wish to delete.
- From the “Edit Item” page, choose the “Item is inactive” for Windows. For the Mac users, click on the “Inactive” option.
- Hit the “OK” button.
As you perform these steps, the inventory items will be hidden from the list. If required in the future then you can make the items active in the list.
Important Things To Know If You Hide the items in QuickBooks
- If you are hiding the item, it will only be removed from the list but will remain in your QuickBooks records.
- By clicking on the “Include Inactive” checkbox, you can make the items active in the item list.
- When you make the items inactive then you can reverse the steps anytime. All you have to uncheck the “Item is inactive” option.
- If the “Item is inactive” checkbox is grayed out then you will not be able to make items active. In such a situation, you need to check if it’s a sub-item of the inactive item. If so then create a parent item active or you can simply delete the connection between the sub-item and parent item.
To Wind Up
If you have mistakenly added the same items twice then you can delete one of them to keep a good book record. However, there are a few conditions that you need to keep in mind when hiding or deleting the items. In this guide, we have shown how to delete inventory items, multiple items, inventory starting value, inventory adjustment, and hide the items in QuickBooks Online and Desktop. If you are thinking “how do I delete inventory items in QuickBooks Online”, we hope you have got the answer.
There are different item types in QuickBooks and you may want to switch between them. Learn in detail how to change item type in QuickBooks Online and Desktop.