
 +1-877-790-2297
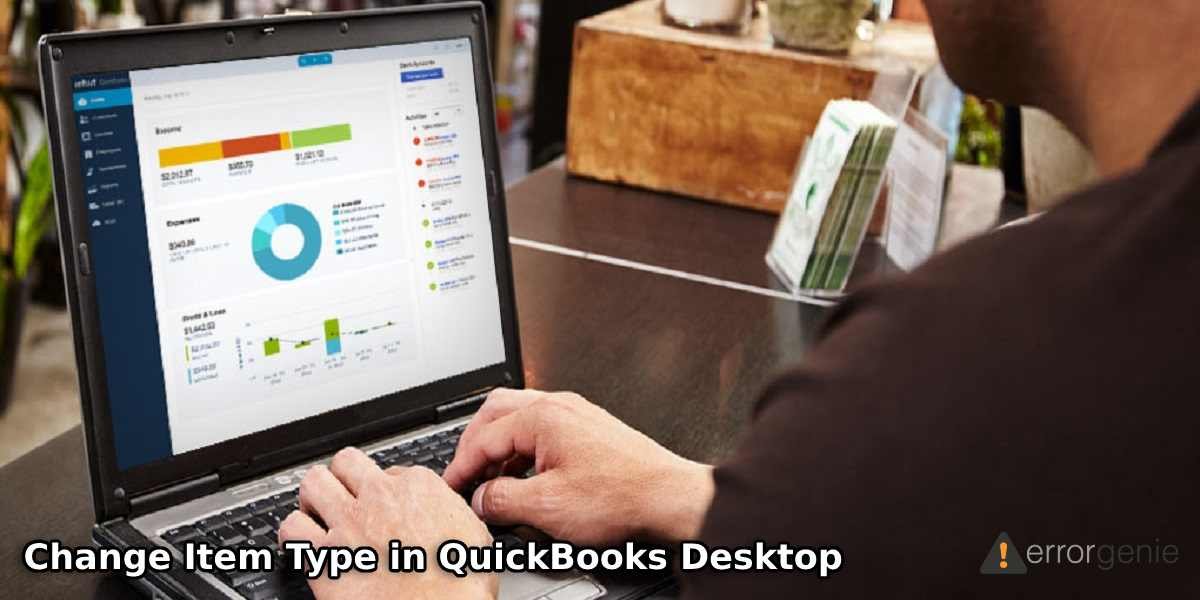
For every business, it is essential to create an inventory of the sales, purchases, services, and products that are supposed to be tracked. QuickBooks is a user-friendly software that makes this process simple. Users can easily add the services, inventories, and switch between other item types. However, most users are not knowledgeable enough to change or switch between item types. Thus, we bring you this guide on how to change item type in QuickBooks Desktop and Online version.
- What Are Item Types in QuickBooks?
- Change Item Type in QuickBooks
- Create a BackUp of QuickBooks Data
- Update the Item Information
- Change the Item Type
- Important Things to Remember About Changing Item Types in QuickBooks
- How to Change the Types of Products and Services in QuickBooks?
- Change Non-Inventory Item to Inventory in QuickBooks
- Change Inventory Item to Non-Inventory in QuickBooks
- Change Non-Inventory to Service Items in QuickBooks
- The Procedure QuickBooks Change Service Item to Non-Inventory
- How to Change Inventory Items in QuickBooks Account?
- Why Do You Want to Change the Inventory?
What Are Item Types in QuickBooks?
Item is something that the company sells, buys, or resells in the course of your business. It could be a product, handling charges, shipping, sales tax, and discounts. It displays as a line on the customer invoices or sales forms.
Different Types of Item Types
QuickBooks majorly uses services or inventory items. However, there are different types of item types in QuickBooks. Each item type serves a different purpose for your business. For your better knowledge, we are providing different types of item types you should be aware of:
- Service: The service is the most important type of your business as it is offered to your customers. With this item type, you can create services that can be charged by the hour or job.
- Inventory Part: When you buy a product for reselling it to the customer is called the inventory part. However, you will not see this item type if you have not activated inventory on the Items and Inventory section available in the Preferences or enabled it during the Easy Step Interview.
- Non-Inventory Part: This is the item type that is used when you purchase a product but do not resell it or sell the product but do not buy it. Even when you buy or resell the product but do not stick in your inventory or track it as an inventory is called the non-inventory part.
- Other Charge: This is a type of item that can be used for charges, shipping, markups, or other line items displayed on the invoices.
- Subtotal: This item type adds up all details before it comes before it. For instance, before you add markups, shipping charges, or subtract any prepayments or discounts, it adds up as a subtotal. In QuickBooks Enterprise or higher version, you can even subtotal the Price, Quantity, Numeric custom columns, and Cost.
- Group: You can use this item type to enter the group of items at once. But remember that all the items should exist in your item list. For instance, if you are receiving shipping charges frequently along with other types of charges that you can simply create the group item that should include those two items.
- Assembly: This item type is supported in QuickBooks Enterprise and Premier editions. Assembly is a type of product that you need to assemble from parts. You can track it as the inventory items in your QuickBooks account.
These are seven item types that are supported in different versions of QuickBooks.This should be noted that not every item type is supported by every edition of QuickBooks. For example, QuickBooks Online mainly supports two types of items; service and inventory whereas QuickBooks Enterprise or other versions support assembly, subtotal, and others.
Change Item Type in QuickBooks
When you create the item lists, they can be updated or edited anytime. Make sure that you create a backup of your QuickBooks data to avoid any loss of company files.
Create a BackUp of QuickBooks Data
To backup your data, you can do the following:
- Login to the QuickBooks company files.
- Go to the “Files” tab.
- Click on the “Create Copy” button using the drop-down menu.
- Select the “Save a backup file” from the dialogue box.
- Hit the “Next” button.
- Go through the local backup radio icon and click on the “Options” tab.
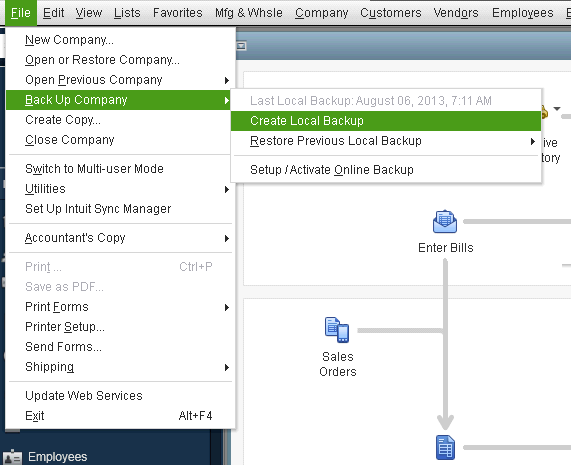
- To store the backup, you can click on the “Browse” button.
- Choose the preferred location.
- Scroll down and click on the “Verification”.
- Click the “Next” button.
When you are done performing these steps, make sure you click the Finish button. This will save the backup file successfully on your computer. Once the backup is taken, you can update or change the item types without worrying about losing the company files.
Update the Item Information
By updating the item type information, you can edit the information in any of the item types. To do so, you can navigate through the following steps:
- Click on the “Lists” menu.
- Then, click on the “Item List” on Windows. In case you use QuickBooks for Mac, click on the “Items”.
- Now, click twice on the item that you wish to change.
- Here, add the changes by going to the “Edit Item” section.
- Click the “OK” button.
If it is required to edit the multiple items then you can click on the List and select the Add/Edit Multiple List window to make changes.
Change the Item Type
If you as a business owner use the Non-inventory part and you wish to change it to other types of the item then you can simply edit the item type and switch from one to another. The basic steps for changing item types in QuickBooks are as follows:
- Click on the “Lists” menu.
- Then, click on the “Item List” on Windows. In case you use QuickBooks for Mac, click on the “Items”.
- Now, click twice on the item that you wish to change.
- Here, choose the new item type using the “Type” drop-down.
- Click the “OK” button.
This is how you can update and change the item type in your QuickBooks account. If required, you can edit the details again depending on the preferences.
Important Things to Remember About Changing Item Types in QuickBooks
When changing the item types in QuickBooks, you may encounter a few restrictions. Thus, before you learn how to change item type in QuickBooks Desktop and Online version, we want you to consider the following:
- If you change the item to the inventory assembly or inventory part item then the “as of” date you add for the total value should be the date that is after the date of recent transactions.
- You can change the type of items but they could be limited so you cannot change the item back always. As an example, if you change the item type from Other Charge to the inventory part, then you should not change its type again.
Since you are aware of the important details, you can make your decision wisely whether you want to change the item types in QuickBooks. In the following discussion, we will be teaching simple or indirect ways to change the item type in the QuickBooks account.
How to Change the Types of Products and Services in QuickBooks?
Whether you use inventory or service item type, you probably prefer to change it someday. If you want to use Service items to Non-Inventory or Inventory to Non-Inventory, we will guide you, how to change item type in QuickBooks Desktop and Online version.
Change Non-Inventory Item to Inventory in QuickBooks
QuickBooks users cannot change the non-inventory to inventory or vice versa. But, as a workaround, you can deactivate the non-inventory and create a new type. To deactivate and create the new item type, you can do the following:
- Login to your QuickBooks account.
- Go to the “Lists” option.
- Select the “Item List” option.
- Now, highlight your item.
- Click right on the mouse and select the “Make Item Inactive” option.
Once deactivated, you can add the new inventory item by the following these steps:
- On the same screen, click right on the mouse.
- Click on the “New” button.
- Select the “Inventory Part”.
- Add the required information.
- Hit the “OK” button to save the details.
Creating a new item type is the only way to change the non-inventory item to the inventory item type in your QuickBooks.
Change Inventory Item to Non-Inventory in QuickBooks
Users are not allowed to change the inventory to non-inventory items but if you play an indirect workaround then it can be possible for you to do so. All you have to do is duplicate the existing inventory items with the non-inventory status to create two versions of the items. Let’s know the procedure of QuickBooks change inventory item to non-inventory.
- Click on the “Reports” menu.
- Choose the “List” option.
- Click on the “Item List” option.
- When you see the existing items in the list, click on the “Modify Report”.
- Then, select the “Filters” option.
- Click on the “Type”.
- Select the “Inventory Part” option.
- Hit the “OK” button.
- When you see the existing inventory items, click the “Print” button in order to make a printed copy of a list.
- Now, click on the “Lists” menu.

- Select the “Items List”.
- Click on the “Item”.
- Then, hit the “New” option.
- Click on the time type “Non-inventory”.
- Read the list of inventory items and add the name for the existing item.
- Add the description for your item, select the cost of the goods that are sold.
- Hit the “Next” button.
- When you are done creating a new non-inventory item, you can repeat the same process in order to replicate the items from your printed list.
This way you can change the inventory to a non-inventory item. The new non-inventory items can be used for future transactions whereas the quantity of the old inventory items will be set to zero. If required you can remove the previous inventory.
Change Non-Inventory to Service Items in QuickBooks
The procedure of changing non-inventory to service items is easy. All you have to do is go through the Gear icon, select the products and services, and check the box for the item type you wish to change.
- Login to your QuickBooks account.
- Go to the “Gear” icon located on the top.
- Click on the “Products and Services” option.
- Now, click on the checkbox next to the non-inventory item you wish to change.
- After that, you can select the “Batch actions” drop-down followed by the “Make service” option.
This way you can change the non-inventory to service in a few simple steps. Batch conversion can also be followed if needed.
The Procedure QuickBooks Change Service Item to Non-Inventory
For converting service to non-inventory, users have to find the item that they wish to change and then edit the information to click on the link so that it can select the item type.
- Navigate through the “Gear” option.
- Click on the “Products and Services”.
- Then, locate the “Item you want to update”.
- After this, go to the “Action column”.
- Click on the “Edit” button.
- Then, you have to click on the “Change type link”.
- Choose the “Inventory” option.
- Here, you might have to add the following details:
- Initial quantity.
- Effective date or as of date. (Make sure the date you mention should be the date prior to the last transaction when the item was used).
- Income, Inventory Asset, and Expense accounts.
- Cost, Sales Price, and Purchasing/Sales information.
- Click the “Save and Close” option.
This should be noted that inventory items cannot be converted to other types. So, if you are changing the type of inventory item then you need to create a new item.
How to Change Inventory Items in QuickBooks Account?
Inventory is an essential part of the balance sheet. It shows the quantity that you have in your stock. This helps you to track the inventory to your inventory asset account. In addition, you can change and delete the inventory item as it is a part of your business’s overall value.
Why Do You Want to Change the Inventory?
There can be two conditions when you want to change the inventory item to another item type:
Condition 1: The first condition is when you prefer to add another item in QuickBooks then you can sell all the stock in order to convert the inventory quantity 0 to deactivate it. Thereafter, you can create a new item in order to replace it.
Condition 2: In the second case, when you want to change the inventory is when you mistakenly add the wrong details so you prefer to remove them. In such a condition, you can create an inventory adjustment to keep everything balanced.
Adjust the Quantity of the Inventory Item
If you want to change the inventory items in your QuickBooks, you will have to adjust the quantity and then find the total value of the adjusted inventory.
- Go to the “Settings” option.
- Click on the “Product and Services” button.
- Find the inventory item from the “Products and Services” list.
- Click on the “Edit” button using the “Action” column.
- Select the “Quantity on Hand” option.
- Click on the “Adjust”.
- Click the “Quantity” button.
- Here, you need to add the value as “0” in the new quantity window.
- Save the changes.
- Once you are done, close the window.
Find the Total Value of the Inventory
After you adjusted the inventory, make sure you find the total value. This can be done through the settings where you need to run the report. Here are the steps for that.
- Click on the “Settings” tab in QuickBooks.
- Choose the “Chart of Accounts” option.
- Now, find the “Inventory Shrinkage Account”.
- Hit the “Run Report” button.
After following these steps, you can look for the adjusted inventory item. Then, keep the amount in another place of the adjusted note.
Create a Journal Entry to Account
Creating a new journal entry is compulsory to your account. Hence, in these steps, we will show you how to create journal entries in QuickBooks.
- Go to the “+New” button.
- Click on the “Journal Entry” option.
- Here, click on the “Account” drop-down from the first line.
- Choose the “Opening Balance Equity” button.
- In the “Debit” column, add the adjustment amount.
- Now, in the second line, click on the “Account” drop-down again.
- Choose the “Inventory Shrinkage” button.
- In the “Credit” column, add the same adjustment amount.
- Hit the “Save” button.
This is how you can adjust the quantity, find the total value, and create the journal entry in your QuickBooks account.
Final Words
Creating an inventory of the sales, purchases, services, and products is important as you need to track them. You may need to add the services, inventories, and switch between other item types. Whether you want to change the inventory to non-inventory or services to inventory, you can do that easily with the help of this guide on how to change item type in QuickBooks Desktop and Online version.
A lot of users ask “how do I delete inventory items in QuickBooks Online”. To learn that, we have prepared this detailed guide for you.