
 +1-877-790-2297
There are times when you find unused accounts in QuickBooks. Such accounts display in the list that does nothing but creates a long list of accounts (unnecessarily). To keep your account look organized, you can remove unused accounts from the list. All you have to do is to deactivate the account and if you require the same account in the future, it can be reactivated again. If you are concerned about “how do I deactivate an account in QuickBooks Online”, we will instruct you with the right guidance.
Why Should You Deactivate the Account Instead of Deleting It?
Deleting the account may cause you permanently lose whereas disconnecting the account can be connected again to online banking if needed in the future. By disconnecting the account, QuickBooks stops downloading new transactions for a temporary period. As you reactivate the account, the transactions can be downloaded again. Moreover, the existing accounting data will not change if you deactivate the account from your QuickBooks online banking.
This should be noted that as you disconnect the account, QuickBooks removes the transaction that was still supposed to be categorized in the section of For Review. Also, you will not be able to download the transactions if they are older than 90 days.
Now that you are aware of the important details regarding deactivating the account, let’s learn how to deactivate an account in QuickBooks Online in the following discussion.
How to Deactivate an Account in QuickBooks Online?
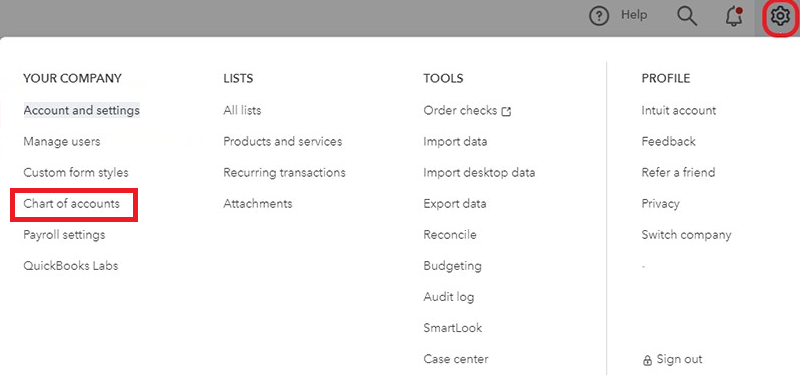
If you are sure about deactivating the account in QuickBooks Online, you can go through the Settings menu. From the Chart of Accounts menu, you can locate the account that you wish to remove. Then, select the Make Inactive option using the Action drop-down menu. You can go through the following steps for better understanding:
- Launch “QuickBooks Online”.
- Then, navigate through the “Settings” option.
- After this, choose the “Chart of Accounts” option.
- Here, you need to find the account that you want to disconnect.
- Once selecting, use the “Action” drop-down menu to select the “Make Inactive” button.
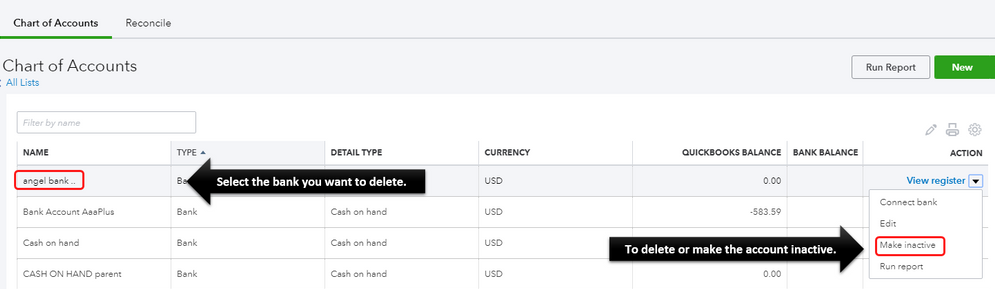
- As you perform these steps, the account will be removed from the list. Now onwards, QuickBooks will not download any new transactions until you activate the account again.
Where to Find Inactive Accounts?
If you are wondering where you find these accounts you have made inactive, we will let you know. As you run the reports, you can view the inactive accounts along with the transactions. QuickBooks Online includes these accounts so that your details can be kept accurately. If required, you can customize a few reports in order to keep the inactive account hidden. However, this may affect the accuracy.
To view the inactive accounts, you can perform the following steps in QuickBooks Online:
- Click on the “Settings” menu.
- Then, select the “Chart of Accounts” menu.
- Here, you can press the “Gear” icon located at the top of the list.
- Now, select the checkbox for “Include inactive”.
What If You Need to Make the Account Active Again?
There can be instances when you wish to keep the account visible in the list of QuickBooks accounts. If that is the case, you can go through the following steps:
- Navigate to the “Settings” icon in QuickBooks Online.
- Then, click on the “Chart of Accounts” menu.
- Now, press the “Gear” icon that should be located above the column of “Action”.
- Here, you can click on the “Include inactive” button.
- At this point, you are required to select the account that you wish to use again.
- After that, click on the “Make active” option.
This way you can get the account back on the list. However, QuickBooks will not edit the Journal Entries that have been to or add the transactions.
To Sum Up
If you no longer require a specific account, you can disconnect or deactivate it anytime. By doing so, you can remove the account from the list and stop downloading the new transactions. If you ever need the same account in the future, you can turn the inactive account active again. With the help of this guide, we have explained how to deactivate an account in QuickBooks Online. Hopefully, you find this blog easy to understand.
Do you want to restore the deleted accounts? Learn here how to recover a deleted account in QuickBooks Online.