
 +1-877-790-2297
When sending invoices to the clients or customers, it includes the email address that you might need to update for a specific reason. There can also be scenarios when you want to change the email message, email template, and replace the old email address with the new one. If you have no idea about how to change email invoice in QuickBooks, we will enlighten you.
In this particular guide, we will cover different ways to change the information related to emails on invoices. It also covers different versions of QuickBooks such as QuickBooks Online, QuickBooks Desktop Enterprise Suit, and QuickBooks Self Employed.
How to Change Invoice Email in QuickBooks?
In QuickBooks Desktop, you may need to change the email address for a number of reasons. Not just email address, you may also want to edit the email message or email template. If that is the case, we will guide you on how to change email invoice in QuickBooks. Moreover, you will learn to edit the email address that has been already sent to the customers.
There can be instances when you want to send invoices to the customer from the same email address regardless of what company you are logged into. QuickBooks basically adds these mail server settings within the program and then sends the invoice to the considered person right from QuickBooks not via Outlook. As a result, the preferences align automatically with the file you are logged into. However, the email address can be incorrect and needs to be updated as soon as possible.
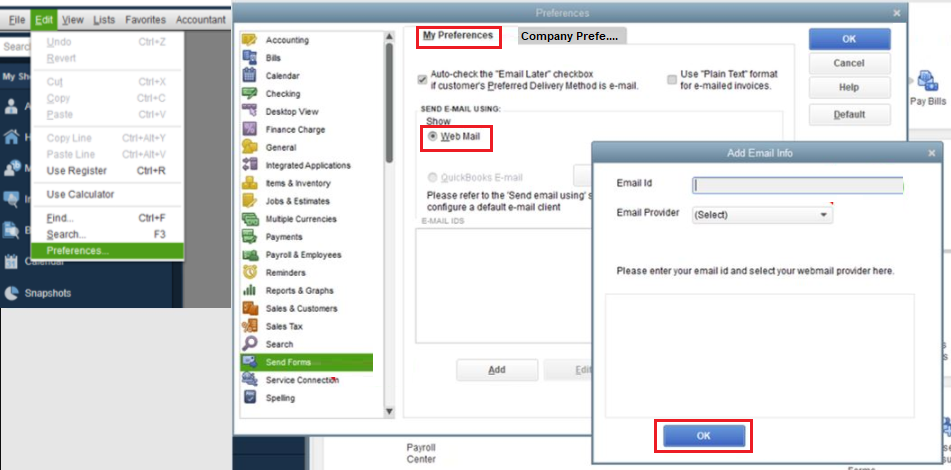
If you want to edit the email address when sending an invoice to your customer, first you need to check the email set up in the Preferences menu.
- Click on the “Edit” menu.
- Then, select the “Preferences” option.
- Choose the “Send forms” button.
- Switch to the “My Preferences” tab.
- Here, you can mark the “WebMail” radio icon.
- Now, press the “Add” button. After doing so, you can search for the provider using the drop-down menu to add the email address.
- Once done, you need to be sure that the “Use Enhanced Security” option is marked.
Note: If you encounter any error message, e.g. Network Error, Please try again then you can uncheck this option (Use Enhanced Security) and press the Ok button.
After that, you can sign into the “Intuit” account. Please note that it is not necessary that the email address or user name you will use here is the same as the one you use for connecting to QuickBooks.
When you see the “Webmail Provider’s login” screen, you can sign in to the account and choose to grant Intuit access.
As you implement these steps, you can try sending the invoice. It is suggested to use the test email first. This will let you know how the email address will appear on the invoice.
How to Change Email Messages in QuickBooks Invoice?
When you send invoices to your customers, you may need to change the default email message. In such a scenario, you can go to the Customization screen and Edit the email message. You can take help from the following steps and learn to change the email address in QuickBooks Self Employed:
- Open the “Invoice” menu.
- Then, click on the “Create Invoice” option.
- Here, you can choose the “Customize” button. This will open the screen for customizing details.
- Now, you can press the “Email” drop-down menu.
- At this point, you can edit your message for the customer.
- Once done, press the “Save and Close” button.
Now onwards when you send the invoices to the customers, they will receive the message you just updated. You can also try sending a test email to see the result before sending the actual invoice.
Steps to Change Invoice Email Template in QuickBooks
If you want to change the email message to the existing invoice template then you will need to add another template so that you can make changes to it. After that, you can send the invoices to the customers with the updated email message. Check out the following steps and learn how to change email invoice in QuickBooks Enterprise Suite:
- In “QuickBooks Desktop”, you can click on the “Edit” menu.
- Then, select the “Preferences” option.
- Now, click on the “Send Forms” option.
- Select the “Company Preferences” option.
- Here, you can click on the “Add Template” option.
- When you see the “Add Email Template” screen, you can add the appropriate details and hit the “Save” button.
This is how you can edit the email body and update the message to send your customers. All you just have to do is add a new template and customize it.
Change the Email Address Sent Already to the Customer
When you add a new email address but the clients are replying to the older one because that is the only email they have, how would change the email address that has been already sent out to the customer invoice? To fix this issue, you can simply add your new email on the Your Work Info screen. Here are the steps for the same:
- Click on the “Invoices” menu located on the left.
- Then, click on the “Create Invoice” option located on the top right.
- Once done, you can go to the “New Invoice” screen located at the bottom.
- Here, you can press the “Edit work info” option.
- When you go to the “Email” field, add the right email address.
- Press the “Save” button.
As you add the new invoice, you can easily add the email address for the invoice. Thereafter, you can send it to your clients through QuickBooks Self Employed.
How do i Change Invoice Email in QuickBooks Online?
On some occasions, you may want to change the email that you are using for the sales forms in QuickBooks Online. To update or change the company email that you use to send invoices, you can pursue the following steps:
- Login to “QuickBooks Online” and navigate to the “Settings” menu.
- Here, you can choose the “Account and Settings” menu.
- Now, choose “Company” located on the left side.
- From the “Contact Info” area, you can click on the “Pencil” icon.
- At this point, you can go to the “Company email” section and add a new email address.
- After this, place the checkmark on the “Same as company email” box.
- Select the “Save” button.
- Hit the “Done” button.
This will assign a new email address for the invoice. Now onwards, your customers will receive the updated email address on the invoice.
To Conclude
If you are planning to update the email address on the invoices you send to the customers, this can be done very easily. Here, we have shown you how to change email in QuickBooks invoice, email template, and email message. You can customize the whole email template based on the company’s preference.