
 +1-877-790-2297
Every QuickBooks user has to set up the correct date and time. That’s because every report you generate or transactions you pass within your program will be occupied with the respective date. When you send a report or invoices to the client, your QuickBooks account will include the date and time automatically within the mailer. However, if you are planning to change or edit the date format in your accounting software, this can be done easily. Let’s read in detail how to change date format in QuickBooks Desktop and Online versions.
The guide illustrates the date format in QuickBooks based on the US and Canada versions. Here, you will learn how to change date format in QuickBooks Desktop 2020 and QuickBooks Online including the date format of Windows computer for QuickBooks program.
Learn About Date Format in QuickBooks
Time and date format may differ depending on the QuickBooks version you are using. If you are using the QuickBooks US version, the date format should be followed as YYYY-MM-DD whereas the QuickBooks Canada version follows MM-DD-YYYY.
There can be scenarios when you use the QuickBooks US version in a US country but your clients are Canada and thus they are using the QuickBooks Canada version. While sending the invoices, recording clients, or sharing other reports, you may confront issues related to date due to the different versions of QuickBooks (the US and Canada). Your clients may also face date issues when receiving the invoices.
Dealing with the indifferent time zone can be very confusing while attempting business operations. Thus, it is important to change date format in QuickBooks Desktop. Even if you are using QuickBooks Online, the date format can be easily changed. Read more to get in-depth details.
How Do I Change the Date Format in QuickBooks through Windows System?
Before moving forward, you should know that QuickBooks does not provide any specific feature to change the date format. Your QuickBooks software picks up the date format and settings you have made on your Windows or Mac system. In other words, the date format and time you use on your computer will be automatically used by QuickBooks software while sharing the invoices(Create an Invoice in QuickBooks), reports, and emails to the clients.
In case your system has the wrong calendar or time settings, it may have a direct impact on your QuickBooks software as it will pick up the wrong date format. Thus, you need to make sure that your system date format and time should be correct so that your QuickBooks program can use the appropriate time and date format.
In the following steps, you will learn how to change the date format in QuickBooks Desktop and Online on your Windows computer:
- To get started, make sure that you close all the running tabs on your computer.
- Now, go to the “Start” menu located at the bottom left.
- From the provided options, you can select the “Control Panel”.
- When the “Control Panel” window opens, move to the “Regional and Language Options/Preferences”.
- This will open another window and now you can close the “Control Panel” window
- Here, you will see the “Formats” tab. From here, you can choose the format of the regional language as per your preference.
- Now, you can change the date formats as you wish to display on QuickBooks.
- Once done making changes, select the “Apply” button. As you hit the apply button, this will display the First day of a week, Long date, and Short date as per your preference.
- After that, you can move towards the “Additional Settings” option.
- From here, you can customize the date format in two ways:
- Decimal Format: If it is 5 hours and 30 minutes then it will be shown as 5.50 by the desktop.
- Minutes Format: In this format, the till be interpreted as 5:30. To avoid confusion, it is suggested to use the Minutes format.
- When you are satisfied with the date formatting, click on the “OK” button to end the process.
By following the aforementioned steps, you can easily change the date formats in QuickBooks Desktop and Online. All you have to do is open the Control Panel and choose the desired date formats. If required, you can customize the date formats using advanced settings.
Steps to Edit the Date Format in QuickBooks Desktop
QuickBooks uses the date and time format settings of your computer system. However, if you want to edit the date format in QuickBooks, you can change the preferences right from your QuickBooks account.
All you are required to do is click on the Edit menu, choose the Preferences tab and go to the Reports and Graphs option. From the Company Preferences, you can select the correct format. Make sure you don’t forget to make changes.
For better insights, you can continue following these steps:
- In QuickBooks Desktop, go to the “Edit” tab located at the top menu.
- Then, click on the “Preferences” tab.

- Select the “Reports and Graphs” option from the left menu bar.
- After this, you can switch to the “Company Preferences” tab.
- Now, you can move to the “Format” tab located under the “Default formatting for Reports” section.

- Here, select the “Date Prepared” option using the drop-down menu.
- Then, choose the desired date format.
- To apply settings, click on the “OK” button twice.
As you follow these steps, the date format will be edited in your QuickBooks Desktop. Now, whenever you can send invoices and reports to the clients, QuickBooks will use the date format you have set.
Steps to Edit the Date Format in QuickBooks Online
QuickBooks users may also be required to edit the date format in their account. From the Accounts and Settings window, you can select the Advanced tab and move to the other preferences. Using the Date format dropdown menu, you can choose the appropriate date format and save changes.
For step by step guide, you can pursue the steps stated below:
- Click on the “Gear” icon located at the top right.
- Now, you can choose the “Accounts and Settings” section.
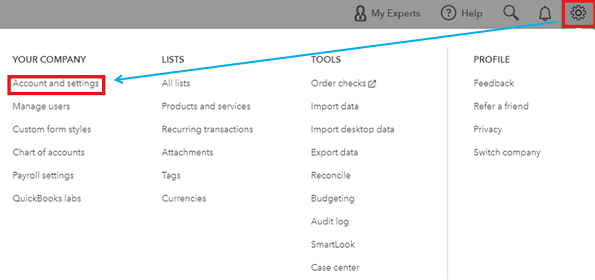
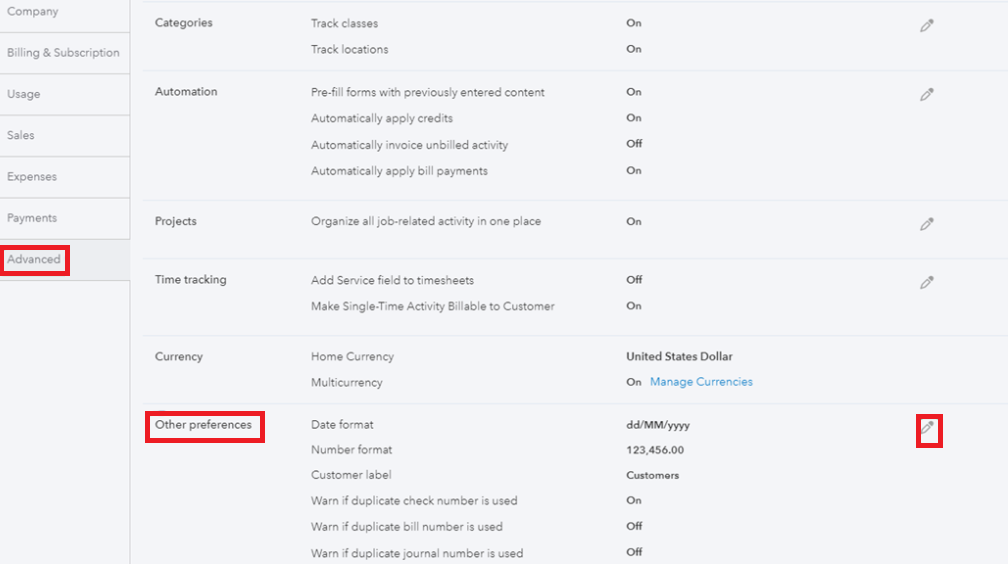
- From here, you can select the “Advanced” tab.
- Now, you can scroll down and choose the “Other Preferences” option.
- At this point, you need to select the pencil icon located beside “Date format”.
- Now, you can choose the “DD/MM/YYYY” using the “Date format” drop-down menu.
- Once done, click the “Save” button.
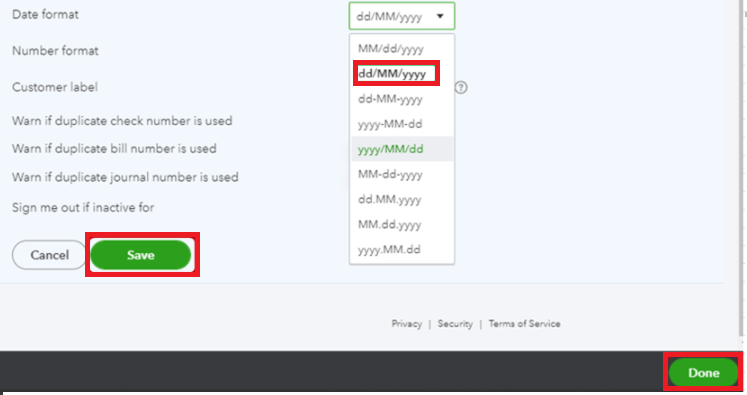
- Then, hit the “Done” button to finish the process.
Using these steps, you can easily edit the date format in your QuickBooks Online. Thereafter, you can continue connecting with your clients and send invoices with the correct date format.
Final Words
Changing the date format is pretty easy in QuickBooks. However, you have to check which country-based version you are using. Thereafter, you can make changes to your computer system (Mac or Windows) related to date formats and time so that QuickBooks can use the correct date format based on your system settings. If required, you can edit the date format from the QuickBooks account. We hope you have understood how to change date format in QuickBooks Desktop 2020 and Online.