
 +1-877-790-2297
Credit Memos can be used when your customers pay more than they owe to you, request a refund, return your product, or if you reward them with store credits. After creating the credit memo, you can apply it to the invoice of a specific customer. By applying credit memos to invoices in QuickBooks Online, your customer can get the amount they asked for. If you have no clue how to apply credit memo to invoice in QuickBooks Online, we will help you with this easy guide.
This comprehensive guide talks about when you should use the credit note in QuickBooks and how to add credit memo to invoice in QuickBooks Online. In addition, we will instruct you to apply a credit memo to vendor invoices.
- When Do You Need to Use Credit Memos in QuickBooks Online?
- How to Apply Credit Memo to Invoice in QuickBooks Online?
- Step 1: Enable Credit Note Auto-Apply Option
- Step 2: Make a Credit Note
- Step 3: Applying Credit Memos to Invoices in QuickBooks Online
- How to Apply Credit Memo to Vendor Invoice in QuickBooks Online?
When Do You Need to Use Credit Memos in QuickBooks Online?
Credit memos can be used by both the owner and the customers. There can be different instances when you should use credit memos. In the following points, you can find when you or the customer may need to create the credit memos to apply to the invoice(Create an Invoice in QuickBooks).
- When your customer asks for reducing the current open balance immediately, you can use the credit memo.
- Your customers can also use the credit memo as payment for the invoice. In addition, customers can use the credit memo or a portion of the credit memo.
- Credit memos can also be used when you record the payment for an invoice of your customers.
Please note credit memos impact the sales reports even when you don’t apply any credit memos to the invoices. Now, continue reading the guide to know how to add credit memo to invoice in QuickBooks Online.
How to Apply Credit Memo to Invoice in QuickBooks Online?
For applying credit memos to invoices in QuickBooks Online, you are required to perform a number of steps. First of all, you will have to enable the Credit note auto-apply feature. This makes your task easy in the future as it automates the procedure of applying credit to the invoices.
After this, you need to create the credit memo in your account so that it can be applied to the invoice. To know the entire procedure of applying credit memos to invoices in QuickBooks Online, check out the following details:
Step 1: Enable Credit Note Auto-Apply Option
QuickBooks allows its users to enable the Credit Note Auto-Apply feature. By turning this feature on, you can tell QuickBooks to apply the credit notes automatically to the customer’s open invoices or balances. If you want to enable this feature, you can go through the following steps:
- Navigate to the “QuickBooks Settings” by clicking on the Gear icon.
- Then, click on the “Account and Settings” option.
- Switch to the “Advanced” tab.
- Move to the “Edit” button located in the “Automation” section.
- Click on the “Automatically apply credits” option.
- Here, press the “Save” button.
- Click on the “Done” button.
Once you enable the Credit Note Auto-Apply feature, QuickBooks will automatically apply the credit notes to the customer you will specify. If not needed, you can disable this feature in the future.
Step 2: Make a Credit Note
To create the credit note or memo, you can click on the New button and choose the Credit Note option. After selecting the relevant customer, you can enter the required details and save the information. Check out the following steps to create the credit note in QuickBooks Online:
- Click on the “+New” button.
- Then, select the “Credit Note” option.
- Select the name of the customer using the “Customer” drop-down menu.
- After this, you can add the required details such as the amount and date. You can also create a custom credit service item. This will allow you to add it quickly to the credit notes as a single line item.
- Click on the “Save and Close” button.
As you perform these steps, the credit note or memo will be credited. Thereafter, you can apply to the invoice of your customer.
Step 3: Applying Credit Memos to Invoices in QuickBooks Online
The Credit Note Auto Apply feature will take care of the whole procedure if you have enabled it. However, if you are not using this feature and want to apply the credit memos to the invoice manually then you can pursue the following steps:
- Click on the “+New” option.
- Then, click on the “Receive payment” option.
- At this point, you are required to pick a customer by using the “Customer” drop-down menu.
- Move to the “Outstanding Transactions” section.
- Now, choose the open invoice to which you want to apply the credit memo.
- Thereafter, you can switch to the “Credits” section and click on the credit notes that you wish to apply.
- Once done, you can go to the “Payment” column for the open invoice and enter how much credit you wish to apply.
- Next to this, leave the following options blank:
- Reference no.
- Payment method
- Deposit to
- Amount received
- Here, you can fill the remaining fields including the “Payment Date”.
- Users have to make sure that after applying the credit note, the total should be correct.
- Once done, click the “Save and Close” button.
This is how you can complete the procedure for applying credit memos to invoices in QuickBooks Online.
How to Apply Credit Memo to Vendor Invoice in QuickBooks Online?
QuickBooks Online users can also add vendor credit to enter refunds from vendors or returns to vendors. Moreover, the vendor may issue a refund check or serve you a credit document that will show you no longer own any amount specified on the document.
In case your vendor issues the credit document then you can enter the vendor credit in QuickBooks Online and apply it while paying the vendor’s bill. However, if your vendor issues only the refund check then you can enter the vendor credit as well as add the deposit to link it with the refund check. In upcoming details, we will enlighten you about both scenarios.
Scenario 1: When the Vendor Issues Credit Document
- Click on the “+” icon from the “Credit” option.
- Then, select the “Vendor Credit”.
- When you see the “Vendor Credit” window, you can choose your vendor. Make sure you select the relevant vendor who has issued the credit.
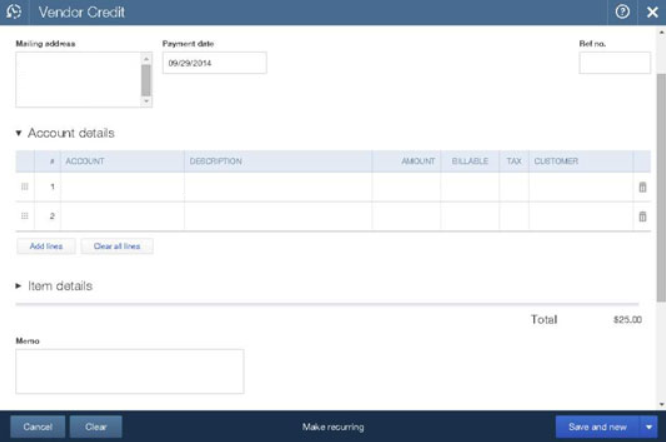
- Then, add the “Credit date”.
- Now, enter the “Amount of Credit”.
- Move to the “Account Details” menu and choose the account you used on an original bill.
- If you returned the items to your vendor, you must have received the credit(Receive Credit Card Payments in QuickBooks). In such a scenario, you can choose the items that have been returned. This can be done in the “Details” section.
- After this, you can scroll down and then attach the credit e-copy to the “Vendor Credit transaction”.
- Now, click on the arrow icon beside the “Save and New ” option. You can also choose the “Save and Close” button.
Scenario 2: When the Vendor Issues the Refund Check
- Click on the “+” sign from the “Create” menu.
- Then, select the “Bank Deposits” option.
- Move to the “Add New Deposits” section and add the following details:
- Go to the “Received From” section and choose the vendor who has issued the check.
- Move to the “Account” column and choose the “Accounts Payable” account.
- Enter the check amount in the “Amount” section.
- Select the “Save and New” or “Save and Close” button.
- Then, click on the “+” icon again from the “Create” menu.
- After this, select the “Expense” option.
- Choose the vendor whose check you have deposited. It could be credits, available deposits, and bills.
- Select the “Add” button in the outstanding vendor credit.
- Click on the “Add” button in the “Deposit” section.
- Click on the “Save and New” or “Save and Close” options.
As you add both the transaction to the Expense, QuickBooks automatically created the “Bills Payment transaction with $0 net value. It also applies vendor credit to a deposit.
To Wind Up
There can be different reasons to use credit memos in QuickBooks. Primarily it is used to refund the amount to a specific customer. With the Credit Note Auto-Apply feature, QuickBooks can handle credit memos. However, you can apply the credit memos manually to the open invoices. We have already shared the easy steps for applying credit memos to invoices in QuickBooks Online and adding vendor credit to enter refunds from vendors or returns to vendors.
To learn about creating and writing the bonus checks in QuickBooks, you can go through these dedicated guides:
- How to Create a Bonus Check in QuickBooks Online?
- How to Write Bonus Checks in QuickBooks Desktop?