
 +1-877-790-2297
A credit note is also known as a credit memo that is provided by a supplier for their customer to notify them that the credit amount has been sent to their account. There can be numerous reasons due to which credit note is used. For instance, when the customer returns the product for any reason (for example, the product got damaged during transit), the original invoice has specified an incorrect amount, and when there is an overpayment on the invoice. As a supplier, you have to create the supplier credit note and link it to the invoice. If you are not sure about the right procedure, we are here to reveal how to apply supplier credit note in QuickBooks Online.
How to Enter Supplier Credit Note in QuickBooks Online?
There can be instances when you want to cancel the invoice after issuing it for your customer. However, the invoices cannot be deleted once the invoice is issued. To handle this situation, one should create credit notes. By creating the credit notes, you can delete the amount specified on the invoice without having to delete the invoice.
Moreover, the customers can also make some changes or return the goods. As a result, you have to prepare the credit note and apply it to the invoice by adding the relevant details. In the following discussion, we will show you how to apply a supplier credit in QuickBooks Online for two different scenarios. Let’s read ahead!
Case 1: Link the Supplier Refund to the Supplier Credit
If you want to link the supplier refund to a supplier credit, all you just have to do is create the new supplier credit, add the supplier refund, and link the supplier refund deposit to the supplier credit. Let’s carry the following series of steps to know how to apply supplier credit in QuickBooks Online:
1: Create a New Supplier Credit
First of all, you will have to create a new supplier credit in your account. While doing so, make sure you select the appropriate supplier name, date, account, amount, and save the details.
- Click on the “+New” button.
- Then, choose the “Supplier Credit” option.
- After this, move to the “Supplier” field and select the relevant supplier name.
- Here, you can add the “Date”, “Amount”, and “Account”. The account you choose here is basically the original expense account on your original bill.
- Now, click on the “Save and Close” button.
2: Add the Supplier Refund
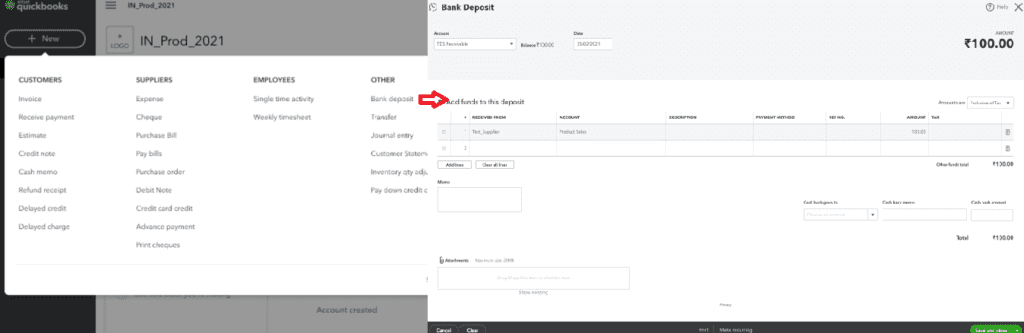
After you create the supplier credit, you can add this to the bank deposit. This requires you to mention the supplier name, account, and amount so the fund can be added to the selected deposit. Find out how to apply supplier credit note in QuickBooks Online:
- Go to the “+New” button.
- Then, click on the “Bank Deposit” section.
- After this, move to the “Add Funds to the Deposit” section. Thereafter, you can enter the following details:
- Received from: Select the “Supplier name”.
- Amount: Here, you can choose the “Accounts Payable” account.
- Amount: Add the amount for “Supplier Refund”.
- Choose the “Save and Close” button.
3: Link Your Supplier Refund Deposit to a Supplier Credit
Now, you are required to link the supplier refund deposit with the supplier credit. All you have to decide is whether you want to use the cheque or the expense. After that, you can choose the supplier name and add the deposit along with the outstanding supplier credit. Let’s know how to apply supplier credit note in QuickBooks Online:
- Click the “+New” option.
- Then, choose the “Cheque” or “Expense” option.
Please Note: Both Cheque and Expense recognize and keep the expense records in QuickBooks. If you prefer the Cheque, the transaction enters the list of cheques automatically for which you can take prints if required.
- Move to the “Payee” drop-down menu and choose the supplier name.
- After this, you may skip the following fields:
- Ref/Cheque number
- Payment date
- Memo
- Amount
- Go to the “Add to Cheque” or “Add to Expense” located on the right side.
- Press the “Add” button to enter the deposit and outstanding supplier credit.
- Click on the “Save and Close” option.
This is the entire procedure for creating and applying QuickBooks credit note from suppliers. Make sure you enter the details correctly.
Case 2: Pay the Bills using Supplier Credits
If you require to pay the bill by using the supplier credit, this can be done in two simple steps. All you are required to do is make the supplier credits and pay the bills using the cheque or expense. Let’s have a look at the following steps:
1: Create the Supplier Credits
This time you need to choose the debit note and enter the required details such as date, amount, and account. Be sure to choose the appropriate supplier name and save the details.
- Navigate to the “+New” menu.
- Then, click on the “Debit Note” option.
Note: Do not confuse Credit Notes with Debit Notes. In QuickBooks, the debit note is a formal commercial document that is usually issued by the buyer to their seller as an act of requiring the credit note.
- Select the “Supplier” field and choose the relevant supplier name.
- After this, you can add the “Date”, “Account”, and “Amount”. The account you choose here is basically the original expense account on your original bill.
- Hit the “Save and Close” option.
2: Pay Your Bills using the Supplier Credits
Since you have created the supplier credits, you are now eligible to pay the bills using those credits. All you have to do is to choose between a cheque or expense, select the payee name, and add it to the cheque or expense.
- Press the “+New” button.
- Then, choose the “Cheque” or “Expense” options. This should be noted that “Cheque” and “Expense” recognize and keep the expense records in QuickBooks. If you prefer the Cheque, the transaction enters the list of cheques automatically for which you can take prints if required.
- Select your supplier name using the “Payee” drop-down menu.
- After that, you may leave the following fields blank:
- Amount
- Payment date
- Ref/Cheque number
- Memo
- Now, go to the “Add to Cheque” or “Add to Expense” section located on the right side.
- Click on the “Add” button to add the deposit and outstanding supplier credit.
- Press the “Save and Close” option.
This is how you can pay your bills using supplier credit in QuickBooks Online. Make sure you enter the details carefully while paying the bills in QuickBooks.
To Conclude
Here, we have talked about two different scenarios when you may need to create the QuickBooks credit note from supplier. We hope you have learned how to apply supplier credit note in QuickBooks Online.
If you are planning to pay the bill partially or merge duplicate customer names in QuickBooks, read these guides to get the right details: