
 +1-877-790-2297
Most users delete or make the accounts inactive (that are no longer required) to keep the chart of accounts organized. After making the accounts inactive, the account disappears from the lists, however, QuickBooks keeps the older transactions on the report. There can be instances when you may need these inactive accounts back to the list. In such a scenario, you make the inactive account active again. To find the best information for the same, you can read here how to activate an inactive account in QuickBooks Online and QuickBooks Desktop.
What Happens When You Make the Account Inactive in QuickBooks?
As you remove a particular account from the list, it may not show up in the result. However, QuickBooks does not completely remove these accounts. If you are wondering what happens after you make the account inactive, you can go through the following details:
- When you make your account inactive that has a balance, QuickBooks makes the journal entry so that the remaining balance can move to another account.
- After making the account inactive, the existing transactions reside on the financial reports.
- If you choose to use your account again then QuickBooks will not change your journal entry or move your balance back to place.
This is how QuickBooks reacts after you make accounts inactive. There can be instances when you want to reactivate these accounts. To do so, you can continue reading how to activate an inactive account in QuickBooks Online and QuickBooks Desktop.
How Do I Make an Inactive Account Active in QuickBooks Online?
QuickBooks Online allows you to make the inactive account active again. If required, you can activate your clients and customers as well. In the following discussion, we will show you how to make your inactive accounts, clients, or customers active again in QuickBooks Online.
Make the Inactive Accounts Active
To make the account active, you can simply open the QuickBooks Settings and go to the Chart of Accounts menu. Then, click on the Gear icon located above the column of Action. Here, you can select the Include Inactive option. At this point, you can locate the account you wish to use again and hit the Make Active button next to it.
For step by step details, you can learn here how to activate an inactive account in QuickBooks Online in the following information:
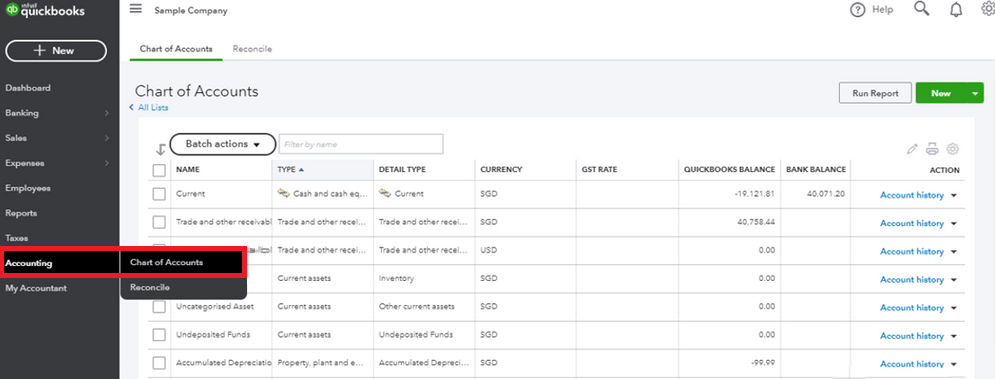
- Click on the “Settings” icon located on the top right.
- Then, click on the “Chart of Accounts” option.
Note: Alternatively, you can go to the Accounting menu or Transactions menu from the left and select the Chart of Accounts menu. Besides that, you can click the Gear sign on the Toolbar and choose the Chart of Accounts from the Your Company section.
- Now, from the top of the “Actions” column, you can click the “Gear” icon.
- Here, you can select the “Include Inactive” option.
- After this, select the account you want to activate.
- Once selected, you can hit the “Make Active” option next to that account.
Although you have made the inactive account active, you need to remember that QuickBooks will not edit the journal entries that were made to balance the account or add the transactions to your account.
Make the Inactive Clients Active
If you disabled the client company and now wish to reactivate it in QBO then you should refer to the following steps:
- Log in to the “QuickBooks” account.
- Then, click on the “Clients” option from the “YOUR PRACTICE” option located on the left.
- After this, search for the client’s company from the results.
- Now, go to the “Actions” column and click on the “Make active” option.
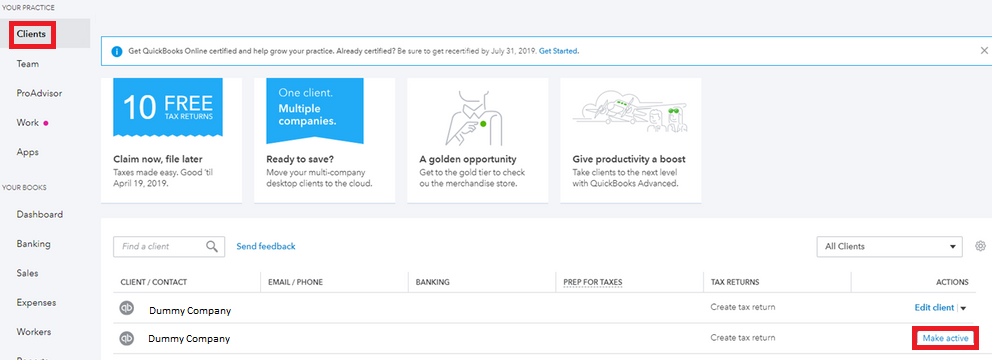
As you choose this option, QuickBooks will make your client’s company active and you will see your client on the list again.
Make the Inactive Customers Active
Most users remove a particular customer from the list when no longer required. However, these inactive customers can be reactivated from the Sales menu. Pursue the following steps to understand better:
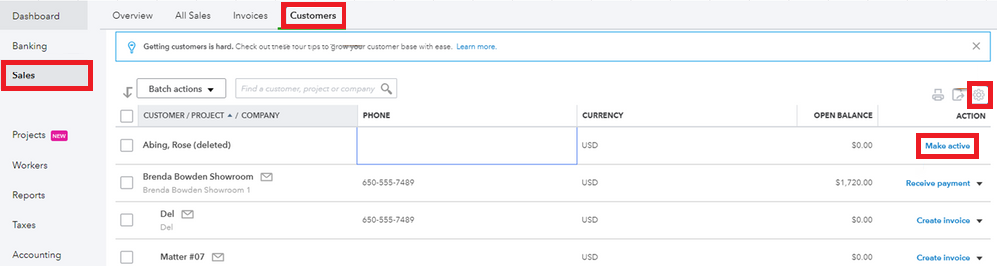
- Navigate to the “Sales” menu located on the left.
- Then, switch to the “Customers” tab.
- Select the “Gear” icon located on the top of the “Actions” icon.
- Here, you can select the “Include Inactive” checkbox.
- At this point, you can search for the customer you wish to activate then press the “Make Active” link from the “Actions” column.
By following these steps, you can reactivate the customer’s or clients’ company accounts in QuickBooks Online.
How to Make an Inactive Account Active in QuickBooks Desktop?
QuickBooks Desktop users may also be required to reactivate the inactive accounts. In the following details, we will show you how to make an inactive account active in QuickBooks Desktop. Along with this, we will teach you to activate the credit card account.
Re-activate the Inactive Account
To activate the inactive account in QuickBooks Desktop, you can go to the Customer Center menu. From the Customer & Jobs tab, you can select the All Customers and double click on the profile you wish to activate to remove the checkmark. Here are the detailed steps:
- Click on the “Customers” menu.
- Then, select the “Customer Center” option.
- Now, switch to the “Customer & Jobs” tab.
- After this, choose the “All Customers” option.
- Here, you will find the “X” button for inactive customers. You can click twice on the name so the profiles can be opened.
- Then, remove the checkmark for the “Customer is inactive” option.
- Hit the “OK” button.
This way you can make the customer account active again in the list. If you wish to activate other accounts for the customer, you can follow the same steps.
Re-activate the Inactive Account
If your credit card account is corrupted or damaged, you may not be able to make it reactive. In such a case, you can create the dummy credit card account and then merge it with the inactive account.
- Click on the “Lists” menu.
- Then, choose the “Chart of Accounts” option.
- Go to the “Chart of Accounts” page located at the bottom and select the drop-down menu located next to the “Account” section.
- Select the “New” button. You can also use the “Ctrl + N” keys together.
- Then, click on the “Credit Card” option.
- Press the “Continue” button.
- After this, add your “Dummy Credit Card” in the field of the “Account Name” option.
- Click on the “Save & Close” button.
- At the bottom of the “COA” page, you can select the “Include Inactive” option.
- Here, you can click right on the affected credit card account and click on the “Edit Account” option.
- Then, update your “Account Name” as your dummy credit card account.
- Press the “Save & Close” button.
- When you see the prompt to merge the account, you can click on the “Yes” button to confirm your action.
On seeing the same error again, you can update QuickBooks Desktop to the latest version or perform the Verify and Rebuild Data utility.
To Sum Up
Making the accounts inactive can be a need of a business owner. However, if you want them back to the list, you can reactivate the accounts easily. All you have to do is locate the inactive account from the QuickBooks menu and select the relevant option to activate the account again. Here, we have shown you how to activate an inactive account in QuickBooks Online and QuickBooks Desktop including clients’ companies, credit card accounts, and customers.
Do you want to learn more about interesting features such as multi-currency in QuickBooks? Read the following guides to know more.