
 +1-877-790-2297
A Credit Card allows you to borrow funds for paying bills and purchases. You can set up credit cards in QuickBooks Desktop and Online to keep track of your payments and charges. And, those who have business credit cards must be entering credit card charges in QuickBooks.
In case you have no idea how to enter credit card charges in QuickBooks Online and Desktop, we will help you to understand. But remember that you reconcile the credit card regularly and categorize the expenses of the credit card charges. This way you make your business life easy especially when you file taxes.
- How to Enter Credit Card Charges in QuickBooks Desktop?
- Entering Credit Card Charges in QuickBooks Desktop using Banking Menu
- Entering Credit Card Charges in QuickBooks Desktop using Company Menu
- How to Enter Credit Card Charges in QuickBooks 2017 (Desktop Pro)?
- Entering Credit Card Charges in QuickBooks Desktop Pro Manually
- Import Credit Card Charges in QuickBooks Pro using Bank Feeds
- How Do You Enter Credit Card Charges in QuickBooks Online?
How to Enter Credit Card Charges in QuickBooks Desktop?
A credit card charge is an amount that you owe to your credit card account. In QuickBooks Desktop, you can enter credit card charges from the Banking menu and Company menu.
But, you have to make sure you have a credit card account created in QuickBooks Desktop. If you don’t have an account, kindly create the new one and proceed with the following details.
Entering Credit Card Charges in QuickBooks Desktop using Banking Menu
From the Banking menu, you can directly enter the credit card charges. All you have to do is choose your credit card account, select your vendor, pick the date, enter the items or expenses that you wish to track, and save changes.
You can also follow these step by step instructions:
- Open “QuickBooks Desktop”.
- Go to the “Banking” menu.
- Click on the “Enter Credit Card Charges” option.

- Choose your credit card account using the “Credit Card” drop down menu.
- Here, you will find the Purchase/Charge” option as a default option. But, if you prefer to record your credit card fund that you have received via a credit card then you can instead click on the “Refund/Credit”.
- Now, using the “Purchases From” drop-down menu, choose your vendor.
- Choose the date.
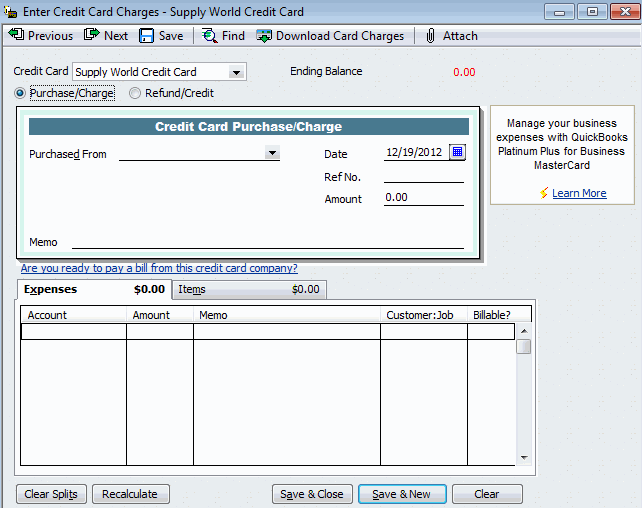
- You can also add the memo that explains your refund or charges. Although this is optional.
- Switch to the “Items” or “Expenses” tab.
- Here, add your items or expenses that you prefer to track.
- Click on the “Save & Close” button.
Entering Credit Card Charges in QuickBooks Desktop using Company Menu
If you want to record credit card finance and annual charges then you can navigate through the Company menu, click on the Chart of Accounts, choose your credit card account and then select your credit card company.
Thereafter, you can add your amount, choose the expense account that you wish to use to keep track of finance, annual, and other charges of other bank services.
To record finance and annual charges in QuickBooks Desktop, you can follow these steps:
- Go to the “Company” menu.
- Click on the “Chart of Accounts” option.
- Choose the credit card account.
- Using the “Payee” drop-down menu, select your credit card company.
- Add the amount in the “Charge” section.
- Here, you can choose your expense account that you wish to use to track finance, annual, and charges of other bank services. For this, you can use the “Account” drop-down menu.
- Click the “Record” button.
Once you are done following these steps, the procedure of entering credit card charges in QuickBooks Desktop will be completed successfully.
How to Enter Credit Card Charges in QuickBooks 2017 (Desktop Pro)?
Business credit card charges can also be recorded in QuickBooks Desktop Pro. This way you can easily manage the finances of your business. You can pursue two different ways to enter credit card charges in QuickBooks Desktop Pro.
For instance, you can either enter the credit card charges manually or import the credit card charges from the Bank Feeds. But, you have to make sure you have a credit card account created in QuickBooks Desktop Pro. If you don’t have a credit card account, you can create the new one.
Entering Credit Card Charges in QuickBooks Desktop Pro Manually
To enter the credit card charges manually, you can navigate through the Banking menu, locate Enter the Credit Card Charges option, select your credit card, and type of credit card transaction.
After that, you can choose the vendor, pick the date, add your reference number, enter the amount, enter the additional information if needed, select your account and save details.
Here are the detailed steps:
- Open “QuickBooks Pro”.
- Go to the “Banking” menu.
- Click on the “Enter Credit Card Charges” option.
- Choose your credit card account using the “Credit Card” dropdown menu.
Note: If you have only one credit card added in QuickBooks then it will be selected automatically by QuickBooks.
- Here, you will find the Purchase/Charge” option as a default option. But, if you prefer to record your credit card fund that you have received via a credit card then you can instead click on the “Refund/Credit”.
- Now, using the “Purchases From” drop-down menu, choose your vendor.
- Choose the date.
- You can also add the reference number for your credit card charges. Although this is optional.
- Add the amount for the credit card charge.
- Select the “Add” button and add the memo to mention what your charges were for.
- If required, you can enter additional information.
- Use the dropdown to select your account so that you can categorize your expenses. This also helps in the future when you want to view the Profit and Loss Statement or when you want to check the tax deductions before finding the tax.
- Click on the “Save & Close” button. You can also press the “Save & New” button if you want to add more credit card charges.
Import Credit Card Charges in QuickBooks Pro using Bank Feeds
Those who don’t want to enter the credit card charges manually can go with the import option. By importing the credit card statement, you can easily record the charges of your credit card.
To do so, one has to enable the live bank feeds in QuickBooks Desktop Pro. This will automatically pull the bank transactions into the account. Thereafter, you can enter a credit card account instead of a bank account. But, if you select this import option, you still will have to manually add the vendor and expense category for transactions before reconciling the credit card account.
To enable live bank feeds and connect the bank account to a QuickBooks account, you can follow these steps:
- Make sure your bank account is already added in QuickBooks. If not, you can create and add the account.
- Now, click on the “Banking” menu.
- Select the “Bank Feeds” option.
- Click on the “Set Up Bank Feed for Account” option.
- Select the “Save and Close” button.
- Hit the “Yes” button if any notification appears.
- From the “Bank Feed Setup” window, search for the bank account.
- As you choose the bank account, it opens the “Direct Connect” window. Here, you can return to the banking institution and then enroll in the “Direct Connect”.
Note: Each bank has a different way of handling integrations. Make sure you contact your bank for the right instructions for allowing the connection.
- Once the connection is enabled, click the “Continue” button located at the bottom right.
- Now, you are required to log in to the bank account. Make sure you use the right login credentials and then click the “Connect” button.
- After this, you will see the accounts that are linked with the bank login. You can select your bank account that you want to add in QuickBooks Pro. You can click on the dropdown menu to choose the bank account.
- Then, the “Connect” button has to be selected to finish the bank connection.
After following these steps, you can visit the Bank Feeds Center to find your transactions that are pulled automatically from the bank.
Whichever method you opt for entering credit card charges in QuickBooks, you should make sure that you reconcile the credit card regularly and categorize the expenses of the credit card charges. This makes your business life easy especially when you file taxes.
How Do You Enter Credit Card Charges in QuickBooks Online?
To enter credit card charges in QuickBooks Online, you can use three primary ways which are as follows:
- Directly add the credit card charges into the credit card register.
- Enter your transaction and match it with the bank feed.
- Enter your transaction from the bank feed or by importing it.
All the methods require different procedures. To avoid confusion, we are showing the whole procedure for QuickBooks Online enter credit card charges.
Add the Credit Card Charges into the Credit Card Register
If you have used a credit card for a short period of time and then you close the account then you will not be able to connect your bank feed or get the CSV or Excel file to import. In such a scenario, you can enter the transactions into the credit card register directly.
To get started, you can carry out the following instructions:
- Open the dashboard of the QuickBooks Online account.
- Then, hover your mouse over the “Accounting” menu.
- Click on the “Chart of Accounts” option.
- Select the “New” button located on the right.
- When you see a new window, you can do the following:
- In the “Account Type” field, choose the “Credit Card” option using the drop-down menu.
- This will automatically add the “Credit Card” in the “Detail Type” and “Name” fields.
- But, we suggest you remove the “Credit Card” from the “Name” field and add your account name along with the last four digits of your card number instead.
- The “Description” field can be left blank if you don’t want to add a note about the credit card.
- You can also skip the “Is sub-account” field.
- Then, using the drop-down menu, you can choose the time to tell QuickBooks when you wish to start tracking the finances from the account.
Note: As you select the date, you may be asked to add the balance to your account. If this is the new card entry, then you should set it to $0. But, if your card was used before the date you used this for business then you should discuss it with your accountant. Because your balance sheet should be accurate. Once you enter the beginning balance, you can click on the Save and Close button.
- When you are on the “Chart of Accounts” screen, find your account that you have created. For this, you can go to the “Chart of Accounts” list and select the “View Register”.
- As the “Credit Card Register” window opens, you need to select the “Add CC Expense” link in order to expand the first data entry line.
- Enter the details in each of the fields. Make sure that the data field remains accurate. However, “Ref No.” and “Memo” fields can be skipped.
- Now, press the “Save” button.
- In case you wish to add the credit card payment then hit the down arrow located next to the “Add CC Expense” option. Then, change it to the “CC Credit”.
Note: Make sure you use the correct transaction type; CC Credit is for the payments on your credit card’s balance and CC Expense is for the purchases with your credit card. Also, when adding the credit card payment, you should add the bank account (in the Account field) from which you want to make the payments.
After adding all the credit card payments and charges, select the Reconcile button. This will make sure that your data entry has no errors.
Enter Your Transaction and Match it with the Bank Feed
Adding the credit card purchases and then matching the transaction with the bank feed is the best method for entering credit card charges in QuickBooks Online. To use this method, you can pursue the following methods:
- Open the dashboard of the QuickBooks Online account.
- Then, click on the “New” menu.
- From the “Vendors” section, click on the “Expense” option.
- Add the “Payee name”.
- Choose the credit card you have used for the transaction. This can be done through the “Payment Account” drop-down menu.
- Add the transaction date in the “Payment Date” section.
- Now, choose the right payment method.
- Add the reference number if required.
- Here, you can finish the other fields of the transaction, choose the category, add the description if required, and enter the transaction amount. Transactions can also be split between categories. For this, you can enter multiple lines.
- If you wish to attach the receipt then you can drag and drop the receipt in the “Attachments” box. If you have already added the attachment then click on the “Show Existing” option. This will open the attachment in the sidebar.
- Once done, click on the “Save and Close” option.
To accelerate the process of matching the transaction in QuickBooks Online, you can also use the Receipts feature. This is an alternate method of entering credit card charges in QuickBooks Online.
- Open the dashboard of the QuickBooks Online account.
- Then, click on the “Banking” menu.
- Click on the “Receipts” option.
- When you see the “Receipts” screen, upload the receipts.
Whichever method you prefer to enter the credit card charges, you can match the transaction with the bank feeds. For this, you can go to the Banking screen.
Enter Your Transaction from the Bank Feed or By Importing It
If you do not want to enter the credit card charges then you can connect your credit card account to QuickBooks Online. Thereafter, you can simply add the credit card transactions from your bank feed.
All you are required to do is connect to the credit card account. If you are unable to get the bank feed or if you have to enter the transactions that occurred a while ago then you can import the transaction. After that, you can go to the Banking screen either from the manual import or from the bank.
At this point, you will find three different options; View, Add and Match the Transaction in QuickBooks bank feed. Here, you can use the features based on your preferences.
Conclusive Lines
Entering the credit card charges in QuickBooks is so simple and quick. In this guide, we have provided a number of methods through which you can record the credit card charges in QuickBooks Online, QuickBooks Desktop, and QuickBooks Pro. All you have to do is determine which method is best to follow. For any other query, you can drop your questions in the comment section.
To learn about how to change opening balance in QuickBooks, read this guide.