
 +1-877-790-2297
Unexpected errors may hinder your smooth workflow with the QuickBooks program. PDF error is one of the annoying errors that restrict you from creating or saving documents in PDF format. If QuickBooks cannot create PDF on Windows 10 or it is unable to save the form as a PDF file then you should diagnose the major causes and implement valid methods to resolve the PDF errors.
Leading Factors of “QuickBooks Cannot Create PDF” Error
By understanding the cause of the error, you can resolve the PDF errors. If your QuickBooks cannot create the necessary PDF files, there must be the following reasons behind it.
- QuickBooks software not responding.
- The PDF converter is in offline mode.
- The user is unable to print to the QuickBooks PDF converter directly.
- Due to the missing components on Windows, you may encounter a “QuickBooks cannot create PDF” error.
- QuickBooks PDF converter tool activation error 20, 30, or 41.
- A drag is connected to your MS XPS document writer on the XPS port or printer.
- The device is probably not ready.
- There are problems with printing reports/transactions.
- The QuickBooks program freezes during reconciliation.
- Unrecoverable error.
Now that you are knowledgeable about what could cause PDF errors in QuickBooks, you can troubleshoot the error in no time.
How to Fix “QuickBooks Cannot Create Necessary PDF Files” Error?
Some Windows components such as MSXML or XPS Document Writer are required to perform certain operations. For instance, QuickBooks uses XPS Document Writer to create or print PDFs. If you reinstall or repair MSXML 6.0 or reinstall the MS XPS Document Writer then you can easily rectify PDF errors in QuickBooks.
In addition, you can run the QuickBooks PDF & Print Repair tool from the QuickBooks Tool Hub. This will help you to resolve the errors automatically. Yet if you face any issues while creating PDF forms or documents then you can rest the TEMP folder permissions, enable the XPS services, five full control to Windows users, and bypass the print spooler.
Make sure you follow these methods carefully. For your help, we are providing step-by-step instructions while performing each method to resolve the “QuickBooks cannot create PDF” error.
Fix 1: Use the QuickBooks PDF & Print Repair Tool
QuickBooks PDF & Print Repair tool helps to fix PDF errors restricting you from creating or printing PDF documents. This tool can be accessed from the QuickBooks Tool Hub. All you have to do is make sure that QuickBooks Tool Hub is downloaded and installed on a Windows 10 (64-bit) computer.
After installing QuickBooks Tool Hub, you can launch it and jump to the following steps to repair PDF errors.
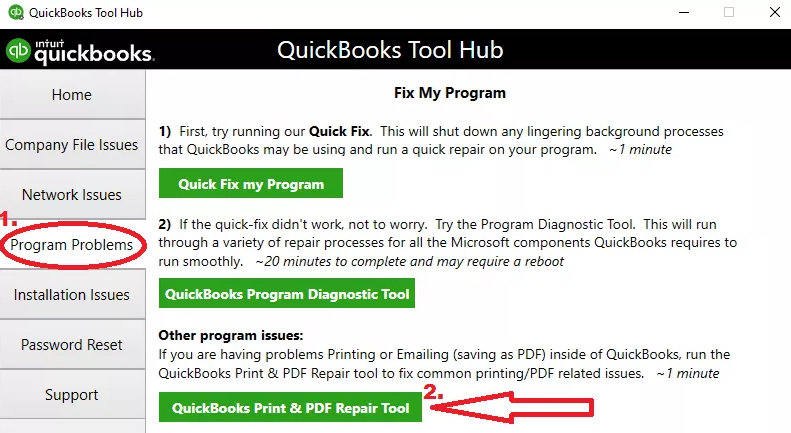
- When the “QuickBooks Tool Hub” is opened, go to the “Program Problems” tab. You will find it on the left.
- At this point, you need to select the “QuickBooks PDF & Print Repair Tool” button.
This will take a few minutes to scan and repair the PDF errors. After that, you can attempt to create and print the document in PDF format. If it does not work effectively, switch to the next fix.
Fix 2: Reset the Permissions of Temp Folder
By resetting the permission of the temp folder, you can resolve the error related to the QuickBooks PDF converter. Before performing this method, you will have to reboot your Windows computer. After that, you can verify the TEMP folder permission and reset it.
- Launch the “Run” command. To open it, use the “Windows” and “R” keys together.
- When you see the “Run” dialog box, type in “%TEMP”.
- After that, press the “Enter” key.
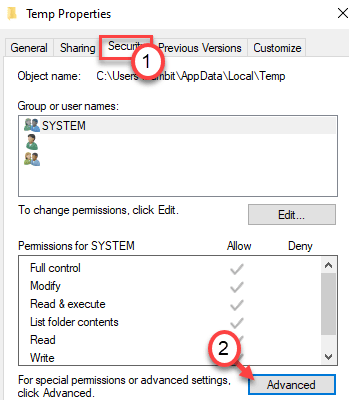
- Now, you can click right on the blank area of your temp folder and select the “Properties” option.
- Then, switch to the “Security” tab.
- In the “Security” tab, make sure that all the groups and user names are set to “Full Control”.
- When you set the folder permission to full control, you can create a PDF file within your QuickBooks software.
Apart from this, users are required to confirm if they are able to print to the XPS Document writer. For that, you can do the following:
- Open the “Notepad”.
- Type in “Test” or anything.
- Now, go to the “File” menu.
- Select the “Print” option.
- Here, you can choose the “XPS Document Writer” option.
- Hit the “Print” button.

- Then, type the name of the file and save it on the desktop.
Later, you can go to the desktop and open the XPS document you just printed from the Notepad. This way you can determine that QuickBooks can create and print the documents after resetting the TEMP folder permission.
Fix 3: Check If XPS Services are Active
QuickBooks uses the part of Windows components such as XPS Document Writer. If you have not enabled the XPS services on your Windows computer, you probably will not be able to create PDFs and this leads to “QuickBooks cannot create the necessary PDF files”.
To check and enable the XPS services on Windows computer, you can pursue the instructions given below:
- Use “Windows” + “E” keys on your keyboard. This will open the “File Explorer” window.
- Then, click on the “Computer” tab located on the top left.
- Here, choose the “Uninstall” or “Change a Program” options from the “System” group.
- Now, you can click the “Turn Windows Features on or off”.
After that, you need to scroll down and ensure that XPS Viewer and XPS Service are selected or enabled. In case you find any of the services unchecked, you can check it to enable both the services. This will allow you to create and print the PDFs.
Fix 4: Reinstall the XPS Document Writer
If you are finding Microsoft XPS Document Writer problematic, try reinstalling it. To do so, you are required to remove the XPS Document Writer from your system and then use the XPS port to add XPS as your local printer.
- From the Windows “Start” menu, open the “Settings” app.
- Go to the “Control Panel”.
- Switch to the “Devices and Printers” option.
- Click on the “Microsoft XPS Document Writer” icon.
- Select the “Remove device” option.
- Click the “Yes” button.
- Now, click on the “Add a printer” option from the toolbar.
- Then, choose the “Add a local printer”. Or, you can add the network printer with manual settings”.
- Go to the “Use an existing port” option and choose the “PORTPROMPT: (Local Port)”.
- Hit the “Next” button.
- Click on “Microsoft” from the list of manufacturers.
- After that, select the “Microsoft XPS Document Writer v4”.
- Press the “Next” button.
- Click on the “Replace the current driver” option.
- Click the “Next” button again.
- Now, go to the “Printer Name” section and remove “v4” from the name. It should be “Microsoft XPS Document Writer” only.
- Press the “Finish” option.
If needed you can remove the check so that the XPS Document Writer becomes the default printer on Windows computer. Now that you have to reinstall the XPS Document Writer, make sure you test creating the PDF in QuickBooks.
Fix 5: Give Permissions to Windows Users for XPS Document Writer
Windows users are required to have permission to create or print to the XPS Document Writer. If you don’t have permission then your QuickBooks software will not be able to create a PDF file.
To avoid the “QuickBooks cannot create the necessary PDF files” error, you should adjust the permission of Windows users. Before going ahead, make sure you log in to your Windows computer as an administrator otherwise you will not be able to make changes.
- On your Windows computer, open the “Control Panel”.
- Go to the “Microsoft XPS Document Writer”.
- Select the “Printer Properties”.
- Go to “Security” and choose the “Everyone” user group.
Note: In case you don’t find the Everyone group in the list then click on Add button, select Everyone, select the Check Names option, and click the OK button.
- Now, click the “Print” option in the “Allow” column.
- Then, press the “OK” button.
- After that, you can go to the “Windows Explorer” and follow this path: C:\Windows\System32\spool.
- Here, choose the “Printers” option and select “Properties”.
- Now, click on the “Security” option.
- Select the “Edit” button and click the “Add” option.
- At this point, you can enter the “Local Service” and press “Enter”.
- Here, you need to make sure that “Local Services” have “Full Control”.
- Click the “OK” button.
Once you are done adjusting the Windows user permission for Microsoft XPS Document Writer, you can try creating a PDF file. In case you find the “QuickBooks cannot create PDF on Windows 10” error then move to the next solution.
Fix 6: Repair or Install MSXML 6.0
Microsoft components such as MSXML 6.0 are the requirement of your system for the XPS Doc Writer. If you don’t have MSXML 6.0, install it, or if you already have it then repair it. To perform this method, you are supposed to use the System File Checker utility to repair Windows system files.
- Click the “Start” menu on Windows.
- Search for “Command Prompt” using the Windows search bar.
- When you find “Command Prompt” in the result, click right on the “Run as administrator”.
- If it prompts then enter the “Administrator password” or click the “Allow” button.
- Once the “Command Prompt” window opens, type “sfc/ scannow”.
As you execute this command, you can wait and once your system files are repaired, you can restart your Windows computer.
Fix 7: Bypass Print Spooler
Once you are done setting the XPS Document Writer’s permission on the server (for the Terminal Services), you can set the Microsoft XPS Document Writer to bypass the print spooler.
- Click on the “Start” menu on Windows.
- Look for “Command Prompt” using the search bar.
- Go to the “Microsoft XPS Document Writer”.
- Click on the “Printer Properties”.
- Go to the “Advanced” tab and choose the “Print Directly to Printer”.
- Hit the “OK” button to save changes.
After following these instructions, you can close the Printer Properties window. Now that you have set the Microsoft XPS Document Writer to bypass the print spooler so you can try converting PDF in QuickBooks.
Conclusive Words
If QuickBooks cannot create PDF on Windows 10, you should adjust the necessary settings for Windows users and its components. Microsoft XPS Document Writer plays a major role in creating PDF so make sure you reinstall it on your system. Besides that, you can try other methods we have already provided in this guide.
In case QuickBooks error 193, you should follow this guide to repair the error.