
 +1-877-790-2297
Adjusted Service Date is the rehiring date (prior years of service) of an employee. If you are willing to hire an employee again, you need to activate the inactive employee from the Employee list. If you want to know what is adjusted service date in QuickBooks, we will explain it to you in detail.
What is Adjusted Service Date in QuickBooks and How it’s Work?
Many employers may plan to hire the employees again who were marked as laid off earlier. Rehiring the same employees can be a great option as these employees are already familiar with their job and the culture of the company.
In case you or your company are willing to rehire employees then the first thing you need to ensure is that reactive your employees in QuickBooks updated account.
Also, make sure that these employees are part of the payroll process. Although these employees may display as the active employee in the Employee List. However, they may not be paid through Quickbooks Payroll until your payroll system is aware that the particular employee is being rehired.
How to Reactive the Employee in QuickBooks?
All you have to do is open the list of inactive employees in your account, edit the employee info, remove the release date, and add the rehire date.
Along with this, review the employee information and add the employee to the payroll schedule.
For QuickBooks Premier and Pro Version:
- Go to the “Employee” tab from the menu bar.
- Click on the “Employee Center” option.
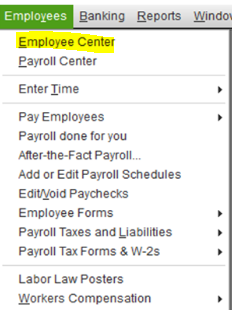
- Now, change the “View” option to the “All Employees” option.
For QuickBooks Simple Version:
- Navigate through the “Payroll” icon.
- Click on the “Go to the Payroll Center” option.
- Then, click on the “View/Edit Employees” option by using the “Employees” drop-down menu.
- Now, click right on the blank area on the employee list.
- Select the “Show Inactive Employees” option.
Depending on your QuickBooks version, when you view all your inactive employees, you can continue following the steps stated below:
- Double-click on the name of your employee.
- Go to the “Edit Employee” window.
- Then, select the “Employment Info” by using the “Change tabs” drop-down menu.
- Now, go to the “Employee” tab in case you are not.
- Then, remove the “Release Date”.
- In the “Hire Date” field, add the rehire date. Make sure you remove the check for the “Employee is inactive” checkbox.
- When you go to the “Edit Employee” window, review the employee details in the following fields:
- Personal Info
- Workers’ Compensation
- Payroll and Compensation Info
Note: These sections are available with the Assisted Payroll subscription or Intuit QuickBooks Enhanced which you can access through the Change tabs drops-down.
- Go to the “Payroll and Compensation Info” tab, add your employee to an appropriate payroll schedule. This can be done by clicking on the “Payroll Schedule” drop-down menu.
- Once you select the payroll schedule, hit the “OK” button.
Once you save the aforementioned details, you can activate the employee again in your QuickBooks account. This will also let you pay these employees through the QuickBooks payroll service.
Learn to Set Up Employees in QuickBooks
QuickBooks users also should know the procedure of adding a new employee to the account so that you can pay and deduct taxes for your employees. By adding employee details, you can organize the information if they are tax-attempt, seasonal, or have a Visa. It becomes easy to manage their pay schedule so that it does skip your mind.
Note: For Wyoming and Indiana, there is no option of adding the employee for Assisted Payroll.
To add a new employee, you will have to add certain details such as employee name, Social Security number, address, contact, payroll info, employment info, and workers compensation.
However, Form 1120 is not available to use in QuickBooks so you can go to the IRS website to find the form and its instructions.
- Click on the “Employees” tab.
- Go to the “Employee Center” option.
- Click on the “New Employee” option.
- Enter the required detail such as:
- Click the “Personal” tab and fill in the details.
- Go to “Address and Contact” and finish the fields.
- Select the “Additional Info” to add employee details.
- In “Custom Fields”, add only required information or click on the “Define Fields” to enter the customer info.
- Click on the “Payroll Info” and enter the details related to benefits and compensation. For example:
- Direct Deposit: Fill this out if you are paying the employee through direct deposit.
- Taxes: If your employee has a Visa, find out their exemption status or you may contact the accountant.
- Click the “Employment Info” and fill in the details.
- Hit the “OK” button.
Set Up Employee Default in QuickBooks
QuickBooks also lets you set up the employee defaults for their additions, earnings, contributions, taxes, and deductions.
Here are the steps to add the employee defaults:
- Click on the “Edit” button.
- Select the “Preferences” option.
- Click on the “Payroll and Employees” option.
- Then, click the “Company Preferences” option.
- Click on the “Employee Defaults” tab and add the necessary changes.
- Hit the “OK” button.
This way you can add the employee defaults in QuickBooks Desktop. Now, each time you add a new employee, it will automatically show the employee defaults in the employee profile.
How to Change the Employee Info QuickBooks Payroll?
In certain cases, your employee can alter some details such as bank account, name, W-4 filing info, or move to the new address.
If you want to change or edit the information of your employees then you can pursue the following steps:
- First of all, gather all the information that has been changed by the employee. You can ask the employee to provide changes.
When you collect the information, make changes to your payroll account. Below are the helping steps for different payroll accounts.
QuickBooks Online Payroll
Way 1: Update Employee from the Employee Profile
- Go to the “Payroll” menu.
- Click on the “Employees” option.
- Select the name of your employee.
- Hit the “Edit” button on the section that you want to update.
- Now edit the info and click the “Done” button.
Way 2: Update the Employee When You Run the Payroll
- Go to the “Run Payroll” section and click on the employee’s name.
- Edit the info and click the “Done” button.
QuickBooks Desktop Payroll
- Click on the “Employees” tab.
- Then, click on the “Employee Center” option.
- Double click on the name of the employee.
- Apply the necessary changes and click the “OK” button.
Intuit Online Payroll
- Click on the “Employees” option.
- Select the name of your employee.
- Select the “Edit” button on the section that you want to update.
- Now click the “OK” button.
After you change the details of your employees, it will appear in your payroll account. Also, if your employee has moved to another state then you have to set up payroll taxes for that particular state.
Closure
The company often rehires employees when the economy starts improving. To rehire them again, you just activate the employee in your QuickBooks account and add them to the payroll schedule.
Frequently Asked Questions (FAQs)
Ans. Adjusted service date means the most recent date of hiring an employee. It reflects proper periods of service.
Ans. To calculate the Adjusted Service Date, you need to enter the employment period. This will help you to determine the time of service (in days, months, and years). Then, from the Most Recent hire date, subtract the amount of time to find out the adjusted service date.
Ans. Employee’s hire date is required for different purposes such as for reporting new hire forms, setting up the sick pay policy or vacation, and for the Payroll tax forms that need complete employee details before filing.
Ans. To update the Employee details, make sure you collect the right information that has been changed. Later, you can go to the Employees, click on Edit, make the relevant changes, and save the information.
Ans. Open the list of inactive employees in your account, edit the employee info, remove the release date, and add the rehire date. Also, make sure, review the employee information and add the employee to the payroll schedule.
It’s good to know about adjust service date and thanks to share how to reactive the employee in QuickBooks.