
 +1-877-790-2297
There are a number of retirement saving plans. One of the popular retirement plan options is a 401k plan. This kind of retirement plan is sponsored by the employer. Setting up 401k in QuickBooks Desktop has its own benefits. As you are planning to proceed with 401k setup, it is important to know about this retirement plan in detail including its types and benefits. Through this guide, we will enlighten you on how to set up 401k deductions in QuickBooks Desktop. Let’s read ahead!
What is a 401k Retirement Plan?
A 401k plan is a type of qualified plan in which an employer contributes a portion of the paycheck of employees to the retirement savings account. Here, “Qualified” suggests that this plan is also eligible for the tax benefits set under IRS guidelines. A 401k term comes from the subsection 401k of the Internal Revenue Code. It describes the rules surrounding such a type of retirement plan. Based on the type of 401k retirement plan, the tax break appears either when you withdraw funds or contribute money to your plan.
There are two types of retirement plans (401k); standardized and non-standardized. If your plan is standardized then all the compensation will be considered wages that are subject to consider while calculating the deferral. On the other hand, non-standardized allows the employee or employer to select not to contribute such types of payment for the retirement deferral. However, all the qualified deferred contribution plans do have the limit of the annual contribution.
How to Set Up 401k Account in QuickBooks Desktop?
To set up the payroll time for the retirement benefits, you can follow two different ways EZ setup and Custom setup. Here, we will show both ways with step-by-step instructions. Let’s learn how to set up 401k in QuickBooks Desktop.
EZ Setup (Recommended for Users)
EZ Setup basically uses the standard settings. It also adds your company contribution payroll item automatically for the retirement plans. To use EZ setup, you can do the following:
- In “QuickBooks Desktop”, click on the “Lists” menu.
- Then, select the “Payroll Item List” option.
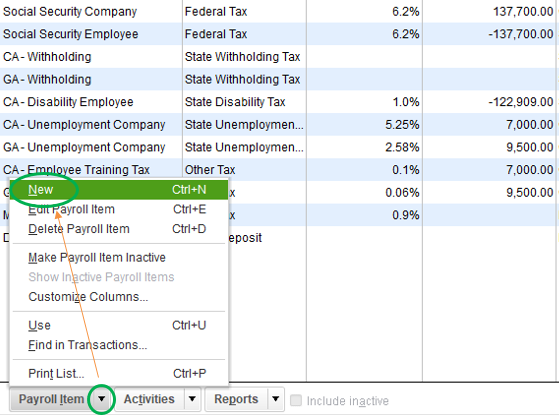
- From the bottom left of the list, click on the “Payroll Item” option.
- After this, press the “New” button.
- Now, click on the “EZ Setup” option.
- Again, click the “New” option.
- Here, you can follow the instructions given on the screen.
Note: If your employee has local income tax which is not reduced by 401k retirement benefits then you will have to deselect the local tax item option from the Taxes window while setting up the payroll item. You can also check the helping topics on the right of your screen.
Once done creating the payroll item, you can edit the payroll item in order to make the important vendor details that have been mentioned. It is also important to change or adjust the preset tax settings.
Custom Setup (Recommended for Experts)
Using the Custom setup, you can edit the settings. This type of setup is recommended for the experts. To access the Custom Setup, you can go through the following instructions:
- To access the “Custom Setup, open “QuickBooks Desktop and go to the “Lists” menu.
- Now, select the “Payroll Item List” option.

- Click on the “Payroll Item” option from the bottom left of the list.
- After this, select the “New” button.
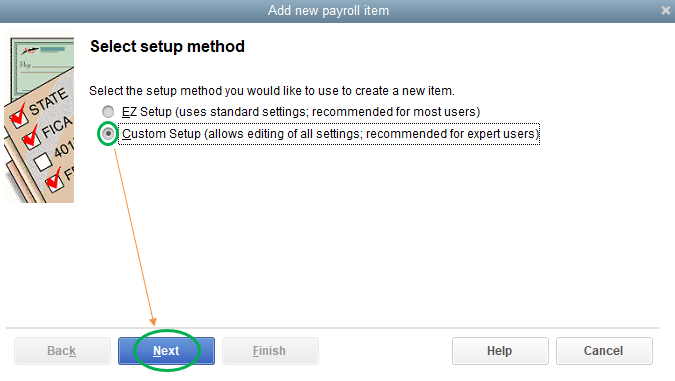
- Click on the “Custom Setup” option.
- Press the “Next” button.
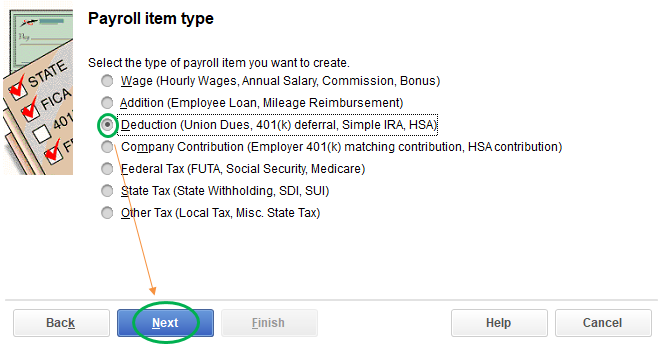
- Now, click on the “Deduction” option.
- Select the “Next” button.
- In the “Enter name for deduction” box, you need to add the name for an item.
- Click the “Next” button.
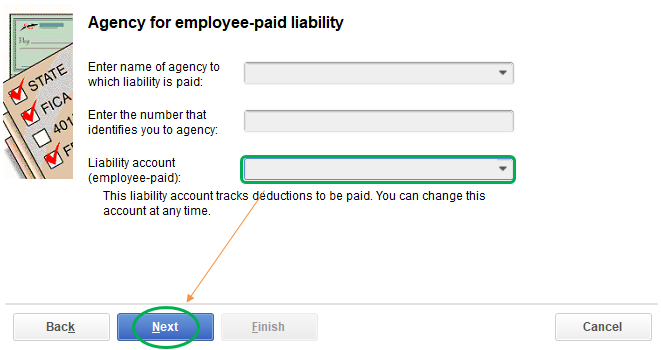
- Go to the “Liability account” dropdown menu located at the bottom. From here, you can choose the liability account. This account will be used later to track your deduction.
- Click “Next”.
- You can add the name of your plan administrator including their identifying account details.
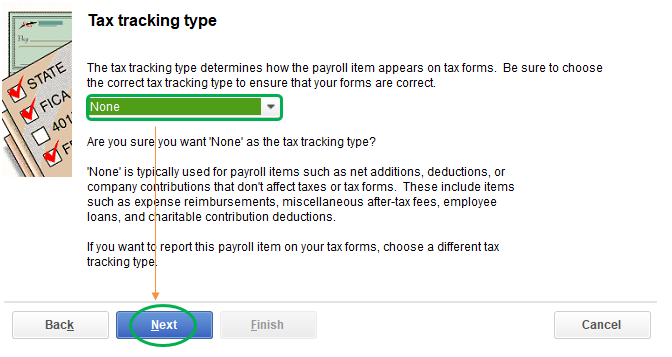
- Now, move to the “Tax tracking type” section and choose the tracking type based on your plan type.
- Press the “Next” button.
- In the “Payroll Item” column, put the checkmark for any item that will be used for calculation after the deduction and then press the “Next” button.
- When you go to the “Calculate Based on Quantity” window, click on “Neither” and hit the “Next” option.

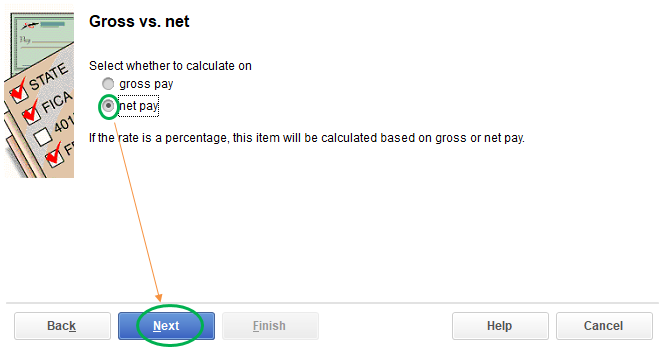
- Then, move to the “Gross vs. net” section. If you see the deduction amount is in the percentage of the gross earnings of the employee then choose the “Gross” option. But if you find it a fixed dollar amount then choose “Net”.
- Once done selecting the tracking type, click the “Next” button.
Note: In case the calculation is different from one employee to another then you are supposed to set up separate items.
- If the deduction amount or rate applies to most employees or all then you should enter it in the “Limit Type” screen located at the top.
- In case there is an annual deduction then make sure you add it at the lower fields. But, this should be filled in when the limit is the same for most employees or all of them.
- Click the “Finish” button.
This way you can finish setting up payroll items for your retirement plan deductions. In case your deduction amount varies for a few employees then you should access the profiles of those selected employees and modify the deduction amount manually.
How to Set Up 401k Deductions in QuickBooks Desktop?
A 401k can be set up in QuickBooks Desktop as deductions. All you have to do is go to the Employee Center, click on the Edit Employee option, and switch to the Payroll Info tab. Then, in the Deduction section, you can add the item name and payroll item for your retirement plan.
To understand the whole concept of setting up 401k in QuickBooks as a deduction, you can jump to the following instructions:
- Click on the “Employees” option located at the top.
- Select the “Employee Center” option.
- Now, click twice on the employee in order to open the “Edit Employee” window.
- Here, move to the “Payroll Info” tab.
- Now, go to the “Additions, Deductions and Company Contributions” window, click on the “Item Name” to open the drop-down menu.
- Then, choose the payroll for your retirement plans.
- After that, place the checkmark for the “Employee is covered by a qualified pension plan” option only if the employee participates in 401k or other plans.
- Press the “OK” button.
Once done following these instructions, you can repeat the same steps for each participating employee that are eligible.
How to Set Up 401k Employer Match in QuickBooks Desktop?
To set up 401k employer match items in QuickBooks Desktop, you can use the Custom Setup. To do so, you can pursue the following steps:
- Open “QuickBooks Desktop” and click on the “Lists” menu.
- Now, click on the “Payroll Item List” option.
Note: You may not find the Payroll Item List option if the payroll service is disabled.
You have to make a new payroll item for your employer match section of the employee’s 401k plan. To do so, click the “Payroll Item” located at the bottom and press the “New” button. Alternatively, you can use the “Ctrl + N” keys.
Important Note: Make sure you don’t confuse this method with the Employee Deductions for 401k accounts. Employee deduction is a different payroll item set up. However, this setup is the same as the Employer Match portion for Roth 401 k plans.
- Click on the “Custom Setup” option.
- Press the “Next” button.
- Now, click on the “Company Contribution” option.
- Select the “Next” button.
- In the “Enter name for payroll item” box, you can enter the name for an item.
- Click the “Next” button.
- Here, select the “Vendor” name to whom you will submit 401k payments.
- After that, click on the “Liability account” dropdown menu located at the bottom. From here, you can choose the liability account.
- Once done, click on the “Payroll Expense” account.
- Press “next”.
- Now, select the “Tax Tracking Type” option and click on “401K Co.Match”.
- Click the “Next” button.
- When you go to the “Calculate Based on Quantity” window, click on “Neither” and hit the “Next” option.
- Then, move to the “Gross vs. net” section. If you see the deduction amount is in the percentage of the gross earnings of the employee then choose the “Gross” option. But if you find it a fixed dollar amount then choose “Net”.
- Once done selecting the tracking type, click the “Next” button.
Note: In case the calculation is different from one employee to another then you are supposed to set up separate items.
- Now, enter the “Default Rate & Limit” only when you want this information to make a default choice for your employee profiles.
- Click the “Finish” button.
Once done following these steps, your setup for employer match will be finished. Make sure that you follow each step carefully as the wrong information may affect your retirement plans. Hope you have understood how to set up 401k match in QuickBooks.
Conclusive Lines
Retirement plans 401k helps employees to get the contribution of their paycheck portion from the employers to the retirement savings account. To make it happen, it is important to proceed with setting up 401k in QuickBooks Desktop. In this guide, we have shown you to set up a 401k account using both EZ setup and Custom setup. In addition, we made you aware of setting up the 401k deductions and employer match in QuickBooks Desktop.
To know more about QuickBooks guides, follow these links you may be interested in: