
 +1-877-790-2297
Simple IRA, also known as 401(k) plan is an account for tax retirement provided by an employer to an employee. This is basically a salary reduction contribution that is made to the retirement savings plan. After retirement, employees can get this fund. If you are not having any clue about how to set up a Simple IRA in QuickBooks, don’t worry. We will enlighten you.
In this simple guide, you will learn about how to set up Simple IRA in QuickBooks Desktop including payroll items using EZ Setup and Custom Setup. You will also learn to set up the company contribution item for Simple IRA in QuickBooks.
How to Set Up a Simple IRA in QuickBooks?
To set up the Simple IRA in your QuickBooks Desktop, you are required to perform numerous steps. First of all, select the employee from the list of employees. After that, you can switch to the Payroll Info tab, add the item names, and save the details. For step by step guide, read here how to set up Simple IRA in QuickBooks Desktop:
- First of all, open “QuickBooks Desktop” and log in to the account.
- Then, click on the “Employees” tab.
- After this, switch to the “Employee Center” option.
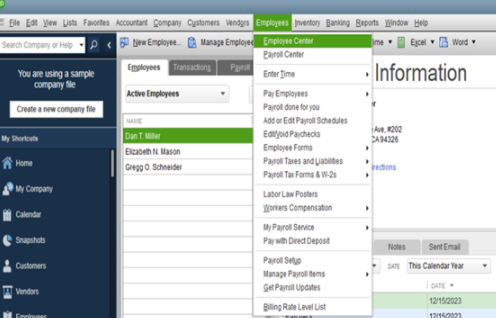
- Click twice on the employee you wish to select.
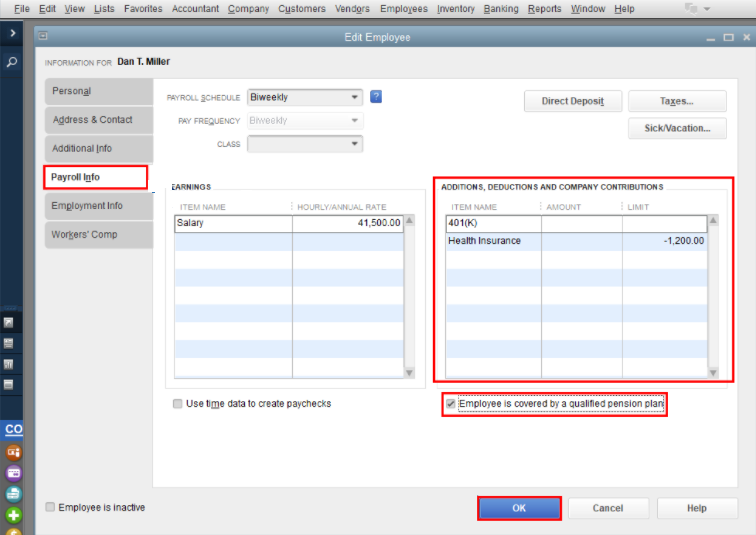
- Now, go to the “Payroll Info” tab.
- When you see the “Additions, Deductions, and Company Contributions” window, go to the “Item Name” field.
- After that, you can start adding the item by clicking on the “Add New” button.
- If any employee participates in the following retirement plans then you should place the checkmark for the “Employee is covered by a qualified pension plan”:
- 401(k)
- 403(b)
- 408(k)(6) SEP
- SIMPLE IRA plan
- Press the “OK” button.
Now you have learned how to set up a Simple IRA in QuickBooks Desktop. Thereafter, your employee can get this fund once they get retired.
How to Setup the Payroll Items for Simple IRA in QuickBooks?
Employers can make non-elective or matching contributions to the plan for the eligible employees. Also, employers may add the profit-sharing feature to a plan. If you are planning to set up the payroll items for Simple IRA or 401K(setting up 401k Account in QuickBooks), you can do it in two different ways; EZ Setup and Custom Setup.
Add Payroll Items using EZ Setup
EZ Setup can be used for standard settings. It is recommended for almost every user. Once you use this setup, it will automatically add the company contribution payroll item for the retirement plans. You can follow these steps to add payroll items using EZ set up:
- Launch “QuickBooks Desktop” and navigate to the “Lists” menu.
- Then, choose the “Payroll Item List” option.
- Select the “Payroll Item” option located at the bottom left.
- After that, click on the “New” button.
- Now, select the “EZ Setup” option.
- Here, press the “New” option again.
- Once done, you can follow the prompts given on the screen.
This is how you can add the payroll items. If required, you can edit the item to be sure that all the important vendor details have been entered. It is also necessary to adjust the preset tax settings.
Add Payroll Items using Custom Setup
Custom Setup is recommended for experts mainly that lets you edit the settings. To run this Custom setup to add the payroll items, you can perform the following steps in QuickBooks Desktop Payroll:
- Launch “QuickBooks Desktop” on your computer.
- Move to the “Lists” menu.
- Here, choose the “Payroll Item List” option.
- Click the “Payroll Item” button from the lower left of the list.
- After that, click on the “New” button.
- Press the “Custom Setup” option.
- Click the “Next” button.
- Now, choose the “Deduction” option.
- Press the “Next” button.
- When you see the “Enter name for deduction” box, add the name for your item.
- Click on the “Next” button.
- Move to the “Liability account” dropdown arrow placed at the bottom. From here, select the liability account. Later, you might need to use this account to track your deduction.
- Select the “Next” option.
- If required, you can also add the plan administrator name including the identifying account information.
- Now, go to the “Tax tracking type” section and click on the tracking type that is based on the plan type.
- Click the “Next” button.
- Moving ahead to the “Payroll Item” column. Here, you need to place the checkmark for the item that you will use for calculation when the deduction is taken. Then, click the “Next” button.
- Click on the “Calculate Based on Quantity” screen and choose “Neither” and press the “Next” option.
- Then, click on the “Gross vs. net” section. If you find any deduction amount (in the percentage) of the employee’s gross earnings then you should select the “Gross” button. But, if you see a fixed dollar amount then click on the “Net”.
- Once done choose the tracking type, press the “Next” button.
Please Note: If the calculation differs from one employee to another, set up the separate items.
- If the deduction amount or rate easily applies to the employees then you should add it in the field of “Limit Type”. This should be located at the top.
- Add the annual deduction in the lower fields if you find any. But, make sure you fill this field only when the limit is identical for most employees or all of them.
- Press the “Finish” button.
As you perform these steps, the payroll items will be added to your QuickBooks account. This is how you can set up the items for Simple IRA for your employees. Please remember if the deduction amounts differ for a couple of employees then you should open their profile and make the adjustment for deduction manually.
How to Set Up Company Contribution Items in QuickBooks?
To set up the retirement plan company contribution item, you can use the Custom Setup. Make sure you add the correct amount for contribution while filling in the fields. Let us help you with the information you are supposed to enter for company contribution items:
- Open “QuickBooks Desktop” on your computer.
- Click on the “Lists” menu.
- Here, select the “Payroll Item List” option.
- Click on the “Payroll Item” button from the lower left of the payroll item list.
- Select the “New” button.
- Press the “Custom Setup” option and click the “Next” button.
- Once you get into the “Custom Setup”, click on the “Company Contribution”.
- Select the “Next” button.
- Here, you can add the name for a contribution and hit the “Next” button. Make sure you don’t enter the same name that you used for your employee deduction.
- Now, select the “Liability account” drop-down menu and choose the same liability account you selected earlier.
- After this, click on the expense account using the “Expense account” drop-down menu.
- Press the “Next” button.
- Move to the “Tax Tracking Type” screen and choose the tax tracking type that can match the plan type. Once selected, click the “Next” button thrice to continue.
- If the contribution amount or rate easily applies to the employees then you should add it in the field of “Limit Type”. This should be located at the top.
- Add the annual contribution in the lower fields if you find any. But, make sure you fill this field only when the limit is identical for most employees or all of them.
- Press the “Finish” button.
As you perform these steps, the payroll items for the company contribution will be added to your QuickBooks account. Please remember if the contribution amounts differ for a couple of employees then you should open their profile and make the adjustment for contribution manually.
In a Nutshell
Simple IRA is a type of retirement plan account to which employers make all the salary reduction contributions. If you are willing to set up a Simple IRA account, we have already discussed above how to set up a Simple IRA in QuickBooks Desktop. Besides that, we enlightened you about setting up payroll items and company contribution items in QuickBooks.
Also, read about setting up the loan and importing item lists into QuickBooks. Check out the following links to know more:
- How to Set Up a Loan in QuickBooks?
- How to Import Item List into QuickBooks?