
 +1-877-790-2297
As the file size increases in QuickBooks, it takes more time to post transactions into a data file. Due to this, users have to wait for more to save or search the transactions. Compressing the file size can be a huge relief in this. By using the Condense Data utility, you can streamline the company data file. If you encounter performance issues in QuickBooks, the Condense Data utility can be the best choice to reduce file size and improve performance. Let’s dig more into how to reduce QuickBooks company file size using Condense Data utility.
What is Condense Data Utility?
The updated condense option in QuickBooks lets you delete the audit trail which as a result reduces the file size. However, it leaves all your detailed transactions record unlike a traditional File Condense option that deletes the transaction’s details and generates the consolidated journal entry for the data prior to a chosen date. If you want to use the traditional condense option, it is available in QuickBooks.
To access this feature, you can go through the following steps:
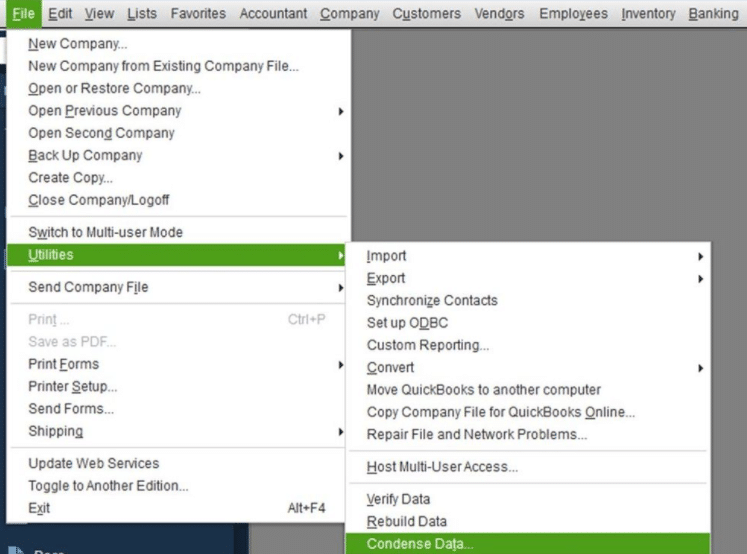
- Go to the “File” menu.
- Then, select the “Utilities” option.
- Click on the “Condense Data” option.
- At this point, you can choose the first option for the company. This should be noted that your system will suggest to you the approximate reduction in the file.
- Hit the “Next” button.
As you perform these steps, you will see the working status for the file. Once the process is finished, a new window shows up where it advises of the total file reductions along with the backup file location prior to a file optimization. If you want to use the Condense Data utility, continue reading how to reduce QuickBooks company file size.
How to Compress QuickBooks File using the Condense Data Utility?
To compress the company file size, you will have to make sure of certain things. For instance, you should be aware that all transactions cannot be condensed. Thereafter, you should prepare the company file, remove the data file closing date, run the reports, re-sort the list, check for damages in the file, and save the comparison reports. Once done, you can easily condense the file without any interruption. To know more about how to reduce QuickBooks company file size, read the following guide:
Step 1: Check the Non-Condense Transactions
Before compressing the file size in QuickBooks, you should be aware of the files that will not condense. QuickBooks Desktop Enterprise Solutions or Premier users can run a report that will show which transactions will not be condensed. Every transaction that is not condensable shows a link that can help you to open the transaction on your screen. You can take print of these reports or work directly from the printout. You can also start working from your screen using the links.
- Click on the “File” menu.
- Then, click the “Utilities” option.
- Select the “Condense Data” option.
- When a wizard opens, click on the “Transactions before a specific date” column and add the appropriate date.
- Place the checkmark for the option that shows what all transactions cannot be deleted.
- Then, click the “Next” button.
- Select the “Summarize inventory transactions (recommended)” option.
- Here, you can select the option for how you would like to condense the inventory.
- Click the “Next” button.
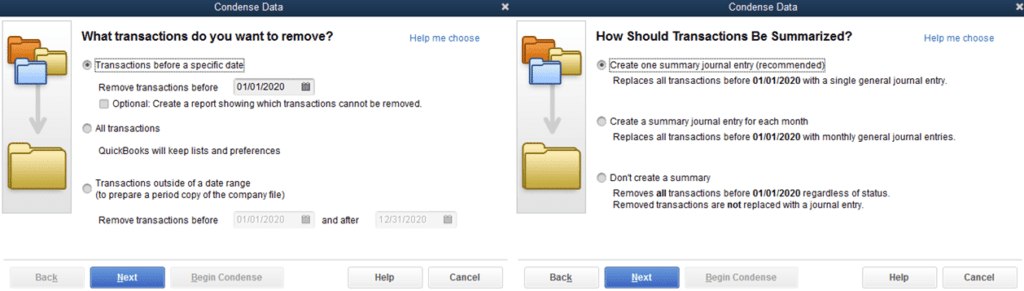
- Select the transaction groups you want to remove and then click the “Next” button.
- Choose the “Begin Condense” option. Remember that QuickBooks will only run the report, not the condensing process.
As your report populates, start working through the report by fixing the transactions. For instance, the invoice appears as unpaid on a report then chooses the link on a report. This will bring your invoice to your screen. Thereafter, you can do the following:
- Click on the “Apply Credits” option. This will link your invoice to the existing credits.
- After this, click the “Save and Close” button on your invoice.
By performing these steps, the invoice will no longer show up on the report and transactions it was blocking.
Step 2: Prepare the QuickBooks Company File
Here, you will perform a number of steps. For instance, you need to remove the data file Closing Date, run the reports such as Balance Sheet and Profit and Loss, re-sort the lists, and use the Rebuild and Verify Data utilities. Thereafter, you can copy the company file and create a backup for the same. Let us help you with detailed instructions:
Remove the Data File Closing Date
- Remember you can’t condense data for periods that come after the closing date.
- Click on the “Edit” menu.
- Click the “Preferences” option.
- Press the “Accounting” option.
- Select the “Company Preferences” tab.
- Click the “Set/Date Password” option mentioned in the “Closing Date” section.
- Once done, you can go to the “Closing Date” box and remove the date.
- Click the “OK” button.
Run the Balance Sheet and Profit and Loss Report
By running the report, you can find the transactions that were entered before the company starting date. In case such transactions are not set to the proper date then you can fix this after the condense.
Re-sort the Lists
- Go to the “Lists” menu.
- Then, choose the list you want to re-sort.
- After that, choose the “Include Inactive” option. If you see it grayed out it indicates there are not any inactive names.
- Once done, click the “View” option.
- Click on the “Re-sort Lists” option.
- Press the “OK” button.
Run Rebuild and Verify Data Utilities
- Select the “File” menu.
- Click the “Utilities” option.
- Choose on the “Verify Data” button.
- If you detect any damage then run the rebuild data utility. For this, select the “File” menu.
- Then, choose the “Utilities” option.
- Click on the “Rebuild Data” button.
- Now take a backup and save the backup file when prompted.
- Once done, press the “OK” button.
Save the Comparison Reports
Now you can use these reports to be sure that all the information is intact. These reports will be compared to the report that you will be running after the condensing process. If required, you can save or print the following in PDF formats:
- Balance Sheet (Accrual-based) for all dates
- Prost & Loss (Accrual-based) for all dates
- Cash Flows statements
- A/P and A/R Aging Detail for as of the report dates or for all dates.
- Other reports that your accountant, you, or technical assistance recommend
Step 3: Run the Condense Data Utility
To use the Condense Data Utility, one has to keep the following things in mind:
- Condensing the file might take some time depending on the file size and the performance of your system. It is also recommended that you should use other apps while using condensing as it may slow down the process.
- In case you encounter the error message on a Windows computer that your QuickBooks isn’t responding, you can ignore this message.
- If you access the file through the network then you can perform the condense data utility on a device where the file is stored. In case your file is on the server then you should copy your file on the workstation before performing the condense data utility.
Please Note: If the Condensed procedure fails or you cancel it in between then you may not use the company file. However, you can restore a backup file before you start condensing.
After making sure of the aforementioned points, you can continue following these steps to reduce the company file size:
- Select the “File” menu.
- Then, click on the “Utilities” option.
- Click on the “Condense Data” option.
- At this point, you can choose the first option for the company. This should be noted that your system will suggest to you the approximate reduction in the file.
- After that, click on the “Begin Condense” option.
Before the condensing procedure starts, QuickBooks will automatically take a backup and create the archive copy. After completing the condensing process, you can check for the discrepancies by running the reports.
Winding Up!
The large file size of QuickBooks company may slow down your activities. This may get frustrating especially when you post the transactions and it takes a lot of time. With the procedure of QuickBooks reduce file size, you can condense the company file and improve the performance of your PC and QuickBooks. We hope you have learned successfully how to reduce QuickBooks company file size.
If you are willing to merge classes or use uncleared check reports in QuickBooks, don’t forget to read these guides:
- How to Run Uncleared check Report in QuickBooks Desktop?
- How to Merge Classes in QuickBooks?