
 +1-877-790-2297
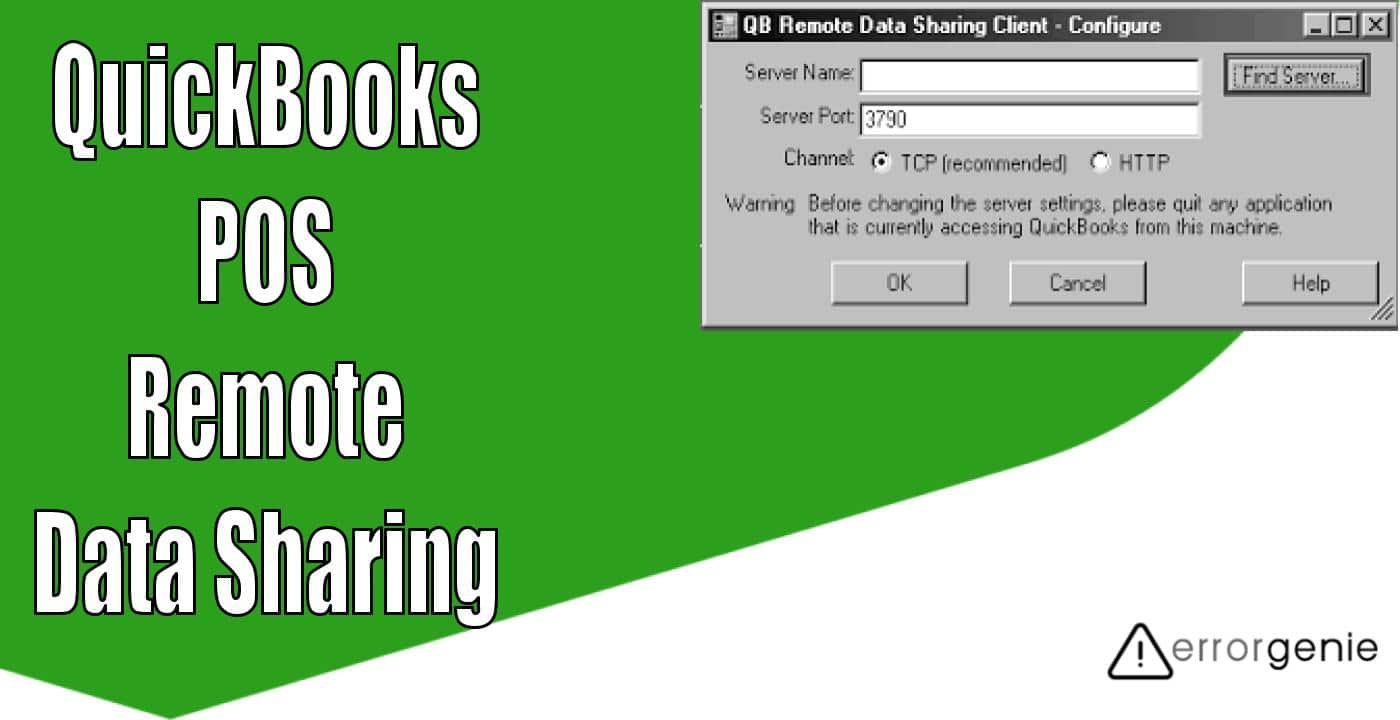
Do you want to access QuickBooks data remotely? If so, QODBC can be used with Remote Data Sharing Server to make this possible. QODBC allows you to run QuickBooks from anywhere through the internet or through the local area network by using the Intuit RDS server. This is a built-in feature and thus does not require any additional charges. If you want to dig more about the QuickBooks POS remote data sharing server, continue reading this guide.
Here, we will explain the Remote Data Sharing Server and how to connect this server to access QuickBooks data remotely. In addition, we will help you to resolve issues that you may encounter when using the RDS server.
What is QuickBooks Remote Data Sharing Server?
QuickBooks POS remote data sharing is a software application that lets the integrated app communicate with QuickBooks POS company files transparently on a different machine on the network. By stating transparent communication, we mean that the app itself will be unaware that QuickBooks is being used remotely.
The Remote Data Sharing (RDS) has two components; QuickBooks Remote Data Sharing Server and QuickBooks Remote Data Sharing Client. This should be noted that the RDS server is installed on the system on which you have installed QuickBooks. It is not necessary to run QuickBooks, however, it depends on which access mode has been chosen at the RDS server. In addition, you should also install the RDS client on the system that runs the application as well as QODBC.
How to Use QuickBooks POS Remote Data Sharing Server?
To successfully access the QuickBooks data remotely, you can use QODBC with the RDS server. For this, you are required to perform a series of steps. For instance, you will have to download the RDS server installer, adjust settings, and configure the RDS. After installing the QuickBooks Remote Data Sharing Server, you need to download and install the QuickBooks Remote Data Sharing Client. Thereafter, you will have to configure it. Once done, start installing the QODBC and configure the Data Source (DSN). For your satisfaction, you can test the remote connection to QuickBooks.
In case you confront any type of issue during the RDS server setup, you can troubleshoot the error. We will provide some helpful methods for you. Continue reading to set up QuickBooks POS remote data sharing server.
Step 1: Download QuickBooks Remote Data Sharing Server Installer
First of all, you need to download the QuickBooks Remote Data Sharing Server. Thereafter, you can install the RDS server on your computer. Here are the instructions for this:
- To get started, you will have to download the “QuickBooks RDS server installer”.
- Then, start installing the “RDS server software”. Then, start setting up on the computer on which you run the QuickBooks application.
- For this, you can click twice on the “RDS Server Installation” button and then install.
- Press the “Next” button.
- Click the “Install” button.
- Select the “Finish” option to complete the installation process.
- Once the RDS server is installed properly, you can click on the “Start” menu on a Windows computer.
- Then, select the “All Programs” option.
- Click the “QuickBooks” icon.
- Now, click twice on the “Remote Data Sharing Server” to open the “Control Panel”.
Step 2: Functions of RDS Server Control Panel
Once the RDS server is installed, you can make it functional through the Control Panel. Have a look at the following steps to understand better:
- Now, you can proceed with the RDS Server with a “Start” button. When your server-side detail is successfully configured and your service has been started, the clients can join a remote data-sharing server in order to use the data of QuickBooks.
- Once the RDS service is started, you can terminate it by clicking the “Stop” option.
- This should be noted that the default file of the company available is already set to the presently open file for remote access. If you want to choose a specific file to use remotely, you can click on the “Change Options” option.
- Remember that one login password should be created for an RDS server to use in a remote application. This can be done from the “Manage” option.
Step 3: Configure the QuickBooks RDS Server
The next step is to configure the Remote Data Sharing Server. This will help you to add appropriate TCP and Server Port. Let us show you for the RDS server configuration:
- Go to the “Control Panel”, click on the “Manage” button.
- Then, select the “New Login” option so you can set up the user details.
- Here, you can enter the user log name along with the password. Make sure you add the password with 6 characters at least.
- Once done, confirm the details and click “OK”.
- When the user name is entered into a “Login List”, you can edit or delete it anytime if needed.
- After that, select the “Advanced Settings” option.
- Here, you will have to define the “Communication Channel” and “Server Port” of the RDS Server.
- For the “Server Port”, 3790 is already selected here. If this is selected by another application, you can then select a different port that is not used on this machine.
- For the “Communication Channel”, you will see the “TCP” selected.
- Then, click on the “OK” button to save your settings.
- Press the “Close” button to close the “Server Manager”. This will take you to the screen of “Control Panel”.
- Select the “Change Options”. Here, you can mention the mode through which you can access the company file:
- If you choose the open company file. After this, QuickBooks will run it as an RDS server on the same system. Make sure the company file is open. In addition, all the remote apps should use the company file once it opens.
- If you mention the specific company files then QuickBooks doesn’t have to run. Also, the remote applications can easily access any company files you add to the list of company files. Then, click on the “OK” button to close a dialog box.
- For the RDS server setup, you need to build the connection to the company file in QuickBooks. Here, the open company file mode is selected so that QuickBooks starts running before the RDS Server starts.
Please Note: Make sure you log in to the QuickBooks with admin rights before you start RDS. If you are running the RDS server for the very first time with a QB company file then you need to grant permission for access by QuickBooks.
- Click on the “RDS Start” menu.
- When QuickBooks shows a dialog box, you can click the “Yes” button even if your QuickBooks account isn’t running.
- Click the “Continue” button to complete the steps.
- At this moment “RDS Server” will wait for the “QuickBooks remote data sharing client” in order to access it. Remember that RDS can run with or without access by a client.
Step 4: QuickBooks Remote Data Sharing Client Installation and Configuration
After configuring the RDS server, you will have to install the RDS client. Thereafter, start configuring the Remote Data Sharing Client. Take help from the following steps:
- To get started, you will have to download the “QuickBooks Remote Data Sharing Client installer”.
- Then, start installing the “RDS server software” and then start setting it up on the computer on which you run the QuickBooks application.
- Here, you can follow the instructions displayed on the screen.
- Once done, click the “Finish” button to finish the installation process.
Note: In case you encounter any errors related to the .Net Framework 2.0 while you install or run the RDS Client then you need to immediately fix the error. We will talk about the solutions later.
Step 5: Start Installing the QODBC
Once you are done setting up RDS Server and RDS Client, it is time to install QODBC. This will help you to successfully finish the server setup to access QuickBooks data. Check out the following steps:
- Now, you can download “QODBC”.
- Once downloaded, run it on your computer by clicking on the “QODBC.exe” file.
- Follow the on-screen prompts to complete the installation.
- In case you paid for “QBDBC” then you can add the “CDKey” that you generated in the “Activation” screen if prompted.
- If you evaluate the product then click the “Next” button and complete the on-screen prompts.
- Click the “Finish” button to finish the procedure.
Step 6: Configure the Data Source (DSN)
After installing all the components for the QuickBooks POS remote data sharing, you should configure QODBC. In addition, you need to set up the Data Source Name (DSN). All you have to perform the following steps:
- Click on the “Start” menu.
- Then, select the “All Programs” option.
- Click on the “QODBC Driver” to use the “QuickBooks” icon.
- By using the drop-down arrow, you can choose the “Configure QODBC Data Source” and select it. It will open the “ODBC Administrator”.
- Click the “Select Add” option on the “User DSN” tab. This will create the “Data Source”.
- Choose the “QODBC Driver for QuickBooks”.
- Press the “Finish” button. This will open the “QODBC” screen.
- Go to the “General” section.
- Here, you can type the name of the new DSN.
- Then, press the “Apply” button.
Please Note: For the RDS Server side, you will see the option selected by default. If you have named the file to be accessed on an RDS server side without using QuickBooks then you can choose another option.
- After this, select the “Browse” option to locate the company file. In case you are having several company files, each DSN will have to be created for the company file. Also, each one will receive the unique DSN path and name.
- Once done, click on the “RDS Server” section.
- Here, you need to place the checkmark for the “RDS Client/Server” option.
- Then, select the “Apply” button.
- Click the “OK” button.
Step 7: Test the Remote Connection
Now that you have completed the setup of the RDS Server, RDS Client, QODBC, and DSN, you can start testing the remote connection. This way you can check if you require additional configuration:
- Click on the “Start” menu.
- Choose the “All Programs” option.
- Click on the “QODBC Driver” option with the “QuickBooks icon”.
- Choose the “VB Demo” icon and click twice on it to the “VB Program”.
- Select the “Connections” option.
- Choose the “Add New Connection” option.
- Switch to the “Select Data Source Machine Data Source” section.
- Here, you can highlight a remote DSN.
- Once done, select the “OK” button.
- If your RDS is running currently and the VB Demo attempts to use the QuickBooks data then you will see the “Integrated Apps screen. Here, you can place the checkmark for the “Yes, always, when the server is available”.
- After that, you can enter the username as well as password.
- At this point, you will see the current connection is displaying with the remote DSN you selected.
- Go to the “VB Demo” file. Here, you will see the default SQL statement as the “SELECT * FROM Customer” option. You can remove its statement and then type “SELECT * FROM Company”.
- After this, click the “Query” option that needs to return the record.
- Once done, click on the “Disconnect” option and close the application.
Now, you have successfully connected the app with the QODBC DSN. This way you can access the QuickBooks data remotely on the server from anywhere in the world.
How to Troubleshoot the Error?
When performing the technical practice, the probability of facing an error is obvious. As stated earlier, you may also encounter some errors while connecting the app or accessing the QuickBooks data on the server. If you confront any problem related to MS .NET Framework 2.0, you can fix this issue easily. Besides that, QuickBooks open connection failed and RDS server error can also occur. Let us help you with some helpful tips to get rid of such errors.
Error 1: Microsoft .NET Framework 2.0 Error
Solution: RDS Client uses Microsoft .NET Framework to perform. If you encounter any problem with the .NET Framework then you should reinstall the recent server pack to fix the issue. All you have to do is visit the Microsoft website and download the recent Microsoft .NET Framework 2.0. After that, you can enable the .NET Framework in the Control Panel.
Error 2: RDS Server Error
Solution: There can also be instances that the details in the server configuration can be corrupted. To solve this problem, you are required to delete the configuration files by navigating to the location “C:\Documents and Settings\All Users\Application Data\Intuit\RDSServer\v6”. Thereafter, you can reboot the RDS server. This will reset the user details and services. Please remember that you backup all your files.
Error 3: QuickBooks Open Connection Failed
Solution: DNS server can also become the reason that you are unable to access the error. This happens when the RDS Client does not remain consistent with the DNS Server of an RDS Server. To solve this problem, you can change the DNS server available in the settings for the network connection. If required, you can ask for help from the network administrator.
Final Words
Remote Data Sharing (RDS) provides a copy of Keystone that is installed on your computer. This does not have QuickBooks QuickBooks to use the copy of QB located on another machine. However, RDS allows Keystone to connect with QuickBooks through the network (local area network). By setting up the RDS server, you can join the network to access QuickBooks data. Here, we have shown you the whole procedure of connecting the QuickBooks POS remote data sharing server. We hope you find this information helpful.
Do you want more guides on QuickBooks? If so, check out the following links to learn deleting the bank feeds and extract trial balance from QuickBooks account: