
 +1-877-790-2297
A recurring invoice is used to automatically create and send the invoices to the customer on a routine basis. If you create recurring invoice in QuickBooks Online, you may be required to edit it in the future. QuickBooks Online recurring invoice template or recurring transactions consists of all the necessary details regarding the customer, service/products, service date, start date, etc. If you ever require to make any changes to the recurring template, you should know the right ways to do it. In this blog, we will share a few important details regarding how to edit recurring invoices in QuickBooks Online.
The purpose of this guide is to enlighten you on how you can edit the QuickBooks Online recurring invoice template for different editing reasons such as changing the service date on the saved recurring invoice and editing the date on the recurring transactions. So, let’s get straight into it.
How to Edit Recurring Invoices in QuickBooks Online?
The procedure of QuickBooks Online edit recurring invoices is easy. All you have to do is open the Recurring Transaction list, choose the relevant template, click on the Edit button, make the required changes, and save the information. For step by step guide, you can pursue the following steps:
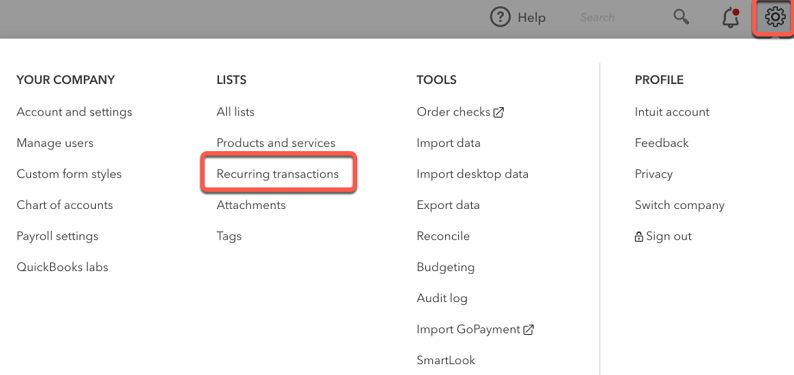
- Click on the “Gear” icon to open the settings.
- Now, click on the “Recurring Transactions” option.
- Here, you need to choose the right template that you wish to edit.
- Then, hit the “Edit” button.
- From the top of the screen, you can edit the details such as recurring invoice template name and type of invoice such as Scheduled, Unscheduled, or Reminder.
- After this, you can edit how long you want to use QuickBooks Online to create the invoice automatically.
- Once you make the required changes on the recurring invoice template, you can press the “Save Template” button.
Please note that the changes you make to the recurring invoice template or recurring transactions are not retroactive. If you enter the incorrect transaction mistakenly, it can be edited normally.
How to Edit the Service Date on the Saved Recurring Transactions?
The Service Date created on the transaction from your recurring template will not populate automatically. Hence, it is necessary to search for the transaction and enter the correct service date manually.
To locate the transaction that is created recently and change the service date, you can go through the following steps:
- Click on the “Reports” section located on the left menu.
- Then, start searching for the “Recent Automatic Transactions” option.
- Once found, click on it. This will start running the report.
- After this, you can click on the transaction one by one to display it completely.
- Now, you can manually change the service date in the “service Date” field. Make sure you enter the date when the service was performed.
- Once done, you can click the “Save” button.
By checking the transactions manually, you can change the service date on the QuickBooks Online recurring invoice template.
How to Edit the Date on Your Recurring Transactions?
If you specifically change the date on your recurring invoice template for changing its schedule, you can jump to the following steps:
- Open the settings by clicking on the “Gear” icon.
- Then, go to the “Recurring Transactions” option.
- Click on the “Template Type:” option from the top left.
- Now, set this type to “All”. You can also edit the template as per your preferences.
- After this, you can select the desired template you want to edit and then hit the “Edit” button from the bottom.
- Here, you can press the “Edit Schedule” button located on the left of the recurring invoice template.
- After making the desired changes, you can select the “OK” button.
- Then, click on the “Save Template” button.
As you make these changes to the recurring transactions template, the schedule settings will be updated in QuickBooks Online.
What Happens When You Make Changes to the Recurring Transactions?
As you make changes to the recurring transactions, the QuickBooks Online recurring invoice template changes to the new value. If you edit the customers/items or company settings, it will have an impact on the recurring template.
Editing Items or Customer
If you make changes to the items or customer field, you will see a dialog box with the following fields for Customer Record:
- Email Address
- Billing and Shipping Addresses
- GST Types
- Terms
- Payment Method
- Delivery Method
When you receive the dialog box that says the matching recurring templates will update your changes then you can do any of the following:
- OK: Press the “OK” button when you want to save the “Customer/Item” and update the templates.
- Cancel: Pressing this button will leave the action on the “Item/Customer” and no changes will be saved by you.
Please note that you will not find any option to save the Item/Customer without making any changes to the recurring invoice template. In addition, all fields should be added for the Scheduled templates. For instance, if the item has a $0 rate then enter 0. If you leave it blank, the changes will not be saved.
On the other hand, it is not important to enter every field for an Unscheduled or Reminder template. All you have to enter the data to repeat is in each occurrence.
Editing the Company Settings
If you edit certain sections on the Company Settings page, it will update the QuickBooks Online recurring invoice template. Online items or customers, you will not get any warning message. But if you apply any changes to the following fields in the company settings, it may affect the recurring template:
- Customer sales forms message
- Customer estimates message
- Account for tax
- Account for discount
- Sales tax rate
- Account for shipping
- MAS deposit account
When you change the preferences, you will not get any confirmation dialog for recurring templates.
Read the Sales Tax Note
If you enable the “GST” preference then you will get a dialog box that asks if you wish to make all your items and customers taxable. Even if you select “Yes”, QuickBooks Online will not update the “Recurring Templates”.
Similarly, if you turn off the “GST” preference, QuickBooks Online will not affect your “Recurring Transactions”.
To Sum Up
Recurring invoice templates save time as it automatically creates invoices and scheduled other business tasks in QuickBooks Online. However, editing these recurring templates can be tricky. Here, we have explained the easy ways for editing QuickBooks Online recurring invoice template. Along with this, we have shared how these changes affect the recurring template including customers, items, and company settings.
Read more in detail on How to Post Petty Cash in QuickBooks Online and Desktop? from scratch or from the existing petty cash.