
 +1-877-790-2297
The Internet Revenue Service (IRS) has added the additional form to use when you file 1099s- Form 1099-NEC. The amount you add on Form 1099-MISC in Box 7 Nonemployee Compensation is supposed to report on Box no. 1 Nonemployee Compensation on the 1099-NEC form. By doing so, the account mapping in the QuickBooks file will have to be updated for your 1099 report to remain accurate. To get the right guide, learn with us how to map 1099 accounts in QuickBooks Desktop and QuickBooks Online. Please note while you proceed with mapping 1099 accounts in QuickBooks, you may find different names or numbers for your account depending on the QuickBooks version.
How Do I Map an Account to 1099 in QuickBooks Desktop?
To map your accounts for 1099 in QuickBooks, one has to check if the vendors have eligibility. After you check each vendor for the 1099 eligibility, you can start mapping the 1099 accounts. Thereafter, you can run the 1099 summary report to see the changes you have made. If preferred you can confirm the account mapping from the Vendors page. To know the entire procedure, learn with us how to map 1099 accounts in QuickBooks Desktop. Read carefully.
Check the Eligibility for Vendors for 1099
There can be instances when you don’t find the dropdown menu to map the accounts. In such a situation, you should first check if the vendors are eligible for 1099. If so, their names will be entered into the report or list. To know how to check if the vendors are eligible, check out the following steps:
- Click on the “Vendors” tab.
- Then, select the “Vendor Center” option.
- Choose the name of the vendor.
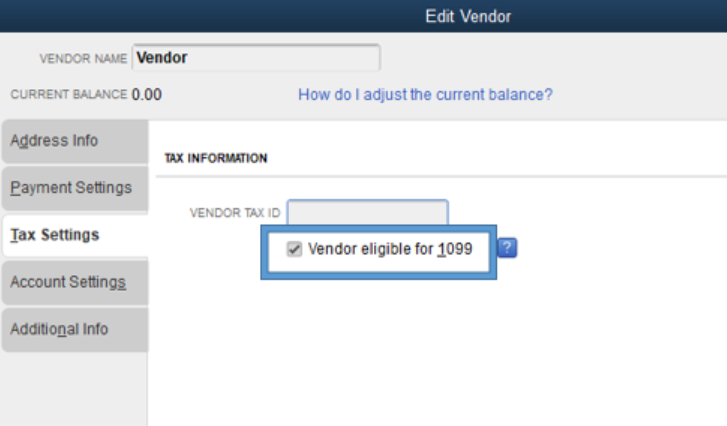
- After this, you can switch to the “Tax Settings” section.
- At this point, you need to place a checkmark for the box located near the “Vendor eligible for 1099” section.
- Press the “OK” button.
Once done, you can repeat the same procedure for other vendors. Make sure these vendors should be eligible for 1099. This should be noted when you map the accounts, select the Show all accounts (all the accounts from the Chart of Accounts) or Show 1099 accounts (the accounts that you used on a transaction for 1099 vendors) either.
If preferred you can sort the chart of accounts again in order to solve the odd behavior and make your list come to the default order.
Get Started with Mapping 1099 Accounts in QuickBooks
Now that you have verified the eligibility of vendors, the accounts can be mapped now. Learn here how to map 1099 accounts in QuickBooks Desktop:
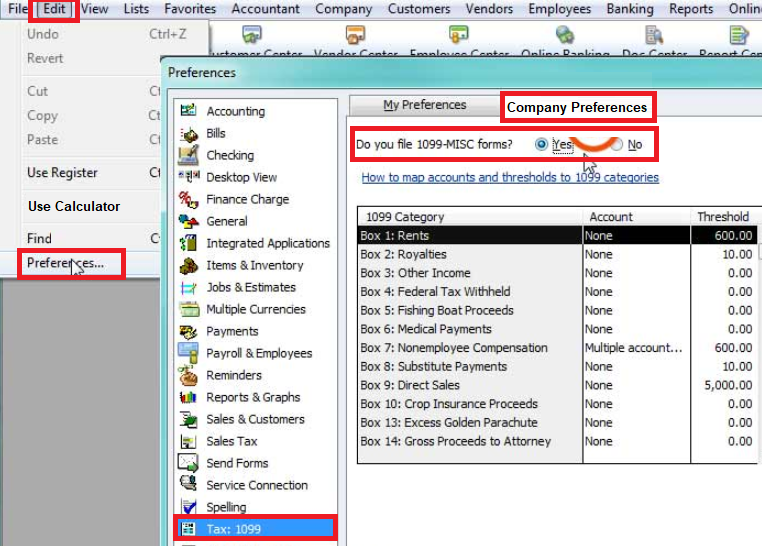
- Navigate to the “Edit” menu.
- Then, select the “Preferences” option.
- Now, click on the “Tax: 1099” located on the left.
- After this, select the “Company Preferences” tab.
- Here, move to the line for your “Form 1099-MISC” and “Form 1099-NEC” and hit the “you can do it here” option. This will help you to map your accounts.
The account assigned previously to Box no. 7 (Nonemployee Compensation) for Form 1099-NEC now needs to be assigned to Box no. 1 (Nonemployee Compensation).
For 1099-NEC, the applicable accounts apart from those you used for the Nonemployee Compensation now need to be assigned. For this, the most common is Box 1 (MISC): Rent.
After that, you will have to run the 1099 Summary Report. This will help you to verify all the modifications you have made. All you have to toggle between the types of 1099 to see each report.
Confirm If the Account Mapping is Done
If you want to check if the account mapping has been confirmed for the vendor payments then you can go through the following steps:
- Click on the “Expenses” menu.
- Switch to the “Vendors” option from the top.
- Select the “Prepare 1099s” option located at the top right.
- If you are using the 1099 wizard for the very first time, you can click on the “Let’s get started” option. Otherwise, choose the “Continue your 1099s” option.
- After that, you will find the “Review your company info” option. At this point, you are required to confirm all the details.
- Once checked, click on the “next” button.
On the next page, you can check account mapping for 1099. This is how you can confirm that the account mapping has been done successfully in QuickBooks Desktop.
How to Map 1099 Accounts in QuickBooks Online?
To map the 1099 accounts, you will go through the Vendors menu in QuickBooks Online. Thereafter, you can open the drop-down option to choose the option for each category you see there. Here are the instructions for the same:
- Click on the “Vendors” page.
- Here, you can select the “Prepare 1099s” option.
- Now, to map the 1099 accounts, you can use the drop-down menu that you see under each category.
When you see the on-screen prompts, follow them carefully. This will allow you to review all the details so that you can be sure everything is included properly. Once done reviewing the details, you can click on the save and close the wizard for 1099. If you want to make changes in the future, go to the Chart of Account or Vendor area.
Conclusive Lines
Mapping the 1099 account is necessary as the IRS has added the additional form to use when you file 1099s- Form 1099-NEC. While filing the form, you will have to ensure that the information is entered in the right box. Through this guide, we have explained how to map 1099 accounts in QuickBooks Desktop and QuickBooks Online. Hope you find this guide easy to follow.
If you are planning to adjust the payroll liabilities or print bill payment stubs in QuickBooks, read the following dedicated guides: