
 +1-877-790-2297
Merging vendors in the Intuit QB software is a practice that can help you in different situations. Sometimes, you may wish to merge a vendor with another one due to certain reasons. There can also be times wherein duplicate vendors may be emerging. As you merge them, duplicity will get removed. There can be other reasons as well to merge vendors in QuickBooks.
In this blog, we’ll help you merge them by following several methods. These methods can be executed on QuickBooks Online, QuickBooks Desktop 2018, 2019, Accountant Edition and Enterprise versions.
Content Summary
The contents of this post are inclusive of the following:
- What does it Mean to Merge Vendors in QuickBooks?
- Is it Helpful to Merge Vendors in QuickBooks?
- Essential Tips Prior to Merging Vendors in QuickBooks and its Versions
- Methods for Merging Vendors in QuickBooks Desktop
- How to Merge Vendors in QuickBooks Online?
- How to Merge Duplicate Vendors in QuickBooks?
What does it Mean to Merge Vendors in QuickBooks?
Prior to learning how to merge vendors in QuickBooks Desktop, it will be essential to know what it means. In QuickBooks, vendors are basically merged for the purpose of consolidating several transactions. In addition, the list of vendors may carry duplicate entries. Such entries can add to your difficulties when you’re looking for a particular transaction for a vendor or customer. By merging them, you can remove the chances of duplicate vendors.
Is it Helpful to Merge Vendors in QuickBooks?
Learning to merge vendors in QuickBooks Online, QuickBooks Desktop, QuickBooks Desktop 2019 or any other version can be helpful for consolidating your transactions. And doing so will not even require you to repeatedly input these transactions. Also, you can easily remove a vendor and assign the data again to another vendor.
Please Note: When you merge vendors in Intuit QB, you may be unable to reverse the action. Additionally, both transfer and deletion will be permanent.
Essential Tips Prior to Merging Vendors in QuickBooks and its Versions
Here are the 6 essential tips you need before learning to merge vendors in QB and its various versions. Let’s quickly go through them.
- Ensure that your QB company files have been backed up before merging the vendors.
- Switch QB to the single-user mode in case it is in the multi-user mode.
- It will be essential to disable the multi-currency option.
- See to it that you don’t merge the direct deposit vendors, vendors paid via online banking, tax authorities vendors, and tax exempt vendors.
- In case you have merged vendors and you wish to reverse the action, then remember that the only way to do so would be by restoring the data file’s backup.
- Care should be taken to merge any accounts only when it is required.
Methods for Merging Vendors in QuickBooks Desktop
Let us walk you through 3 methods for merging vendors in QuickBooks Desktop. If you would like to merge vendors in QuickBooks 2018, then you can follow the first method. The next method will help you merge multiple vendors in the same version. Utilizing the third method, you can merge vendors in QuickBooks 2019.
4.1) Method 1: How to Merge Vendors in QuickBooks Desktop 2018?
Here, we’ll be answering questions like “How can I merge vendors in QuickBooks Desktop 2018 in less duration”. You can initially open the Vendor Center via the menu of Vendors. Right-clicking on the vendor’s name, you can choose to edit it. You can copy its name and go to the vendor Center after hitting the Cancel button. To know the other steps, please read below.
- Begin with opening “QuickBooks Desktop 2018”.
- Go to the “Vendors” menu.
- Then opt for “Vendor Center”.
- Find and right-tap on the name of the vendor.
- Click on “Edit Vendor”.
- Copying the vendor’s name is the next step.
- Press “Cancel”. This will redirect you to the “Vendor Center”.
- Next, right-tap on the name of the vendor which you would like to merge.
- Click on “Edit Vendor”.
- Change the vendor’s name with the one which was copied by you in the fifth step.
- Press “Ok”.
- Then click on “Yes”.
When every step has been correctly done, you’ll be able to merge the vendors in QuickBooks Desktop.
4.2) Method 2: How to Merge Multiple Vendors in QuickBooks Desktop 2018 and Below?
Since some users often ask “How do I merge two vendors in QuickBooks or more?”, We have dedicated an entire section to provide the answer.
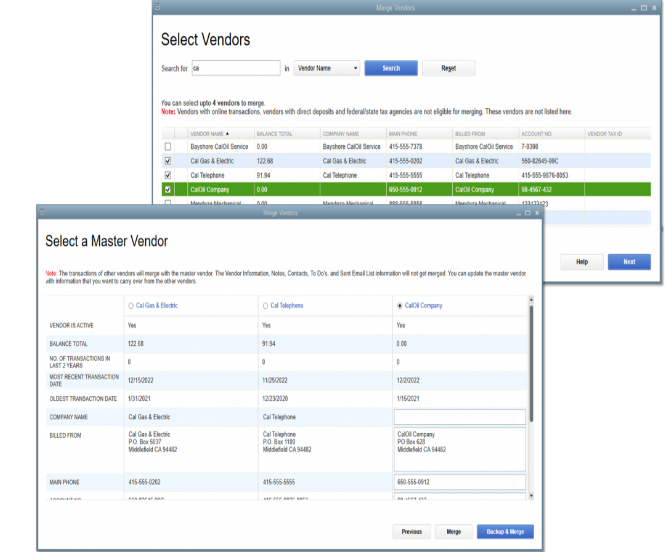
QuickBooks Desktop 2018 enables you to merge multiple vendors in it. This is possible by picking the Master Vendor which has to be retained. After selecting up to 3 vendors you wish to merge, you’re required to decide the information for retaining it. Lastly, a backup of your company file has to be initiated.
- In QuickBooks Desktop, first opt for the “Master Vendor” that has to be retained.
- Choose up to 3 vendors for merging with the “Master Vendor”.
- Decide the information you wish to retain from the other vendors as well as migrate it with the “Master Vendor”.
- You will be asked to prepare a backup of your “QuickBooks Company File”.
The details of the other vendors, with respect to identification, which have been chosen by you will be migrated in the “Master Vendor”. After this, the other vendors’ transactions will also be merged into it. You will then see a message informing you that the merging process has been completed. It will also provide you with the backup file’s location.
4.3) Method 3: How to Merge Vendors in QuickBooks Desktop 2019?
You can follow two options for merging vendors in QuickBooks Desktop 2019. The first option will be apt for doing so in QuickBooks Desktop Accountant Edition while the other one will be fit for QuickBooks Desktop Enterprise. Let’s read the details below.
4.3.1) Option 1: Merging Vendors in QuickBooks Desktop Accountant Edition
In the QuickBooks Desktop Accountant Edition, to merge the vendors, you can land on the window of Merge Vendor and move to the Accountant section. Then pick Client Data Review and hit a click on the Merge Vendors button. To proceed, every vendor that has to be merged needs to be selected.
- Let’s launch “QuickBooks Desktop 2019” as the first step.
- Head to the window of “Merge Vendor”.
- Navigate to the section of “Accountant”.
- The option of “Client Data Review” has to be chosen.
- Press the “Merge Vendors” button.
- Make a selection of the vendors that have to be merged.
- Press “Next”.
- Choose that vendor with which the other one has to be merged.
- Then press “Merge”.
- Tap on “Yes” when the confirmation window is seen.
- Select “Ok” when a message stating “Merge Complete” shows up.
Receiving the “Merge Complete” message will indicate that the process has been successful.
4.3.2) Option 2: Merging Vendors in QuickBooks Desktop Enterprise
Now, let’s see the method for merging the vendors in QuickBooks Desktop Enterprise. This is a 10-step method that demands you to first enter the Company Menu and then opt for Accounting Tools. You’ll find the option to merge the vendors. A window of Merge Vendors will appear on your screen. Here, you can pick each vendor for merging it.
- Open the accounting software.
- Launch the “Company Menu”.
- Click on “Accounting Tools”.
- Choose the option to merge the vendors.
- In the window of “Merge Vendors”, pick every vendor that has to be merged.
- Tap on “Next”.
- Click on “Master Vendor”.
- Select “Merge”.
- Press “Yes” for providing your confirmation.
- Hit “Ok” when the merge is complete and the same is notified on your screen.
How to Merge Vendors in QuickBooks Online?
This section will focus on the method to merge vendors in QuickBooks Online. QBO users are likely to find the menu of Expenses in the software. This menu will take you to the Vendors option. After deciding the vendor that isn’t needed, you can tap Edit and make certain changes. Saving these changes will be the final step to merge the vendors.
- In QBO, head to the menu of “Expenses”.
- You will find a list. Go through it and select the option of “Vendors”.
- Pick the name of the vendor that is not required for usage.
- Choose “Edit”.
- Now, make changes to the “Title”, “First Name”, “Last Name”, “Middle Name”, as well as the “Suffix”. Make the edits in such a way that they are identical to that vendor. Ensure that the name and “Display Name” are the same.
- Save the changes and press “Yes” to confirm.
So, that was all you needed to do for merging the vendors in QBO.
How to Merge Duplicate Vendors in QuickBooks?
If you’re thinking “Can I merge vendors in QuickBooks which are duplicate”, then you’ll be relaxed to know that it is possible. To start, you can locate the Expenses menu and select Vendors. Open that vendor’s profile which is required. Tap on Edit and jot down the Display Name and Company Name. Using the Vendors tab, find the vendor you don’t intend to keep. Then press Edit to make certain changes. For knowing these changes, please read the following 12 steps.
Please Note: It will be important to remember that the process of merging the profiles of the vendors is permanent. You may not be able to reverse the action.
- Open “QuickBooks”.
- Click on “Expenses”.
- Enter the tab of “Vendors”.
- Look for that vendor profile which you wish to keep and open it.
- Tap on “Edit”.
- Make a note of the “Display name” and “Company” name.
- Visit the tab of “Vendors” once again.
- Now, look for the vendor which is not required and opt for it.
- Select the option of “Edit”.
- Make certain changes to the “Display Name” and “Company Name”. The changes should match with the vendor profile.
- Click on “Save”.
- Then press “Yes” for confirming the decision.
Please Note: At the end of this process, 2 vendor profiles will get merged and only one will remain. The older transactions will be moved to the profile that remains.
In Closing
We believe that after reading the various sections of this blog, merging vendors in the QB software shouldn’t seem hard. Whether you wish to merge multiple vendors or duplicate vendors, with these methods in place, no difficulties should arise. Just make sure that you expertly execute all the steps listed in the methods above.
Hey, readers! In case you’re willing to know how QuickBooks accounting software can be remotely accessed, do make sure that you read our post on different QuickBooks remote access methods. Also, go through our post on the QuickBooks Password Reset Tool to learn how it works.