
 +1-877-790-2297
If you have mistakenly added the credit twice for a specific customer, you may need to delete it to keep your accounting records clean. In some cases, customers may also pay you an extra amount on the bill or invoices. However, it can be adjusted in your QuickBooks account. For those who have no clue how to delete a credit on QuickBooks Desktop & Online, we will guide you with the right information.
In this particular guide, we will draw your attention to what condition you may require to remove the credit. Along with this, we will provide you with a couple of ways to delete credit in QuickBooks Desktop and Online.
Why Do You Need to Delete the Credit in QuickBooks?
QuickBooks allows users to pay for the services and products they have been sold. To proceed with the payments, users can generate and send the invoices directly from the QuickBooks account. In some instances, customers might pay an extra amount that you are required to adjust. This should be noted that the overpaid amount can mainly be adjusted in 4 hours. QuickBooks applies the credit to the overpaid invoice automatically from a new customer. However, you may talk about this with your customer to know their preferred way to adjust the overpaid amount.
Another reason that you need to delete the credit in QuickBooks is when you mistakenly add the payment twice. Whether the credit has been applied to the invoice or bill, you can delete it in your QuickBooks account. Let’s know further how to delete a credit on QuickBooks.
What to Do Before Deleting the Credit in QuickBooks?
Before moving forward, one should make the required changes in the credit memo in QuickBooks. First of all, you will have to create a credit memo report. Later, you can settle the overpaid invoice(Create Invoice in QuickBooks) in a preferred way.
To adjust the credit memo, you can follow these steps:
- In QuickBooks, go to the “Report” tab.
- Then, click on the “Customers and Receivables”.
- Here, you need to click on the “Transaction List by Customer” using the drop-down menu.
- Now, select the “Customize Report” option.
- After this, switch to the “Filters” tab.
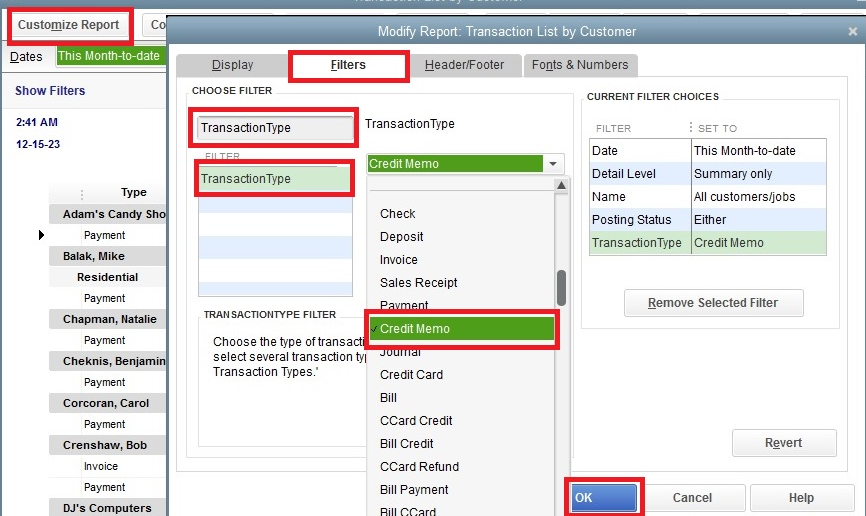
- Search for the “Transaction Type” using the “Choose Filter” option.
- Select the “Transaction Type” when it appears in the result.
- Then, click on the “Credit Memo” from the drop-down menu.
- Press the “OK” button.
By doing so, you will see all the credit memos available in QuickBooks Desktop. At this point, you are required to settle the invoice that is overpaid. Now, this can be done in four different ways which are as follows:
- Generate a credit and then refund the overpaid amount to the customer.
- You can also create a Journal Entry to write off the amount.
- The overpaid amount or credit can be applied to the next invoice as well.
- If there is an unpaid bill, you can apply the credit to that invoice.
How to Delete a Credit in QuickBooks Desktop?
In QuickBooks Desktop, the credit can be applied to the invoice or bill. So, if you want to know how to delete a credit on QuickBooks Desktop for both invoice and bill, we are here to instruct you.
Remove a Credit from the Invoice
If you have mistakenly applied the credit to an invoice, it can be removed from your QuickBooks account. All you have to do is open the transaction history and select the invoice on which you have applied for the credit. Thereafter, you can remove the checkmark for the credit and save details.
Here are the detailed steps for the same.
- Press the “Ctrl + H” key together on your keyboard. This will show all the transaction history.
- Thereafter, you can click twice on the invoice.
- Choose the “Apply Credits” option.
- When you see the “Previously Applied Credits” screen, you can remove the selection you have made for credit.
- Now, click on the “Done” button in the “Apply Credits” window.
- After that, click the “Save and Close” button on the invoice.
This is how you can clear the credit from the invoice in QuickBooks Desktop. This should be noted that there is no direct option to delete the credit; you just need to clear the selection for credit.
Remove a Credit from the Bill
In case you have applied for the vendor credit and now you want to remove it from the bill then you can perform the following steps in QuickBooks Desktop:
- First of all, find the “Vendor Credit”.
- Then, choose the “Bill” radio icon.
- From here, you can modify the “Transaction Type” from “Credit” to “Bill”.
- After that, click the “Save & Close” button.
- Now, open the resulting bill. Then, you can modify the transaction back to the credit. All you have to do is choose the “Credit” radio icon for this.
- Once done, select the “Save and Close” button.
- If you see any prompt related to modifying the transaction then click on the “Yes” button.
As you change the transaction type to the bill, you can easily adjust the credit in QuickBooks Desktop.
How to Delete a Credit in QuickBooks Online?
QuickBooks Online users can also delete the credit from the invoice. All you have to do is open the relevant invoice, click on the link with an invoice to credit and save the details.
- To get started, locate and open the invoice in which you want to make changes.
- Then, choose the shown link with an invoice to a credit.
- After that, click on the “Done” button on the “Apply Credit” window.
- Once done, select the “Save & Close” button on the “Invoice” screen.
As you finish these steps, the credit will be removed from the invoice. We hope you have understood how to delete a credit on QuickBooks Online.
To Conclude
Credit can be mistakenly applied by you or overpaid by the customer. By adjusting the credit amount, you can settle the amount and your accounting records. Here, we have shown you how to delete a credit on QuickBooks from the bill and invoice. Depending on the condition, you can remove the credit in QuickBooks Online and Desktop.
Do you know how to delete a deposit in QuickBooks? Read this guide to get in-depth detail.