
 +1-877-790-2297
QuickBooks cash receipts journal report displays all the deposits you have made and payments you have received till now within a select period of time. Along with this, it shows a subtotal of each customer and the grand total of the report at the bottom. If you are willing to view all these details, you will have to create the cash receipts report in QuickBooks.
In the following guide, you will learn the procedure of creating the cash receipts and disbursements journal in QuickBooks Desktop and QuickBooks Online. Besides that, we will show you how you can post cash receipts and how to enter petty cash receipts in QuickBooks. Keep reading to know more.
What is QuickBooks Cash Receipts Journal Report?
The Cash Receipt report lets you pursue the trend of payment trends that have been received from the customers. You can look at it with several parameters such as collector, customer groups, sales manager, and more. It can be calculated based on the open items that are cleared in accounting such as debit notes, credit notes, unallocated payments, invoices, and more. Since this report provides a lot of helpful information, it becomes essential to create a QuickBooks cash receipts journal report.
How Do I Enter Cash Receipts in QuickBooks?
For entering cash receipts in QuickBooks, one can perform the steps based on the QuickBooks versions. For instance, if you are using Quickbooks Desktop, the cash receipts can be created from the Report menu. Whereas in QuickBooks Online, you can follow two different methods; by creating expenses and by attaching receipts, the cash receipts can be added to QuickBooks Online. Let’s read more about the QuickBooks cash receipts journal.
How to Create Cash Receipts Journal in QuickBooks Desktop?
To create QuickBooks cash receipts journal reports in the desktop version, you can use the Reports menu. From here, you can create the custom report using the appropriate details. Let us take you through more information:
- Go to the “Reports” menu.
- Then, choose the “Custom Reports” option.
- Click on the “Transaction Detail” option.
- Choose the date range.
- Switch to the “Columns” box, choose the following columns:
- Date
- Type
- Memo
- Num
- Split
- CLR
- Amount
- Here, you can click on the “Total by” drop-down option.
- Choose the “Customer” option.
Note: If required, you can choose different criteria, e.g., Total by month or Total by account.
- Switch to the “Filters” tab.
- From the list of filters, you can select the “Transaction type” option.
- Then, select the “Multiple transactions” option using the “Transaction Type” drop-down menu.
- After that, check the following options:
- Sales Receipt
- Deposit
- Payment
- Invoice
- Select the “Detail Level” filter and choose the “Summary only” option.
- Press the “OK” button.
By pursuing these steps, you can easily create the cash receipts and disbursements journal in QuickBooks Desktop. This should be noted if there are multiple split accounts, your report will display the word SPLIT in the column of Split. Remember this report cannot display each split account by name.
How to Enter Cash Receipts in QuickBooks Online?
In QuickBooks Online, you can record the cash receipts. You can either upload all the uploaded receipts to the invoices from the Receipts tab or use the receipt as an attachment. Let us take you through the following steps to guide how to enter cash receipts into QuickBooks Online:
Method 1: Entering Cash Receipts in QuickBooks Online by Creating Expense
The first method to add receipts is to create the expense from the Receipt tab. Have a look at the following instructions:
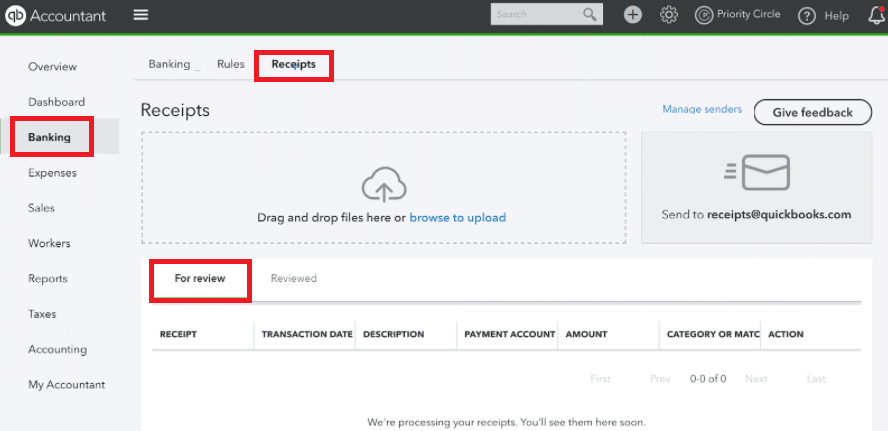
- Log in to “QuickBooks Online”.
- Then, navigate to the “Banking” option.
- Select the “Receipts” tab.
- Now, click on the uploaded receipts from the “For review” option.
- Select the “Create expense” option.
Method 2: Entering Cash Receipts in QuickBooks Online by Attaching Receipts
In this method, you can add the receipts to the invoices by using receipts as attachments. You can walk through the following steps:
- Click on the “+New” menu.
- Then, select the “Invoice” option.
- After this, enter the required details.
- Now, click on the “Show existing” link in the “Attachments” section.
- When you see the side tab, select the receipt you wish to attach. Then, press the “Add” button.
- Click on the “Save and Close” button.
By performing these methods, you can add QuickBooks cash receipts and disbursements. If required, you can manage the receipts. By categorizing the receipts from the Receipts tab, you can stay organized.
How to Post Cash Receipts in QuickBooks?
QuickBooks allows you to post the cash receipts once paid in cash. In the following discussion, you will learn how to post cash receipts reports in QuickBooks Desktop and Online:
How to Add Cash Receipts to QuickBooks Desktop?
If you have received an invoice payment by cash, you can easily mark your invoice as paid. The following are the steps one can follow to post cash receipt in QuickBooks Desktop:
- Go to the “Invoices” menu located on the left.
- Then, search for the invoice you want to mark as paid.
- Once found, select the “Mark as paid” option.
- After this, you will have to record the amount to the account manually. To do so, you can select the “Transaction” option from the left.
- Then, select the “Add transactions” option.
- Now, you can specify the transaction details such as:
- Date
- Transaction
- Category
- Amount
- Click the “Save” button.
How to Record Cash Receipts in QuickBooks Online?
To record the expense that is paid in cash, you need to set up the cash expense account on the Chart of Accounts. You can use the Bank as your Account Type. For the Detail Type, you can choose the Cash on hand. This way you can track your expenses. Here are the instructions:
- Click on the “Accounting” menu.
- Select the “Chart of Accounts” option.
- Click on the “New” button.
- Enter the required information
- Then, select the “Save and Close” option.
By creating the expense account, you can easily manage them. In case you are already facing the account to associate with it then you just need to add the cash expense in your QuickBooks account. For that, you can pursue the following steps:
- Select the “New (+)” button.
- Choose the “Expense” option.
- After this, you can add the cash expense amount.
- Now, you can enter the required details in the dedicated fields.
- Once done, click the “Save and New” or “Save and Close” button.
If required, you can edit your expense transactions in the future. In this way, you can add the cash receipts in QuickBooks Desktop and QuickBooks Online.
How to Enter Petty Cash Receipts in QuickBooks?
Petty Cash translation is the expense of small businesses that are usually paid by cash. This type of transaction is made for office supply and reimbursement. Hence, such transactions don’t merit writing the check. In addition, these funds should be reconciled at regular intervals so that your accounts can match properly.
Remember these transactions are important to record otherwise you will lose the details related to them. Also, when making the purchase with petty cash, the expenses will also be recorded or counted with the statement. This will help you to match expenses or income with the accounts.
Before posting the transaction, you can set up the petty cash receipts in your QuickBooks account:
- Click on the “Settings” menu.
- Then, select the “Chart of Accounts” option.
- Click on the “New” button.
- Now, choose the “Bank” option.
- Click on the “Cash on Hand” option using the drop-down menu.
- After this, name your account as “Petty Cash”.
- Now, go to the “Balance” field and specify the amount for the petty cash.
- Press the “Save and Close” button.
Now, whenever you create the transaction, you can choose to post them to your petty cash account so you don’t have to create a new check for a new transaction.
In order to record the cash you have kept for the petty transactions, you can pursue the following steps:
- Select the “+New” button.
- Then, click on the “Transfer” option.
If you have written the check then you can follow these steps to record them:
- Select the “+New” button.
- Then, click on the “Check” option.
- Press the “Petty Cash” option.
This is how you can record the petty cash in QuickBooks. In case you have not created the petty cash, the new account can be easily created.
To Conclude
If you create the cash receipts report in QuickBooks, you can view all the deposits you have made and payments you have received till now within a select period of time. Through this guide, we have explained the whole procedure of creating cash receipts and petty cash in QuickBooks Desktop and QuickBooks Online.
Do not miss out on the following guides to learn how to create a journal entry and cash disbursement journals in QuickBooks: