
 +1-877-790-2297
Budgets play a vital role in planning business finances for the future. By setting a budget for your company, you can make future plans of finances and calculate company performance by differentiating the true result from your budget file. To make this procedure easier, QuickBooks allows you to upload a budget file by using an Excel sheet. This will give you a proper view of the budget. The following write-up lets you understand how to upload budget in QuickBooks Desktop using an Excel file. Read the guide carefully and implement these steps to successfully upload budget into QuickBooks. Let’s read ahead!
What to Do to Upload Budget into QuickBooks?
To upload budget into QuickBooks, one can use the Excel file. By creating a file, you can set up dedicated columns in the Excel sheet. After doing so, you can export an empty budget file and add the accounts to the Chart of Accounts. Later, you can export the Chart of Accounts. Once done, prepare the spreadsheet by adding relevant cells and columns. As you prepare the sheet, you can save it and upload it to your QuickBooks account.
It is also important to review your budget once you upload the budget file. For detailed information, you can walk through the following steps and learn how to upload budget in QuickBooks:
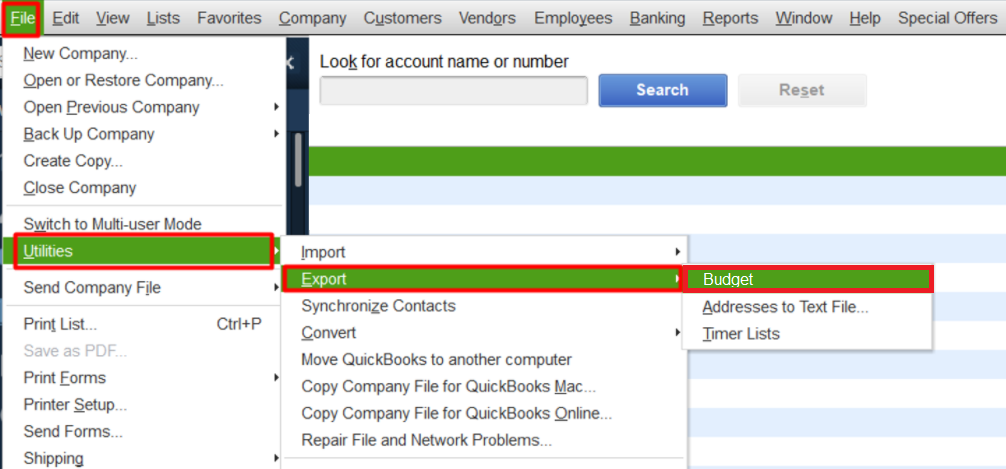
Step 1: Exporting an Empty Budget File
- Go to the “File” menu.
- Then, select the “Utilities” option.
- Here, the “Export” button.
- Select the “Budget” button.
- Now, you can save the budget on the basis of the year.
- Please note the file should be saved in an IIF format.
Step 2: Adding Accounts in QuickBooks Chart of Accounts
- Navigate to the “Chart of Accounts” in your QuickBooks account.
- After this, you are required to add the two accounts which are as follows:
- 3300: This is for earning from construction. After this, click on “Contracted”.
- 4400: This is for Cost of Goods Sold (COGS) Contracted Jobs
Step 3: Exporting the QuickBooks Chart of Accounts
- It is time to start exporting the QuickBooks “Chart of Accounts” menu. For this, you can navigate to the “File” menu.
- Now, select the “Utilities” menu.
- Then, click on the “Export” button.
- Select the “Chart of Accounts” menu.
- Here, you can save it in “COA.iif” file format.
Step 4: Applying Changes and Saving the Excel File
- To get started, you need to launch the “Invoice template Excel”. This is basically a “Pro Forma Spreadsheet”.
- Then, navigate to the “Year 1- Combined” tab.
- Here, you are required to select the cells from “G14” to “T106” and copy them.
- Once you copy the selected cells, you can paste them into the budget file. It must start at the “B4” cell. Alternatively, you can click on the “Edit” drop-down to select the “Paste Special” option.
- After this, you can paste the “Values” and choose the “Operation” as “None”.
- Please note that any account name in your QB budget file can be shifted from the C to B column.
- From here, you can go to the “BUD” located at the bottom of your budget list and copy it into the cell number “A4” in your sheet.
- Once done, move to the “C4” cell and from here you can copy the text “MONTH” specified in your budget list.
- This step requires you to copy the date. The date can be copied from the cell number “P4” in your budget list.
- Go to column B of your QB budget file and replace the account name with the account name available in the QuickBooks “Chart of Accounts” file. You can also find this name in the B column. After doing so, you can clear the cells for any total lines as well as subtotal (available in the B column). This can be done by using the exceptions specified below:
- Earnings from Construction: The income that you received will go to the Total 3000- Earnings from Construction – T&M line.
- Salaries and Fringe Benefits: This is basically for Indirect Labor. Indirect HRS Wages generally go to the Total 6030- indirect labor line.
- Income Received and Contracted Lines: Here, you need to apply changes to the income numbers with the negative numbers.
- Now, you have to be sure that Columns D and O are formatted with “Numbers” in two places.
- After making changes, save your budget file.
Step 5: Importing the Budget File
- It is the time when you are ready to import the budget file into the QuickBooks account. To do so, select the “File” menu.
- Then, click on the “Utilities” menu.
- After this, hit the “Import” button.
- Now, click the “Budget.iif” file.
- Then, select the “Open” tab.
Step 6: Reviewing the Budget Report
- After you import the budget file successfully on QuickBooks, it is important to review the details. To do so, go to the “Reports” button.
- Then, you can click on the “Budget” button.
- Select the “Profit and Loss overview”.
This is how you can upload budget into QuickBooks Desktop using the Excel file. This should be noted that if you are using the Excel file, make sure you convert your Excel sheet into a supported format so you can import it easily into your QuickBooks account. To make it possible, you just need to launch the QuickBooks budgeting template in your Excel file. If needed, you can clear any account from the record. Although, you do not have to do so.
Note: Ensure that you don’t remove any balance sheet account. Doing so can leave you with debits and credits to spend and an income account.
In a Nutshell
It is essential to plan a budget for your company’s financial future planning. Every business owner prepares a budget that can be imported to QuickBooks so the users can analyze the report by comparing it to the actual result of the budget. If you have come up with a question “can you import a budget into QuickBooks Desktop”, we have provided you with a detailed answer. Remember the budget file can also be imported using other formats such as Google Sheets.
Do you want to export your QuickBooks Online to the Desktop version or set up memorized transactions? Read the following guides first: