
 +1-877-790-2297
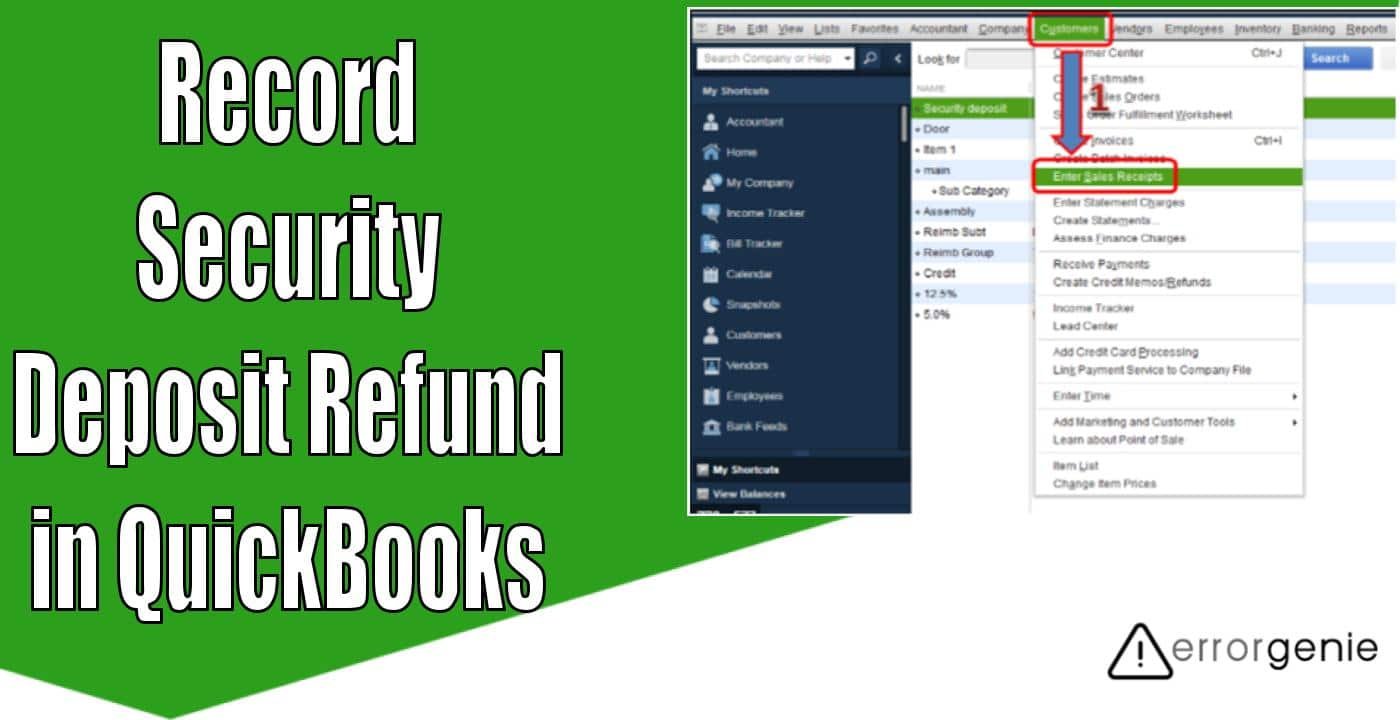
In QuickBooks, security deposits are recognized as liabilities or current assets by organizations. Such security deposits are paid or received in advance before availing of any service. Usually, accountants don’t prefer to deal with security deposits containing a return window that is more than one year. If you are willing to record the security deposit refunds, learn with us in detail. Here, we will show you how to record security deposit refund in QuickBooks.
Along with this, we will show you how to record security deposits and rent security deposits in QuickBooks. Read the guide carefully.
Learn About Security Deposit in QuickBooks
In QuickBooks deposits are preserved so it can easily adjust the damages and overdue payments. In addition, you can record the security deposits and apply them to the relevant assets and liability accounts. If required, you use the reporting tools to analyze the security deposits data. In the following discussion, you will learn how to record security deposit refund in QuickBooks.
How to Record a Security Deposit in QuickBooks?
To add the security deposit in QuickBooks, one must have to prepare a liability account. In addition, it is equally important to mention a name for the account. i.e., Other Assets. After that, you can start creating new products and name them as security deposits. For more insights, learn here how to record security deposit in QuickBooks:
- Go to the “Chart of Accounts” option.
- Then, create the account for liability.
- After this, add “Other Assets” as the name of your account.
- Once done, you can start collecting assets, for example, security deposits, rent, etc.
Important Note: If you are giving the security deposits then instead of an asset account, you should create the liability account and add Other Liabilities as its name.
- Now, you can make a new product and name it “Security Deposits”. It will include the data regarding your security deposit whether it is created for you or made by you.
- Thereafter, you can start analyzing the products to “Other Assets” or “Other Liabilities”.
- Remember if you are receiving the security deposits then you can make the ”Sales Receipts”. This will reflect in a relevant account. On the other hand, if you are giving security deposits then you need to prepare a “Bill” for mapping it to the appropriate account/
- Once done, save the details by clicking on the “Save & Close” option.
After you have made, stored, and mapped the security deposits properly, you can start creating reports by using them. All the data related to the security deposits will show up in financial statements in QuickBooks.
Make sure you make a note of these numbers while preparing the financial statements. Remember that the incorrect detail related to the security deposits might cause inaccuracy in your financial statements, e.g., balance sheets, ledgers, and more. Thus, it is important to enter the correct details.
Now, you have learned how to record security deposit refund in QuickBooks. If needed, you can reverse the deposit, refund, and remove the deposit accounts linked with them.
How to Record Return of Security Deposit in QuickBooks?
QuickBooks Online users can record the security deposit refunds by writing a check or creating the expense. All you need to do is prepare a Check or Expense account from the Vendor column. Thereafter, you can post the refunds by using the Bank Deposit. Let us teach you how to record security deposit refund in QuickBooks:
Prepare Check or Expense
- Select the “+New” menu located on the top left.
- Here, you will have “Expense” or “Check” options under the “Vendors” section. You can choose any of them to record the security deposit refunds.
- At this point, you need to add the required information.
- Move to the “Account details” area and choose the liability account that you usually use for the security deposits. To choose the liability account, you can press the “Account” drop-down option.
- Then, press the “Save and Close” button.
Post-Security Deposit Refunds
- Click the “+New” button.
- Select the “Bank Deposit” option.
- After this, choose the “Checking Account” by using the “Account” drop-down menu.
- Now, select the “Add funds to this deposit” option.
- Move to the “Received From” section and select the way where you have paid a security deposit.
- Once done, select the account you usually use while entering the expense. This can be done through the “Account” section.
- After this, you can mention “Security Deposit Refund” as the description.
- Now, you can type the amount and hit the “Save and Close” button.
By following these steps, you can easily record the security deposit refund in QuickBooks Online. All you have to choose from is a Check or Expense to post the security deposit refunds.
How to Record Rent Security Deposit in QuickBooks?
QuickBooks allows you to record the security deposit along with the rent of the first month that you have got from the tenant. All you need to do is make the item for your security deposit and rent for one month. Thereafter, you can add both of them to the Liability account. Let us show you how to do this:
Prepare the Item for Security Deposit
- Select the “List” option from the top menu.
- Then, go to the “Item List” menu.
- Here, select the “Item” option and hit the “New” option.
- After this, click the “Service” option by selecting the “Type” option.
- Then, you can specify the “Item Name”. Also, enter the other mandatory fields.
- Now, go to the “Account” drop-down option to choose the “Liability account”.
- Press the “OK” option.
- Now, you can continue following the same steps for creating the item for the one-month rent.
Prepare the Sales Receipt to Record Payments
- Select the “Customers” option.
- Now, choose the “Enter Sales Receipts” button.
- Here, you can pick the tenant by clicking on the “Customer: Job” option.
- After that, you can add the necessary information, for example, the “Date” and “Sale No.” option.
- Now, switch to the first and second line items and select the security deposit including your first month’s rent items.
- Then, you can specify an amount for every item.
- Press the “Save and Close” option.
This way you can record the security deposits in QuickBooks and the rent of one month you received from the tenant.
In a Nutshell
By maintaining the security deposits, one can ensure that the damages or overdue payments are easily adjusted. QuickBooks allows you to create security deposits, security deposit refunds, and rent security deposit. For your help, we have given a detailed guide with easy instructions.
If you prefer to record other types of deposits or want to make your account inactive then the following guides may help you:
- How to Record Deposits in QuickBooks Online?
- How to Make an Account Inactive in QuickBooks Online?